
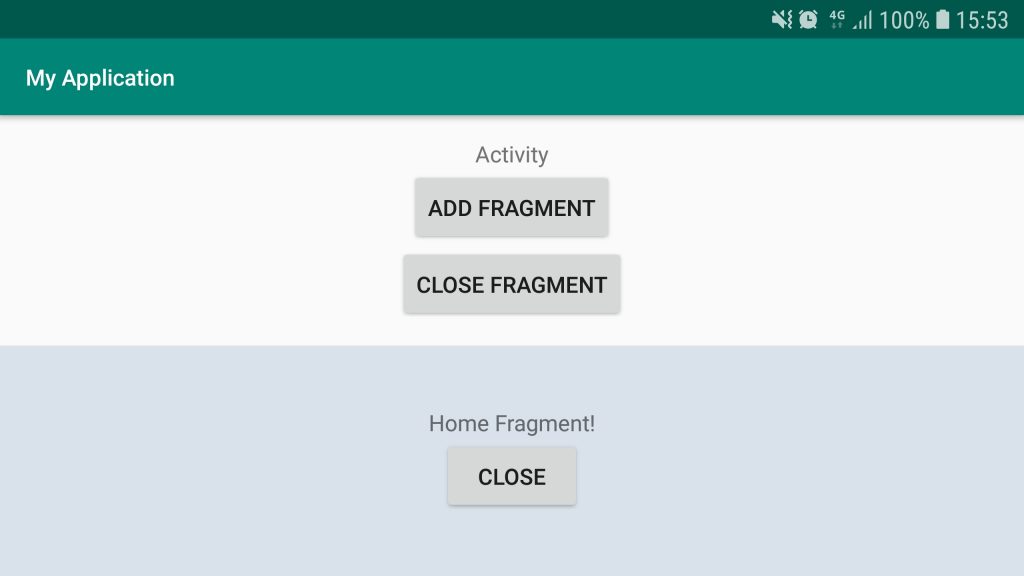
เมื่อเปิดแอพจะสร้าง fragment ขึ้นมาด้วยเลย 1 อัน
ถ้าจะสร้าง fragment เพิ่มก็กดปุ่ม ADD FRAGMENT กด 1 ครั้งก็สร้าง fragment ขึ้่นมา 1 อัน (fragment ที่สร้างใหม่จะอยู่ด้านล่าง ดังนั้นอันนี้เอาไว้ศึกษา ยังใช้จริงไม่ได้)
ถ้าจะลบ fragment ก็กดปุ่ม CLOSE FRAGMENT กด 1 ครั้งก็ลบ fragment ออกไป 1 อัน
สร้าง Fragment ขึ้นมาใหม่ชื่อ HomeFragment
ไฟล์ที่เกี่ยวข้อง
- activity_main.xml
- MainActivity.java
- fragment_home.xml
- HomeFragment.java
activity_main.xml
<?xml version="1.0" encoding="utf-8"?>
<LinearLayout xmlns:android="http://schemas.android.com/apk/res/android"
    xmlns:tools="http://schemas.android.com/tools"
    android:layout_width="match_parent"
    android:layout_height="match_parent"
    android:orientation="vertical"
    tools:context=".MainActivity">

    <LinearLayout
        android:layout_width="match_parent"
        android:layout_height="0dp"
        android:layout_weight="1"
        android:gravity="center"
        android:orientation="vertical">

        <TextView
            android:layout_width="wrap_content"
            android:layout_height="wrap_content"
            android:text="Activity" />

        <Button
            android:id="@+id/btn_add_fragment"
            android:layout_width="wrap_content"
            android:layout_height="wrap_content"
            android:text="Add Fragment" />

        <Button
            android:id="@+id/btn_remove_fragment"
            android:layout_width="wrap_content"
            android:layout_height="wrap_content"
            android:text="Close Fragment" />

    </LinearLayout>

    <FrameLayout
        android:id="@+id/layout_fragment_container"
        android:layout_width="match_parent"
        android:layout_height="0dp"
        android:layout_weight="1"
        android:background="#d9e1ea" />

</LinearLayout>
MainActivity.java
package com.phaisarn.myapplication;

import androidx.appcompat.app.AppCompatActivity;
import androidx.fragment.app.Fragment;

import android.os.Bundle;
import android.view.View;
import android.widget.Button;

public class MainActivity extends AppCompatActivity {
    private static final String TAG_HOME_FRAGMENT = "tag_home_fragment";

    @Override
    protected void onCreate(Bundle savedInstanceState) {
        super.onCreate(savedInstanceState);
        setContentView(R.layout.activity_main);

        if (savedInstanceState == null) {
            getSupportFragmentManager()
                    .beginTransaction()
                    .add(R.id.layout_fragment_container,
                            HomeFragment.newInstance(),
                            TAG_HOME_FRAGMENT)
                    .commit();
        }

        Button btnAddFragment = findViewById(R.id.btn_add_fragment);
        Button btnRemoveFragment = findViewById(R.id.btn_remove_fragment);

        btnAddFragment.setOnClickListener(onAddFragmentClickListener);
        btnRemoveFragment.setOnClickListener(onRemoveFragmentClickListener);
    }

    private View.OnClickListener onAddFragmentClickListener = new View.OnClickListener() {
        @Override
        public void onClick(View v) {
            // คำสั่งเพิ่ม Fragment ลงบน ViewGroup
            getSupportFragmentManager()
                    .beginTransaction()
                    .add(R.id.layout_fragment_container,
                            HomeFragment.newInstance(),
                            TAG_HOME_FRAGMENT)
                    .commit();
        }
    };

    private View.OnClickListener onRemoveFragmentClickListener = new View.OnClickListener() {
        @Override
        public void onClick(View v) {
            // คำสั่งลบ Fragment ที่อยู่บน ViewGroup
            Fragment fragment = getSupportFragmentManager().findFragmentByTag(TAG_HOME_FRAGMENT);
            if (fragment != null) {
                getSupportFragmentManager()
                        .beginTransaction()
                        .remove(fragment)
                        .commit();
            }
        }
    };
}
บรรทัดที่ 18 ถ้า savedInstanceState == null เช่นการรันครั้งแรก ให้สร้าง fragment
บรรทัดที่ 23 กำหนด tag ให้กับ fragment เพื่อที่จะได้หา fragment จาก findFragmentByTag()
บรรทัดที่ 51 ตรวจสอบว่ามี fragment อยู่มั๊ย โดยค้นหา fragment จาก findFragmentByTag() ถ้าเจอ fragment ถึงจะทำการลบ
บรรทัดที่ 21, 40 เป็นการ add() Fragment โดย Fragment ที่เพิ่มเข้ามาจะซ้อนอยู่ข้างล่างของ Fragment เดิม, ถ้าอยากให้ Fragment ที่เพิ่มเข้ามาอยู่ด้านบน (เช่นการทำ BackStack) ให้ใช้คำสั่ง replace()
fragment_home.xml
<?xml version="1.0" encoding="utf-8"?>
<LinearLayout xmlns:android="http://schemas.android.com/apk/res/android"
    android:layout_width="match_parent"
    android:layout_height="match_parent"
    android:gravity="center"
    android:orientation="vertical">

    <TextView
        android:layout_width="wrap_content"
        android:layout_height="wrap_content"
        android:text="Home Fragment!" />

    <Button
        android:id="@+id/btn_close"
        android:layout_width="wrap_content"
        android:layout_height="wrap_content"
        android:text="Close" />

</LinearLayout>
HomeFragment.java
package com.phaisarn.myapplication;


import android.os.Bundle;

import androidx.annotation.Nullable;
import androidx.fragment.app.Fragment;

import android.view.LayoutInflater;
import android.view.View;
import android.view.ViewGroup;
import android.widget.Button;


/**
 * A simple {@link Fragment} subclass.
 */
public class HomeFragment extends Fragment {
    private Button btnClose;

    public HomeFragment() {
        // Required empty public constructor
    }

    public static HomeFragment newInstance() {
        return new HomeFragment();
    }

    @Override
    public View onCreateView(LayoutInflater inflater, ViewGroup container, Bundle savedInstanceState) {
        // Inflate the layout for this fragment
        return inflater.inflate(R.layout.fragment_home, container, false);
    }

    @Override
    public void onViewCreated(View view, @Nullable Bundle savedInstanceState) {
        super.onViewCreated(view, savedInstanceState);
        btnClose = view.findViewById(R.id.btn_close);
        btnClose.setOnClickListener(onCloseClickListener);
    }

    private View.OnClickListener onCloseClickListener = new View.OnClickListener() {
        @Override
        public void onClick(View v) {
            getFragmentManager()
                    .beginTransaction()
                    .remove(HomeFragment.this)
                    .commit();
        }
    };
}
บรรทัดที่ 45 ใช้ getFragmentManager() ไม่ใช่ getSupportFragmentManager()
บรรทัดที่ 47 ลบ fragment ด้วย remove()
การทำให้ Fragment รองรับ BackStack
เดิมถ้ากดปุ่ม Back ก็จะเป็นการปิด Activity โดยไม่สนใจว่ามี Fragment อยู่หรือไม่
ถ้าจะให้การกดปุ่ม Back สนใจ Fragment ให้ทำ BackStack
การทำให้ Fragment รองรับ BackStack ทำได้ด้วยการเพิ่มคำสั่ง addToBackStack() ให้กับ FragmentTransaction
MainActivity.java
package com.phaisarn.myapplication;

import androidx.appcompat.app.AppCompatActivity;
import androidx.fragment.app.Fragment;

import android.os.Bundle;
import android.view.View;
import android.widget.Button;

public class MainActivity extends AppCompatActivity {
    private static final String TAG_HOME_FRAGMENT = "tag_home_fragment";

    @Override
    protected void onCreate(Bundle savedInstanceState) {
        super.onCreate(savedInstanceState);
        setContentView(R.layout.activity_main);

        if (savedInstanceState == null) {
            getSupportFragmentManager()
                    .beginTransaction()
                    .add(R.id.layout_fragment_container,
                            HomeFragment.newInstance(),
                            TAG_HOME_FRAGMENT)
                    .addToBackStack(null)
                    .commit();
        }

        Button btnAddFragment = findViewById(R.id.btn_add_fragment);
        Button btnRemoveFragment = findViewById(R.id.btn_remove_fragment);

        btnAddFragment.setOnClickListener(onAddFragmentClickListener);
        btnRemoveFragment.setOnClickListener(onRemoveFragmentClickListener);
    }

    private View.OnClickListener onAddFragmentClickListener = new View.OnClickListener() {
        @Override
        public void onClick(View v) {
            // คำสั่งเพิ่ม Fragment ลงบน ViewGroup
            getSupportFragmentManager()
                    .beginTransaction()
                    .add(R.id.layout_fragment_container,
                            HomeFragment.newInstance(),
                            TAG_HOME_FRAGMENT)
                    .addToBackStack(null)
                    .commit();
        }
    };

    private View.OnClickListener onRemoveFragmentClickListener = new View.OnClickListener() {
        @Override
        public void onClick(View v) {
            // คำสั่งลบ Fragment ที่อยู่บน ViewGroup
            Fragment fragment = getSupportFragmentManager().findFragmentByTag(TAG_HOME_FRAGMENT);
            if (fragment != null) {
                getSupportFragmentManager()
                        .beginTransaction()
                        .remove(fragment)
                        .commit();
            }
        }
    };
}
ทีนี้เวลากดปุ่ม Back ก็จะเป็นการปิด Fragment ก่อน และเมื่อ Fragment ถูกปิดจนหมด ถึงจะปิด Activity