
- เตรียมโปรเจ็กส์
- ควบคุม Player ด้วย Keyboard
- ควบคุม Player ด้วย Accelerator
1. เตรียมโปรเจ็กส์
สร้างโปรเจ็กส์
- สร้างโปรเจ็กส์ชื่อ Player Controller
สร้างโฟลเดอร์
- สร้างโฟลเดอร์ชื่อ Scene
- สร้างโฟลเดอร์ชื่อ Material
- สร้างโฟลเดอร์ชื่อ Script
สร้าง Scene
- ที่โฟลเดอร์ Scene ให้สร้าง Scene ขึ้นมาชื่อ MainScene
ที่ MainScene สร้าง Plane1
- Create > 3D Object > Plane
- Rename to Plane1
- Reset Transform
- Scale = 2, 1, 2
- ที่ โฟลเดอร์ Material สร้าง Material ชื่อ Plane1
- ที่ Material > Plane1 กำหนดให้ Color = 40, 130, 120
- ผูก Material > Plane1 กับ Plane1
ที่ MainScene สร้าง Walls
- สร้าง GameObject ใหม่ เป็น Create Empty
- เปลี่ยนชื่อเป็น Walls
- Reset Transform ของ Walls
- สร้างผนังสี่ด้าน
- สร้าง Cube ชื่อ West Wall เป็นลูกของ Walls
- Position = -10, 0, 0
- Scale = 0.5, 1, 20.5
- สร้าง Cube ชื่อ East Wall เป็นลูกของ Walls
- Position = 10, 0, 0
- Scale = 0.5, 1, 20.5
- สร้าง Cube ชื่อ North Wall เป็นลูกของ Walls
- Position = 0, 0, 10
- Scale = 20.5, 1, 0.5
- สร้าง Cube ชื่อ South Wall เป็นลูกของ Walls
- Position = 0, 0, -10
- Scale = 20.5, 1, 0.5
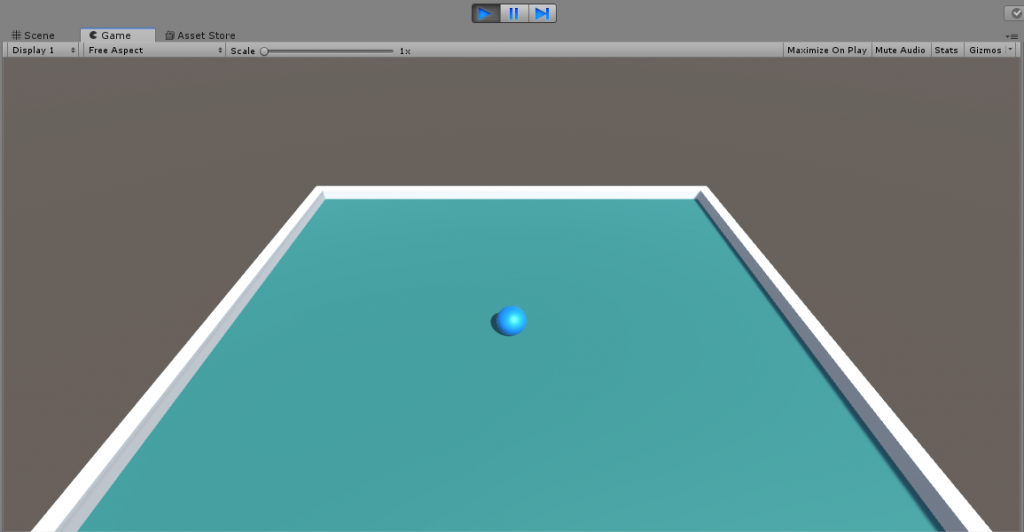
ที่ MainScene สร้าง Player
- Create > 3D Object > Sphere
- Rename to Player
- Reset Transform
- Position = 0, 0.5, 0
- ใส่ Rigidbody ให้ Player (Add Component > Physic > Rigidbody)
- ที่ โฟลเดอร์ Material สร้าง Material ชื่อ Player
- ที่ Material > Player กำหนดให้ Color = 0, 140, 255
- ผูก Material > Player กับ Player
ให้กล้องเคลื่อนที่ตาม Player
ที่ Main Camera
- Position = 0, 10, -10
- Rotation = 40, 0, 0
- Projection = Perspective
- Add Component > New Script ชื่อ CameraController
- ลาก CameraControllerไปไว้ในโฟลเดอร์ Script
- แก้ไขโค๊ด CameraController
สคริป CameraController
using UnityEngine;
using System.Collections;

public class CameraController : MonoBehaviour {
    public GameObject player;
    private Vector3 offset;

    // Use this for initialization
    void Start()
    {
        offset = transform.position - player.transform.position;
    }

    void LateUpdate()
    {
        transform.position = player.transform.position + offset;
    }
}
ที่ CameraController
- ให้ลาก Player มาวางที่สคริป CameraController > Player
2. ควบคุม Player ด้วย Keyboard
ที่ Player
- Add Component > New Script ชื่อ PlayerController
- ลาก PlayerController ไปไว้ในโฟลเดอร์ Script
- แก้ไขโค๊ด PlayerController
สคริป PlayerController
using UnityEngine;
using System.Collections;

public class PlayerController : MonoBehaviour
{
    public int speed = 10;

    private Rigidbody rb;

    void Start()
    {
        rb = GetComponent<Rigidbody>();
    }

    void FixedUpdate()
    {
        float moveHorizontal = Input.GetAxis("Horizontal");
        float moveVertical = Input.GetAxis("Vertical");
        Vector3 movement = new Vector3(moveHorizontal, 0.0f, moveVertical);
        rb.AddForce(movement * speed);
        //rb.velocity = movement * speed;
    }
}
ควบคุม Player ด้วย Keyboard ได้ละ
3. ควบคุม Player ด้วย Accelerator
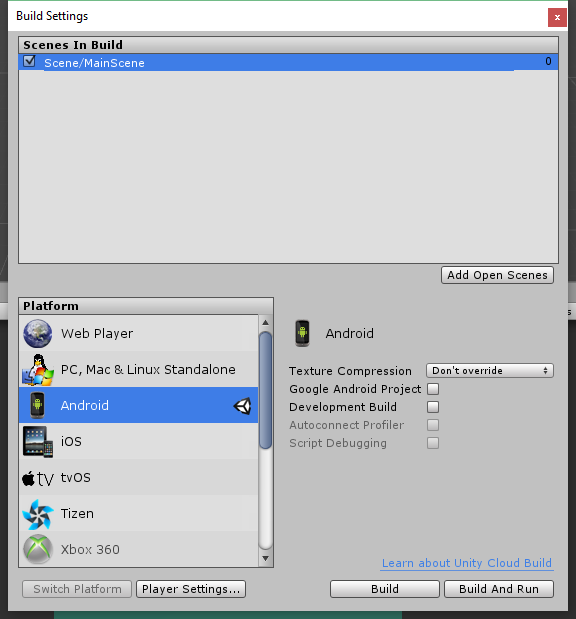
เปลี่ยน Platform เป็น Android
- ไปที่ File > Build Settings…
- เปลี่ยน Platform เป็น Android
- แล้วกด Switch Platform
- ให้สังเกตว่าโลโก้ Unity ย้ายมาอยู่ที่ท้าย Android เป็นอันใช้ได้
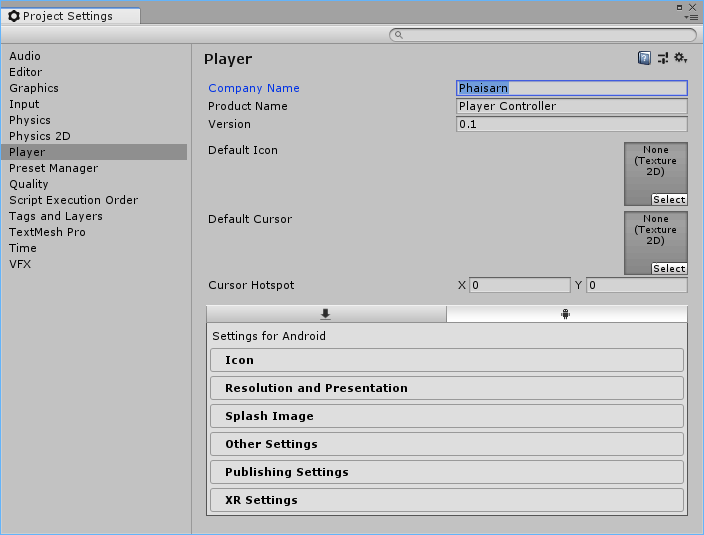
- ไปที่เมนู Edit > Project Settings > Player
- ที่ PlayerSettings
- ใส่ Company Name
- ใส่ Other Settings > Identification > Package Name

ที่ Main Camera กำหนด
- Position = 0, 15, -15
- Rotation = 50, 0, 0
ที่ Player แก้ไขโค๊ด PlayerController
using UnityEngine;
using System.Collections;

public class PlayerController : MonoBehaviour
{
    public int speed = 10;

    private Rigidbody rb;

    void Start()
    {
        rb = GetComponent<Rigidbody>();
    }

    void FixedUpdate()
    {
        Vector3 acceleration = Input.acceleration;
        Vector3 movement = new Vector3(acceleration.x, 0.0f, acceleration.y);
        rb.AddForce(movement * speed);
    }
}
ตอนรันให้วางมือถือในแนวราบ แล้วเอียงมือถือเพื่อควบคุมการเคลื่อนที่ของ Player
แต่ถ้าไม่ต้องการถือมือถือในแนวราบ ให้ทำกำร Calibrate ตำแหน่งเริ่มต้นตอนผู้ใช้เริ่มเล่น
แก้ไขโค๊ด PlayerController
using UnityEngine;
using System.Collections;

public class PlayerController : MonoBehaviour
{
    public int speed = 10;

    private Rigidbody rb;
    private Quaternion calibrationQuaternion;

    void Start()
    {
        rb = GetComponent<Rigidbody>();
        CalibrateAccelerometer();
    }

    void FixedUpdate()
    {
        Vector3 accelerationRaw = Input.acceleration;
        Vector3 acceleration = FixAcceleration(accelerationRaw);
        Vector3 movement = new Vector3(acceleration.x, 0.0f, acceleration.y);
        rb.AddForce(movement * speed);
    }

    void CalibrateAccelerometer()
    {
        Vector3 accelerationSnapshot = Input.acceleration;
        Quaternion rotateQuaternion = Quaternion.FromToRotation(new Vector3(0.0f, 0.0f, -1.0f), accelerationSnapshot);
        calibrationQuaternion = Quaternion.Inverse(rotateQuaternion);
    }

    Vector3 FixAcceleration(Vector3 acceleration)
    {
        Vector3 fixedAcceleration = calibrationQuaternion * acceleration;
        return fixedAcceleration;
    }
}
ทีนี้ตอนเริ่มรัน มือถืออยู่ตำแหน่งไหน ก็จะใช้ตำแหน่งนั้นเป็นตำแหน่งอ้างอิงละ