Azure App Service is an HTTP-based service for hosting web applications, REST APIs, and mobile back ends. You can develop in your favorite programming language, be it .NET, .NET Core, Java, Ruby, Node.js, PHP, or Python. Applications run and scale with ease on both Windows and Linux-based environments.
Built-in auto scale support
Baked into Azure App Service is the ability to scale up/down or scale out/in. Depending on the usage of the web app, you can scale the resources of the underlying machine that is hosting your web app up/down . Resources include the number of cores or the amount of RAM available. Scaling out/in is the ability to increase, or decrease, the number of machine instances that are running your web app.
Continuous integration/deployment support
The Azure portal provides out-of-the-box continuous integration and deployment with Azure DevOps, GitHub, Bitbucket, FTP, or a local Git repository on your development machine. Connect your web app with any of the above sources and App Service will do the rest for you by auto-syncing code and any future changes on the code into the web app.
Deployment slots
When you deploy your web app, web app on Linux, mobile back end, or API app to Azure App Service, you can use a separate deployment slot instead of the default production slot when you’re running in the Standard, Premium, or Isolated App Service plan tier. Deployment slots are live apps with their own host names. App content and configurations elements can be swapped between two deployment slots, including the production slot.
App Service on Linux
App Service can also host web apps natively on Linux for supported application stacks. It can also run custom Linux containers (also known as Web App for Containers). App Service on Linux supports a number of language specific built-in images. Just deploy your code. Supported languages include: Node.js, Java (JRE 8 & JRE 11), PHP, Python, .NET Core, and Ruby. If the runtime your application requires is not supported in the built-in images, you can deploy it with a custom container.
The languages, and their supported versions, are updated on a regular basis. You can retrieve the current list by using the following command in the Cloud Shell.
App Service on Linux is not supported on Shared pricing tier.
You can’t mix Windows and Linux apps in the same App Service plan.
The Azure portal shows only features that currently work for Linux apps. As features are enabled, they’re activated on the portal.
Azure App Service plans
In App Service, an app (Web Apps, API Apps, or Mobile Apps) always runs in an App Service plan. An App Service plan defines a set of compute resources for a web app to run. One or more apps can be configured to run on the same computing resources (or in the same App Service plan). In addition, Azure Functions also has the option of running in an App Service plan.
When you create an App Service plan in a certain region (for example, West Europe), a set of compute resources is created for that plan in that region. Whatever apps you put into this App Service plan run on these compute resources as defined by your App Service plan. Each App Service plan defines:
The pricing tier of an App Service plan determines what App Service features you get and how much you pay for the plan. There are a few categories of pricing tiers:
Shared compute: Both Free and Shared share the resource pools of your apps with the apps of other customers. These tiers allocate CPU quotas to each app that runs on the shared resources, and the resources can’t scale out.
Dedicated compute: The Basic, Standard, Premium, PremiumV2, and PremiumV3 tiers run apps on dedicated Azure VMs. Only apps in the same App Service plan share the same compute resources. The higher the tier, the more VM instances are available to you for scale-out.
Isolated: This tier runs dedicated Azure VMs on dedicated Azure Virtual Networks. It provides network isolation on top of compute isolation to your apps. It provides the maximum scale-out capabilities.
Consumption: This tier is only available to function apps. It scales the functions dynamically depending on workload.
Deploy to App Service
Every development team has unique requirements that can make implementing an efficient deployment pipeline difficult on any cloud service. App Service supports both automated and manual deployment.
Automated deployment
Automated deployment, or continuous integration, is a process used to push out new features and bug fixes in a fast and repetitive pattern with minimal impact on end users.
Azure supports automated deployment directly from several sources. The following options are available:
Azure DevOps: You can push your code to Azure DevOps, build your code in the cloud, run the tests, generate a release from the code, and finally, push your code to an Azure Web App.
GitHub: Azure supports automated deployment directly from GitHub. When you connect your GitHub repository to Azure for automated deployment, any changes you push to your production branch on GitHub will be automatically deployed for you.
Bitbucket: With its similarities to GitHub, you can configure an automated deployment with Bitbucket.
Manual deployment
There are a few options that you can use to manually push your code to Azure:
Git: App Service web apps feature a Git URL that you can add as a remote repository. Pushing to the remote repository will deploy your app.
CLI: webapp up is a feature of the az command-line interface that packages your app and deploys it. Unlike other deployment methods, az webapp up can create a new App Service web app for you if you haven’t already created one.
Zip deploy: Use curl or a similar HTTP utility to send a ZIP of your application files to App Service.
FTP/S: FTP or FTPS is a traditional way of pushing your code to many hosting environments, including App Service.
Use deployment slots
Whenever possible, use deployment slots when deploying a new production build. When using a Standard App Service Plan tier or better, you can deploy your app to a staging environment and then swap your staging and production slots. The swap operation warms up the necessary worker instances to match your production scale, thus eliminating downtime.
Authentication and Authorization in App Service
Azure App Service provides built-in authentication and authorization support, so you can sign in users and access data by writing minimal or no code in your web app, API, and mobile back end, and also Azure Functions.
Why use the built-in authentication?
You’re not required to use App Service for authentication and authorization. Many web frameworks are bundled with security features, and you can use them if you like. If you need more flexibility than App Service provides, you can also write your own utilities.
The built-in authentication feature for App Service and Azure Functions can save you time and effort by providing out-of-the-box authentication with federated identity providers, allowing you to focus on the rest of your application.
Azure App Service allows you to integrate a variety of auth capabilities into your web app or API without implementing them yourself.
It’s built directly into the platform and doesn’t require any particular language, SDK, security expertise, or even any code to utilize.
You can integrate with multiple login providers. For example, Azure AD, Facebook, Google, Twitter.
Identity providers
App Service uses federated identity, in which a third-party identity provider manages the user identities and authentication flow for you. The following identity providers are available by default:
When you enable authentication and authorization with one of these providers, its sign-in endpoint is available for user authentication and for validation of authentication tokens from the provider. You can provide your users with any number of these sign-in options.
How it works
The authentication and authorization module runs in the same sandbox as your application code. When it’s enabled, every incoming HTTP request passes through it before being handled by your application code. This module handles several things for your app:
Authenticates users with the specified provider
Validates, stores, and refreshes tokens
Manages the authenticated session
Injects identity information into request headers
The module runs separately from your application code and is configured using app settings. No SDKs, specific languages, or changes to your application code are required.
Note
In Linux and containers the authentication and authorization module runs in a separate container, isolated from your application code. Because it does not run in-process, no direct integration with specific language frameworks is possible.
Authentication flow
The authentication flow is the same for all providers, but differs depending on whether you want to sign in with the provider’s SDK.
Without provider SDK: The application delegates federated sign-in to App Service. This is typically the case with browser apps, which can present the provider’s login page to the user. The server code manages the sign-in process, so it is also called server-directed flow or server flow.
With provider SDK: The application signs users in to the provider manually and then submits the authentication token to App Service for validation. This is typically the case with browser-less apps, which can’t present the provider’s sign-in page to the user. The application code manages the sign-in process, so it is also called client-directed flow or client flow. This applies to REST APIs, Azure Functions, JavaScript browser clients, and native mobile apps that sign users in using the provider’s SDK.
The table below shows the steps of the authentication flow.
Step
Without provider SDK
With provider SDK
Sign user in
Redirects client to /.auth/login/<provider>.
Client code signs user in directly with provider’s SDK and receives an authentication token. For information, see the provider’s documentation.
Post-authentication
Provider redirects client to /.auth/login/<provider>/callback.
Client code posts token from provider to /.auth/login/<provider> for validation.
Establish authenticated session
App Service adds authenticated cookie to response.
App Service returns its own authentication token to client code.
Serve authenticated content
Client includes authentication cookie in subsequent requests (automatically handled by browser).
Client code presents authentication token in X-ZUMO-AUTH header (automatically handled by Mobile Apps client SDKs).
For client browsers, App Service can automatically direct all unauthenticated users to /.auth/login/<provider>. You can also present users with one or more /.auth/login/<provider> links to sign in to your app using their provider of choice.
Authorization behavior
In the Azure portal, you can configure App Service with a number of behaviors when an incoming request is not authenticated.
Allow unauthenticated requests: This option defers authorization of unauthenticated traffic to your application code. For authenticated requests, App Service also passes along authentication information in the HTTP headers.This option provides more flexibility in handling anonymous requests. It lets you present multiple sign-in providers to your users.
Require authentication: This option will reject any unauthenticated traffic to your application. This rejection can be a redirect action to one of the configured identity providers. In these cases, a browser client is redirected to /.auth/login/<provider> for the provider you choose. If the anonymous request comes from a native mobile app, the returned response is an HTTP 401 Unauthorized. You can also configure the rejection to be an HTTP 401 Unauthorized or HTTP 403 Forbidden for all requests.
The Azure Command-Line Interface (CLI) is a cross-platform command-line tool to connect to Azure and execute administrative commands on Azure resources. It allows the execution of commands through a terminal using interactive command-line prompts or a script.
For interactive use, you first launch a shell such as cmd.exe on Windows, or Bash on Linux or macOS, and then issue a command at the shell prompt. To automate repetitive tasks, you assemble the CLI commands into a shell script using the script syntax of your chosen shell, and then you execute the script.
You can install the Azure CLI locally on Linux, Mac, or Windows computers. It can also be used from a browser through the Azure Cloud Shell or run from inside a Docker container.
Install Azure CLI
Start PowerShell as administrator and run the following command:
> az upgrade
This command is in preview and under development. Reference and support levels: https://aka.ms/CLI_refstatus
You already have the latest azure-cli version: 2.38.0
Upgrade finished.You can enable auto-upgrade with 'az config set auto-upgrade.enable=yes'. More details in https://docs.microsoft.com/cli/azure/update-azure-cli#automatic-update
Run the Azure CLI
You can now run the Azure CLI with the az command from either Windows Command Prompt or PowerShell.
> az

     /\
    /  \    _____   _ _  ___ _
   / /\ \  |_  / | | | \'__/ _\
  / ____ \  / /| |_| | | |  __/
 /_/    \_\/___|\__,_|_|  \___|


Welcome to the cool new Azure CLI!

Use `az --version` to display the current version.
Here are the base commands:

    account             : Manage Azure subscription information.
    acr                 : Manage private registries with Azure Container Registries.
    ad                  : Manage Azure Active Directory Graph entities needed for Role Based Access
                         Control.
    advisor             : Manage Azure Advisor.
    afd                 : Manage Azure Front Door Standard/Premium. For classical Azure Front Door,
                         please refer https://docs.microsoft.com/en-us/cli/azure/network/front-
                         door?view=azure-cli-latest.
    aks                 : Manage Azure Kubernetes Services.
    ams                 : Manage Azure Media Services resources.
    apim                : Manage Azure API Management services.
    appconfig           : Manage App Configurations.
    appservice          : Manage App Service plans.
    aro                 : Manage Azure Red Hat OpenShift clusters.
    backup              : Manage Azure Backups.
    batch               : Manage Azure Batch.
    bicep               : Bicep CLI command group.
    billing             : Manage Azure Billing.
    bot                 : Manage Microsoft Azure Bot Service.
    cache               : Commands to manage CLI objects cached using the `--defer` argument.
    capacity            : Manage capacity.
    cdn                 : Manage Azure Content Delivery Networks (CDNs).
    cloud               : Manage registered Azure clouds.
    cognitiveservices   : Manage Azure Cognitive Services accounts.
    config              : Manage Azure CLI configuration.
    configure           : Manage Azure CLI configuration. This command is interactive.
    consumption         : Manage consumption of Azure resources.
    container           : Manage Azure Container Instances.
    cosmosdb            : Manage Azure Cosmos DB database accounts.
    databoxedge         : Support data box edge device and management.
    deployment          : Manage Azure Resource Manager template deployment at subscription scope.
    deployment-scripts  : Manage deployment scripts at subscription or resource group scope.
    deploymentmanager   : Create and manage rollouts for your service.
    disk                : Manage Azure Managed Disks.
    disk-access         : Manage disk access resources.
    disk-encryption-set : Disk Encryption Set resource.
    dla                 : Manage Data Lake Analytics accounts, jobs, and catalogs.
    dls                 : Manage Data Lake Store accounts and filesystems.
    dms                 : Manage Azure Data Migration Service (DMS) instances.
    eventgrid           : Manage Azure Event Grid topics, domains, domain topics, system topics
                         partner topics, event subscriptions, system topic event subscriptions and
                         partner topic event subscriptions.
    eventhubs           : Manage Azure Event Hubs namespaces, eventhubs, consumergroups and geo
                         recovery configurations - Alias.
    extension           : Manage and update CLI extensions.
    feature             : Manage resource provider features.
    feedback            : Send feedback to the Azure CLI Team.
    find                : I'm an AI robot, my advice is based on our Azure documentation as well as
                         the usage patterns of Azure CLI and Azure ARM users. Using me improves
                         Azure products and documentation.
    functionapp         : Manage function apps. To install the Azure Functions Core tools see
                         https://github.com/Azure/azure-functions-core-tools.
    group               : Manage resource groups and template deployments.
    hdinsight           : Manage HDInsight resources.
    identity            : Managed Identities.
    image               : Manage custom virtual machine images.
    interactive         : Start interactive mode. Installs the Interactive extension if not
                         installed already.
    iot                 : Manage Internet of Things (IoT) assets.
    keyvault            : Manage KeyVault keys, secrets, and certificates.
    kusto               : Manage Azure Kusto resources.
    lab                 : Manage Azure DevTest Labs.
    lock                : Manage Azure locks.
    logicapp            : Manage logic apps.
    login               : Log in to Azure.
    logout              : Log out to remove access to Azure subscriptions.
    managed-cassandra   : Azure Managed Cassandra.
    managedapp          : Manage template solutions provided and maintained by Independent Software
                         Vendors (ISVs).
    managedservices     : Manage the registration assignments and definitions in Azure.
    maps                : Manage Azure Maps.
    mariadb             : Manage Azure Database for MariaDB servers.
    monitor             : Manage the Azure Monitor Service.
    mysql               : Manage Azure Database for MySQL servers.
    netappfiles         : Manage Azure NetApp Files (ANF) Resources.
    network             : Manage Azure Network resources.
    policy              : Manage resource policies.
    postgres            : Manage Azure Database for PostgreSQL servers.
    ppg                 : Manage Proximity Placement Groups.
    private-link        : Private-link association CLI command group.
    provider            : Manage resource providers.
    redis               : Manage dedicated Redis caches for your Azure applications.
    relay               : Manage Azure Relay Service namespaces, WCF relays, hybrid connections, and
                         rules.
    reservations        : Manage Azure Reservations.
    resource            : Manage Azure resources.
    resourcemanagement  : Resourcemanagement CLI command group.
    rest                : Invoke a custom request.
    restore-point       : Manage restore point with res.
    role                : Manage user roles for access control with Azure Active Directory and
                         service principals.
    search              : Manage Azure Search services, admin keys and query keys.
    security            : Manage your security posture with Microsoft Defender for Cloud.
    servicebus          : Manage Azure Service Bus namespaces, queues, topics, subscriptions, rules
                         and geo-disaster recovery configuration alias.
    sf                  : Manage and administer Azure Service Fabric clusters.
    sig                 : Manage shared image gallery.
    signalr             : Manage Azure SignalR Service.
    snapshot            : Manage point-in-time copies of managed disks, native blobs, or other
                         snapshots.
    sql                 : Manage Azure SQL Databases and Data Warehouses.
    sshkey              : Manage ssh public key with vm.
    staticwebapp        : Manage static apps.
    storage             : Manage Azure Cloud Storage resources.
    synapse             : Manage and operate Synapse Workspace, Spark Pool, SQL Pool.
    tag                 : Tag Management on a resource.
    term                : Manage marketplace agreement with marketplaceordering.
    ts                  : Manage template specs at subscription or resource group scope.
    upgrade             : Upgrade Azure CLI and extensions.
    version             : Show the versions of Azure CLI modules and extensions in JSON format by
                         default or format configured by --output.
    vm                  : Manage Linux or Windows virtual machines.
    vmss                : Manage groupings of virtual machines in an Azure Virtual Machine Scale Set
                         (VMSS).
    webapp              : Manage web apps.
Login
> az login
A web browser has been opened at https://login.microsoftonline.com/organizations/oauth2/v2.0/authorize. Please continue the login in the web browser. If no web browser is available or if the web browser fails to open, use device code flow with `az login --use-device-code`.
[
  {
    "cloudName": "AzureCloud",
    "homeTenantId": "a8de0333-xxxx-xxxx-xxxx-8f11260de56e",
    "id": "5b147b69-xxxx-xxxx-xxxx-e1da24ec0994",
    "isDefault": true,
    "managedByTenants": [],
    "name": "Pay-As-You-Go",
    "state": "Enabled",
    "tenantId": "a8de0333-xxxx-xxxx-xxxx-8f11260de56e",
    "user": {
      "name": "xxxx@outlook.com",
      "type": "user"
    }
  }
]
To create a new functions project, run func init on the command line.
> func init
Use the up/down arrow keys to select a worker runtime:
dotnet
dotnet (isolated process)
node
python
powershell
custom

> func init
Use the up/down arrow keys to select a worker runtime:node
Use the up/down arrow keys to select a language:
javascript
typescript

> func init
Use the up/down arrow keys to select a worker runtime:node
Use the up/down arrow keys to select a language:javascript
Writing package.json
Writing .gitignore
Writing host.json
Writing local.settings.json
Writing C:\Project\FunctionJS2207\.vscode\extensions.json
module.exports = async function (context, req) {
    context.log('JavaScript HTTP trigger function processed a request.');

    const name = (req.query.name || (req.body && req.body.name));
    const responseMessage = name
        ? "Hello, " + name + ". This HTTP triggered function executed successfully."
        : "This HTTP triggered function executed successfully. Pass a name in the query string or in the request body for a personalized response.";

    context.res = {
        // status: 200, /* Defaults to 200 */
        body: responseMessage
    };
}
Note: สร้าง functions project ด้วย vscode extension ง่ายกว่าสร้างด้วยคำสั่ง func init (Create an Azure Function by using Visual Studio Code) เพราะจะสร้างไฟล์ config ต่างๆของ vscode และ .venv มาให้ด้วย , สร้างด้วยคำสั่งมีประโยชน์ตอนสร้าง function ด้วย func new
Create a new functions project with func init
สร้าง functions project ชื่อ FunctionPy2207
> mkdir FunctionPy2207
> cd .\FunctionPy2207\
To create a new functions project, run func init on the command line.
> func init
Use the up/down arrow keys to select a worker runtime:
dotnet
dotnet (isolated process)
node
python
powershell
custom

> func init
Use the up/down arrow keys to select a worker runtime:python
Found Python version 3.9.10 (py).
Writing requirements.txt
Writing getting_started.md
Writing .gitignore
Writing host.json
Writing local.settings.json
Writing C:\Project\FunctionPy2207\.vscode\extensions.json
# Do not include azure-functions-worker as it may conflict with the Azure Functions platform

azure-functions
getting_started.md
## Getting Started with Azure Function
### Last updated: March 8th 2021

#### Project Structure
The main project folder (<project_root>) can contain the following files:

* **local.settings.json** - Used to store app settings and connection strings when running locally. This file doesn't get published to Azure. To learn more, see [local.settings.file](https://aka.ms/azure-functions/python/local-settings).
* **requirements.txt** - Contains the list of Python packages the system installs when publishing to Azure.
* **host.json** - Contains global configuration options that affect all functions in a function app. This file does get published to Azure. Not all options are supported when running locally. To learn more, see [host.json](https://aka.ms/azure-functions/python/host.json).
* **.vscode/** - (Optional) Contains store VSCode configuration. To learn more, see [VSCode setting](https://aka.ms/azure-functions/python/vscode-getting-started).
* **.venv/** - (Optional) Contains a Python virtual environment used by local development.
* **Dockerfile** - (Optional) Used when publishing your project in a [custom container](https://aka.ms/azure-functions/python/custom-container).
* **tests/** - (Optional) Contains the test cases of your function app. For more information, see [Unit Testing](https://aka.ms/azure-functions/python/unit-testing).
* **.funcignore** - (Optional) Declares files that shouldn't get published to Azure. Usually, this file contains .vscode/ to ignore your editor setting, .venv/ to ignore local Python virtual environment, tests/ to ignore test cases, and local.settings.json to prevent local app settings being published.

Each function has its own code file and binding configuration file ([**function.json**](https://aka.ms/azure-functions/python/function.json)).

#### Developing your first Python function using VS Code

If you have not already, please checkout our [quickstart](https://aka.ms/azure-functions/python/quickstart) to get you started with Azure Functions developments in Python.

#### Publishing your function app to Azure

For more information on deployment options for Azure Functions, please visit this [guide](https://docs.microsoft.com/en-us/azure/azure-functions/create-first-function-vs-code-python#publish-the-project-to-azure).

#### Next Steps

* To learn more about developing Azure Functions, please visit [Azure Functions Developer Guide](https://aka.ms/azure-functions/python/developer-guide).

* To learn more specific guidance on developing Azure Functions with Python, please visit [Azure Functions Developer Python Guide](https://aka.ms/azure-functions/python/python-developer-guide).
Create a new function with func new
สร้าง function ชื่อ HttpExample โดยใช้ template แบบ HttpTrigger
> func new
Use the up/down arrow keys to select a template:
Azure Blob Storage trigger
Azure Cosmos DB trigger
Durable Functions activity
Durable Functions entity
Durable Functions HTTP starter
Durable Functions orchestrator
Azure Event Grid trigger
Azure Event Hub trigger
HTTP trigger
Kafka output
Kafka trigger
Azure Queue Storage trigger
RabbitMQ trigger
Azure Service Bus Queue trigger
Azure Service Bus Topic trigger
Timer trigger

> func new
Use the up/down arrow keys to select a template:HTTP trigger
Function name: [HttpTrigger] HttpExample
Writing C:\Project\FunctionPy2207\HttpExample\__init__.py
Writing C:\Project\FunctionPy2207\HttpExample\function.json
The function "HttpExample" was created successfully from the "HTTP trigger" template.
import logging

import azure.functions as func


def main(req: func.HttpRequest) -> func.HttpResponse:
    logging.info('Python HTTP trigger function processed a request.')

    name = req.params.get('name')
    if not name:
        try:
            req_body = req.get_json()
        except ValueError:
            pass
        else:
            name = req_body.get('name')

    if name:
        return func.HttpResponse(f"Hello, {name}. This HTTP triggered function executed successfully.")
    else:
        return func.HttpResponse(
             "This HTTP triggered function executed successfully. Pass a name in the query string or in the request body for a personalized response.",
             status_code=200
        )
The Core Tools are packaged as a single command-line utility named func. If you run func from the command line without any other commands, it will display version information and a usage guide.
> func

                  %%%%%%
                 %%%%%%
            @   %%%%%%    @
          @@   %%%%%%      @@
       @@@    %%%%%%%%%%%    @@@
     @@      %%%%%%%%%%        @@
       @@         %%%%       @@
         @@      %%%       @@
           @@    %%      @@
                %%
                %


Azure Functions Core Tools
Core Tools Version:       4.0.4629 Commit hash: N/A  (64-bit)
Function Runtime Version: 4.6.1.18388

Usage: func [context] [context] <action> [-/--options]

Contexts:
azure       Commands to log in to Azure and manage resources
durable     Commands for working with Durable Functions
extensions  Commands for installing extensions
function    Commands for creating and running functions locally
host        Commands for running the Functions host locally
kubernetes  Commands for working with Kubernetes and Azure Functions
settings    Commands for managing environment settings for the local Functions host
templates   Commands for listing available function templates

Actions:
start   Launches the functions runtime host
    --port [-p]             Local port to listen on. Default: 7071
    --cors                  A comma separated list of CORS origins with no spaces. Example: https://functions.azure.com
                            ,https://functions-staging.azure.com
    --cors-credentials      Allow cross-origin authenticated requests (i.e. cookies and the Authentication header)
    --timeout [-t]          Timeout for the functions host to start in seconds. Default: 20 seconds.
    --useHttps              Bind to https://localhost:{port} rather than http://localhost:{port}. By default it creates
                             and trusts a certificate.
    --cert                  for use with --useHttps. The path to a pfx file that contains a private key
    --password              to use with --cert. Either the password, or a file that contains the password for the pfx f
                            ile
    --language-worker       Arguments to configure the language worker.
    --no-build              Do no build current project before running. For dotnet projects only. Default is set to fal
                            se.
    --enableAuth            Enable full authentication handling pipeline.
    --functions             A space seperated list of functions to load.
    --verbose               When false, hides system logs other than warnings and errors.
    --dotnet-isolated-debug When specified, set to true, pauses the .NET Worker process until a debugger is attached.
    --enable-json-output    Signals to Core Tools and other components that JSON line output console logs, when applica
                            ble, should be emitted.
    --json-output-file      If provided, a path to the file that will be used to write the output when using --enable-j
                            son-output.

new     Create a new function from a template. Aliases: new, create
    --language [-l]  Template programming language, such as C#, F#, JavaScript, etc.
    --template [-t]  Template name
    --name [-n]      Function name
    --authlevel [-a] Authorization level is applicable to templates that use Http trigger, Allowed values: [function, a
                     nonymous, admin]. Authorization level is not enforced when running functions from core tools
    --csx            use old style csx dotnet functions

init    Create a new Function App in the current folder. Initializes git repo.
    --source-control       Run git init. Default is false.
    --worker-runtime       Runtime framework for the functions. Options are: dotnet, dotnetIsolated, node, python, powe
                           rshell, custom
    --force                Force initializing
    --docker               Create a Dockerfile based on the selected worker runtime
    --docker-only          Adds a Dockerfile to an existing function app project. Will prompt for worker-runtime if not
                            specified or set in local.settings.json
    --csx                  use csx dotnet functions
    --language             Initialize a language specific project. Currently supported when --worker-runtime set to nod
                           e. Options are - "typescript" and "javascript"
    --managed-dependencies Installs managed dependencies. Currently, only the PowerShell worker runtime supports this f
                           unctionality.
    --no-docs              Do not create getting started documentation file. Currently supported when --worker-runtime
                           set to python.

logs    Gets logs of Functions running on custom backends
    --platform Hosting platform for the function app. Valid options: kubernetes
    --name     Function name
Local development vs. Azure portal development
The Azure portal has a powerful functions editor experience. In most cases, it doesn’t support modifying functions that you develop locally. Once you start using a local development workflow based on Core Tools, you can’t use the Azure portal to make changes to your functions.
Function apps and functions projects
Every function published to Azure belongs to a function app, which is a collection of one or more functions that Azure publishes together into the same environment. All of the functions in a function app share a common set of configuration values. Build them all for the same language runtime. A function app is an Azure resource that can be configured and managed independently.
When you develop functions locally, you work within a functions project. The project is a folder that contains the code and configuration files that define your functions. A functions project on your computer is equivalent to a function app in Azure, and can contain multiple functions that use the same language runtime.
Create a new functions project with func init
สร้าง functions project ชื่อ FunctionCS2207
> mkdir FunctionCS2207
> cd .\FunctionCS2207\
To create a new functions project, run func init on the command line.
> func init
Use the up/down arrow keys to select a worker runtime:
dotnet
dotnet (isolated process)
node
python
powershell
custom

> func init
Use the up/down arrow keys to select a worker runtime:dotnet
Use the up/down arrow keys to select a language:
c#
f#

> func init
Use the up/down arrow keys to select a worker runtime:dotnet
Use the up/down arrow keys to select a language:c#

Writing C:\Project\FunctionCS2207\.vscode\extensions.json
func init will ask you which language runtime you’d like to use for the app and tailor the project folder’s contents appropriately.
When you create a new functions project, the files included in the project folder depend on the language runtime you select. Regardless of the runtime you choose, the two most critical project files are always present:
host.json stores runtime configuration values, such as logging options, for the function app. The settings stored in this file are used both when running functions locally and in Azure.
local.settings.json stores configuration values that only apply to the function app when it’s run locally with the Core Tools. This file contains two kinds of settings:
Local runtime settings: Used to configure the local functions runtime itself.
Custom application settings: You add and configure them based on your app’s needs. All the functions in the app can access and use them.
Functions projects that func init generates don’t have any functions in them. Let’s find out how to add one.
Create a new function with func new
Each individual function in a project requires code and a configuration to define its behavior. Running func new in a functions project folder will create a new function and all the files you need to get started developing.
สร้าง function ชื่อ HttpExample โดยใช้ template แบบ HttpTrigger
> func new
Use the up/down arrow keys to select a template:
QueueTrigger
HttpTrigger
BlobTrigger
TimerTrigger
KafkaTrigger
KafkaOutput
DurableFunctionsOrchestration
SendGrid
EventHubTrigger
ServiceBusQueueTrigger
ServiceBusTopicTrigger
EventGridTrigger
CosmosDBTrigger
IotHubTrigger

> func new
Use the up/down arrow keys to select a template:Function name: HttpExample
HttpExample

The function "HttpExample" was created successfully from the "HttpTrigger" template.
จะได้ไฟล์ HttpExample.cs
using System;
using System.IO;
using System.Threading.Tasks;
using Microsoft.AspNetCore.Mvc;
using Microsoft.Azure.WebJobs;
using Microsoft.Azure.WebJobs.Extensions.Http;
using Microsoft.AspNetCore.Http;
using Microsoft.Extensions.Logging;
using Newtonsoft.Json;

namespace FunctionCS2207
{
    public static class HttpExample
    {
        [FunctionName("HttpExample")]
        public static async Task<IActionResult> Run(
            [HttpTrigger(AuthorizationLevel.Function, "get", "post", Route = null)] HttpRequest req,
            ILogger log)
        {
            log.LogInformation("C# HTTP trigger function processed a request.");

            string name = req.Query["name"];

            string requestBody = await new StreamReader(req.Body).ReadToEndAsync();
            dynamic data = JsonConvert.DeserializeObject(requestBody);
            name = name ?? data?.name;

            string responseMessage = string.IsNullOrEmpty(name)
                ? "This HTTP triggered function executed successfully. Pass a name in the query string or in the request body for a personalized response."
                : $"Hello, {name}. This HTTP triggered function executed successfully.";

            return new OkObjectResult(responseMessage);
        }
    }
}
Run functions locally
Functions aren’t programs that can be run on their own: they must be hosted. The function host is what powers everything outside of your function code: it loads the configuration, listens for triggers and HTTP requests, starts the worker process for the language your functions are written in, writes log output, and more. In Azure, function apps run the function host automatically when they start.
You can use the Core Tools to run your own instance of the functions host and try out your functions locally before you publish them. By running your functions before publishing them, you can make sure your configuration and code loads correctly and test out your functions by making real HTTP calls to them without the need for Azure resources.
To start the functions host locally, run func start from a functions project folder. At the end of the output, the Core Tools will display local URLs you can use to call each of your functions. While the host is running, you can use any tools or libraries that make HTTP calls, like curl, to interact with your functions. The Core Tools will write any log output produced by the host to the terminal in real time.
> func start
Microsoft (R) Build Engine version 17.2.0+41abc5629 for .NET
Copyright (C) Microsoft Corporation. All rights reserved.

  Determining projects to restore...
  All projects are up-to-date for restore.
  FunctionCS2207 -> C:\Project\FunctionCS2207\bin\output\FunctionCS2207.dll

Build succeeded.
    0 Warning(s)
    0 Error(s)

Time Elapsed 00:00:05.59


Azure Functions Core Tools
Core Tools Version:       4.0.4629 Commit hash: N/A  (64-bit)
Function Runtime Version: 4.6.1.18388

[2022-07-25T09:35:23.827Z] Found C:\Project\FunctionCS2207\FunctionCS2207.csproj. Using for user secrets file configuration.

Functions:

        HttpExample: [GET,POST] http://localhost:7071/api/HttpExample

For detailed output, run func with --verbose flag.
JSON is an acronym for JavaScript Object Notation. Often used in web apps, but it is not limited to JavaScript. One can use any programming language such as Perl, Python or CLI tools such as jq.
CSV is an acronym for Comma-separated values. It is a text file you can use in spreadsheet apps, programming languages and many other apps.
Installing jq
Since jq is available in most common repos, I will use that one for my needs. Here is how to install jq on a Debian or Ubuntu Linux using the apt command/apt-get command:
$ sudo apt install jq
RHEL/Fedora/CentOS/Alma/Rocky Linux user try the dnf command:
$ jq -h
jq - commandline JSON processor [version 1.6]

Usage:  jq [options] <jq filter> [file...]
        jq [options] --args <jq filter> [strings...]
        jq [options] --jsonargs <jq filter> [JSON_TEXTS...]

jq is a tool for processing JSON inputs, applying the given filter to
its JSON text inputs and producing the filter's results as JSON on
standard output.

The simplest filter is ., which copies jq's input to its output
unmodified (except for formatting, but note that IEEE754 is used
for number representation internally, with all that that implies).

For more advanced filters see the jq(1) manpage ("man jq")
and/or https://stedolan.github.io/jq

Example:

        $ echo '{"foo": 0}' | jq .
        {
                "foo": 0
        }

Some of the options include:
  -c               compact instead of pretty-printed output;
  -n               use `null` as the single input value;
  -e               set the exit status code based on the output;
  -s               read (slurp) all inputs into an array; apply filter to it;
  -r               output raw strings, not JSON texts;
  -R               read raw strings, not JSON texts;
  -C               colorize JSON;
  -M               monochrome (don't colorize JSON);
  -S               sort keys of objects on output;
  --tab            use tabs for indentation;
  --arg a v        set variable $a to value <v>;
  --argjson a v    set variable $a to JSON value <v>;
  --slurpfile a f  set variable $a to an array of JSON texts read from <f>;
  --rawfile a f    set variable $a to a string consisting of the contents of <f>;
  --args           remaining arguments are string arguments, not files;
  --jsonargs       remaining arguments are JSON arguments, not files;
  --               terminates argument processing;

Named arguments are also available as $ARGS.named[], while
positional arguments are available as $ARGS.positional[].

See the manpage for more options.
We use the df command to find total disk space and available space on a Linux / Unix file system.
The df is an acronym for disk free.
$ df --help
Usage: df [OPTION]... [FILE]...
Show information about the file system on which each FILE resides,
or all file systems by default.

Mandatory arguments to long options are mandatory for short options too.
  -a, --all             include pseudo, duplicate, inaccessible file systems
  -B, --block-size=SIZE  scale sizes by SIZE before printing them; e.g.,
                           '-BM' prints sizes in units of 1,048,576 bytes;
                           see SIZE format below
  -h, --human-readable  print sizes in powers of 1024 (e.g., 1023M)
  -H, --si              print sizes in powers of 1000 (e.g., 1.1G)
  -i, --inodes          list inode information instead of block usage
  -k                    like --block-size=1K
  -l, --local           limit listing to local file systems
      --no-sync         do not invoke sync before getting usage info (default)
      --output[=FIELD_LIST]  use the output format defined by FIELD_LIST,
                               or print all fields if FIELD_LIST is omitted.
  -P, --portability     use the POSIX output format
      --sync            invoke sync before getting usage info
      --total           elide all entries insignificant to available space,
                          and produce a grand total
  -t, --type=TYPE       limit listing to file systems of type TYPE
  -T, --print-type      print file system type
  -x, --exclude-type=TYPE   limit listing to file systems not of type TYPE
  -v                    (ignored)
      --help     display this help and exit
      --version  output version information and exit

Display values are in units of the first available SIZE from --block-size,
and the DF_BLOCK_SIZE, BLOCK_SIZE and BLOCKSIZE environment variables.
Otherwise, units default to 1024 bytes (or 512 if POSIXLY_CORRECT is set).

The SIZE argument is an integer and optional unit (example: 10K is 10*1024).
Units are K,M,G,T,P,E,Z,Y (powers of 1024) or KB,MB,... (powers of 1000).

FIELD_LIST is a comma-separated list of columns to be included.  Valid
field names are: 'source', 'fstype', 'itotal', 'iused', 'iavail', 'ipcent',
'size', 'used', 'avail', 'pcent', 'file' and 'target' (see info page).

GNU coreutils online help: <https://www.gnu.org/software/coreutils/>
Report df translation bugs to <https://translationproject.org/team/>
Full documentation at: <https://www.gnu.org/software/coreutils/df>
or available locally via: info '(coreutils) df invocation'
In this section, you use Visual Studio Code to create a local Azure Functions project in C#. Later in this exercise, you’ll publish your function code to Azure.
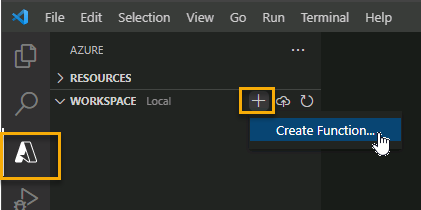
Choose the Azure icon in the Activity bar, then in the Workspace area, select Add…. Finally, select Create Function…. NoteA pop-up message will likely appear prompting you to create a new project, if it does select Create new project.
Choose a directory location for your project workspace and choose Select. NoteBe sure to select a project folder that is outside of an existing workspace.
Provide the following information at the prompts:
Select a language: Choose C#.
Select a .NET runtime: Choose .NET 6
Select a template for your project’s first function: Choose HTTP trigger.
Provide a function name: Type HttpExample.
Provide a namespace: Type My.Function.
Authorization level: Choose Anonymous, which enables anyone to call your function endpoint.
Select how you would like to open your project: Choose Add to workspace.
Using this information, Visual Studio Code generates an Azure Functions project with an HTTP trigger.
Run the function locally
Visual Studio Code integrates with Azure Functions Core tools to let you run this project on your local development computer before you publish to Azure.
Make sure the terminal is open in Visual Studio Code. You can open the terminal by selecting Terminal and then New Terminal in the menu bar.
Press F5 to start the function app project in the debugger. Output from Core Tools is displayed in the Terminal panel. Your app starts in the Terminal panel. You can see the URL endpoint of your HTTP-triggered function running locally.
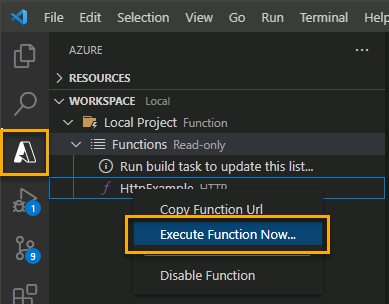
With Core Tools running, go to the Azure: Functions area. Under Functions, expand Local Project > Functions. Right-click the HttpExample function and choose Execute Function Now….
In Enter request body type the request message body value of { "name": "Azure" }. Press Enter to send this request message to your function. When the function executes locally and returns a response, a notification is raised in Visual Studio Code. Information about the function execution is shown in Terminal panel.
Press Shift + F5 to stop Core Tools and disconnect the debugger.
After you’ve verified that the function runs correctly on your local computer, it’s time to use Visual Studio Code to publish the project directly to Azure.
Sign in to Azure
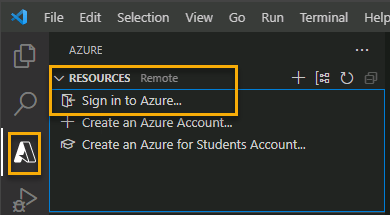
Before you can publish your app, you must sign in to Azure. If you’re already signed in, go to the next section.
If you aren’t already signed in, choose the Azure icon in the Activity bar, then in the Azure: Functions area, choose Sign in to Azure….
When prompted in the browser, choose your Azure account and sign in using your Azure account credentials.
After you’ve successfully signed in, you can close the new browser window. The subscriptions that belong to your Azure account are displayed in the Side bar.
Create resources in Azure
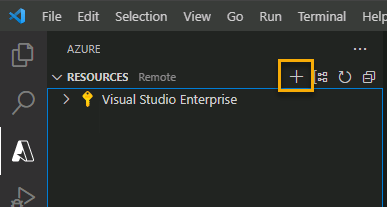
In this section, you create the Azure resources you need to deploy your local function app.
Choose the Azure icon in the Activity bar, then in the Resources area select the Create resource… button.
Provide the following information at the prompts:
Select Create Function App in Azure…
Enter a globally unique name for the function app: Type a name that is valid in a URL path. The name you type is validated to make sure that it’s unique in Azure Functions.
Select a runtime stack: Use the same choice you made in the Create your local project section above.
Select a location for new resources: For better performance, choose a region near you.
Select subscription: Choose the subscription to use. You won’t see this if you only have one subscription.
The extension shows the status of individual resources as they are being created in Azure in the AZURE: ACTIVITY LOG area of the terminal window.
When completed, the following Azure resources are created in your subscription, using names based on your function app name:
A resource group, which is a logical container for related resources.
A standard Azure Storage account, which maintains state and other information about your projects.
A consumption plan, which defines the underlying host for your serverless function app.
A function app, which provides the environment for executing your function code. A function app lets you group functions as a logical unit for easier management, deployment, and sharing of resources within the same hosting plan.
An Application Insights instance connected to the function app, which tracks usage of your serverless function.
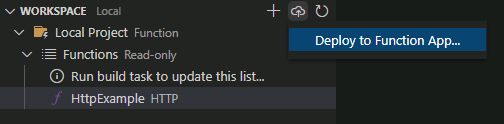
Deploy the code
In the WORKSPACE section of the Azure bar select the Deploy… button, and then select Deploy to Function App….
When prompted to Select a resource, choose the function app you created in the previous section.
Confirm that you want to deploy your function by selecting Deploy on the confirmation prompt. ImportantPublishing to an existing function overwrites any previous deployments.
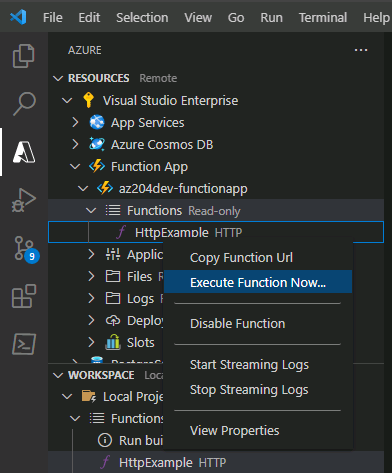
Run the function in Azure
Back in the Resources area in the side bar, expand your subscription, your new function app, and Functions. Right-click the HttpExample function and choose Execute Function Now….
In Enter request body you see the request message body value of { "name": "Azure" }. Press Enter to send this request message to your function.
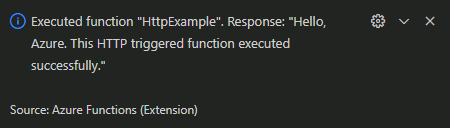
When the function executes in Azure and returns a response, a notification is raised in Visual Studio Code.
def read_file(path):
  try:
    dbutils.fs.ls(path)
    return spark.read.option("inferschema","true").csv(path)
  except Exception as e:
    if 'java.io.FileNotFoundException' in str(e):
      print('File does not exists')
    else:
      print('Other error')

read_file('mnt/pnt/abc.csv')

 NoteA pop-up message will likely appear prompting you to create a new project, if it does select Create new project.