
- Azure Functions – Serverless Functions in Computing | Microsoft Azure
- Azure Functions documentation | Microsoft Docs
- GitHub – Azure/Azure-Functions
- Create serverless logic with Azure Functions – Learn | Microsoft Docs
- Azure Functions scale and hosting | Microsoft Docs
- Create a function app
- Triggers
- Bindings
- Create a function in the Azure portal
- Navigate to your function and its files
- Test in the Azure portal
- Run function manually
- Other .Net
Azure Functions allow developers to host business logic that can be executed without managing or provisioning infrastructure.
1. Create a function app
Let’s create a function app in the Azure portal.
- Sign in to the Azure portal
- Under Azure services, select Create a resource.
- In the menu, select Compute, and then select Function App in the Popular products list.
- On the Basics tab, enter the following values for each setting.
| Setting | Value |
|---|---|
| Publish | Code |
| Runtime stack | Python |
| Version* | 3.8 |
| Play type | Consumption (Serverless) |
*Python มีเวอร์ชันให้เลือกเป็น 3.7 , 3.8 , 3.9
When deployment completes, select Go to resource.
2. Triggers
Functions are event driven, which means they run in response to an event. The type of event that starts a function is called a trigger. Each function must be configured with exactly one trigger.
Azure supports triggers for the following services.
| Service | Trigger description |
|---|---|
| Blob Storage | Starts a function when a new or updated blob is detected. |
| Azure Cosmos DB | Start a function when inserts and updates are detected. |
| Event Grid | Starts a function when an event is received from Event Grid. |
| HTTP | Starts a function with an HTTP request. |
| Microsoft Graph Events | Starts a function in response to an incoming webhook from the Microsoft Graph. Each instance of this trigger can react to one Microsoft Graph resource type. |
| Queue Storage | Starts a function when a new item is received on a queue. The queue message is provided as input to the function. |
| Service Bus | Starts a function in response to messages from a Service Bus queue. |
| Timer | Starts a function on a schedule. |
3. Bindings
A binding is a declarative way to connect data and services to your function. Bindings interact with various data sources, which means you don’t have to write the code in your function to connect to data sources and manage connections. The platform takes care of that complexity for you as part of the binding code.
Each binding has a direction–your code reads data from input bindings, and writes data to output bindings. Each function can have zero or more bindings to manage the input and output data processed by the function.
A trigger is a type of input binding that has the ability to initiate execution of some code.
Azure provides a large number of bindings to connect to different storage and messaging services.
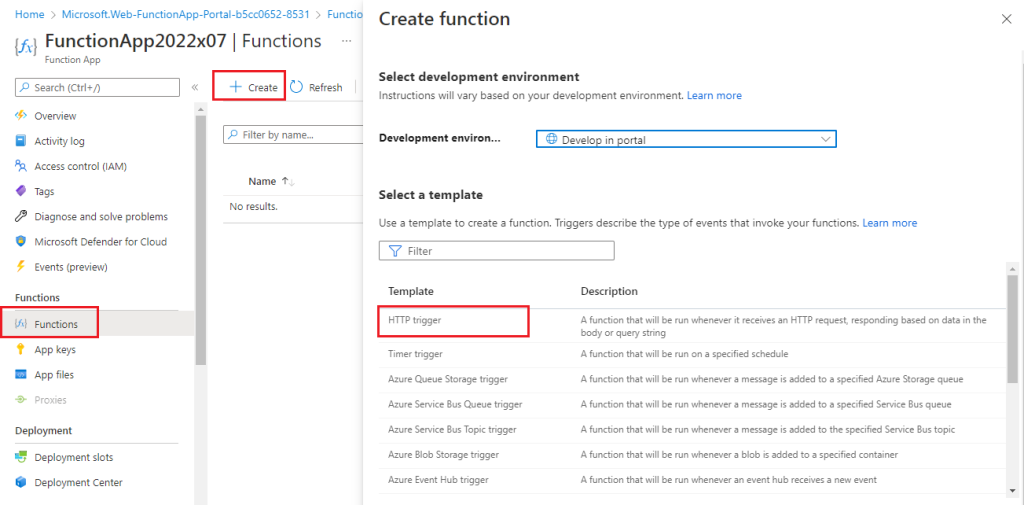
4. Create a function in the Azure portal
When you create your first function in the Azure Create function pane, you can select a predefined trigger for your function. Based on your selections, Azure generates default code and configuration information, such as creating an event log entry when input data is received.
5. Navigate to your function and its files
When you create a function from a template, several files are created, including a configuration file, function.json, and a source code file, __init__.py.
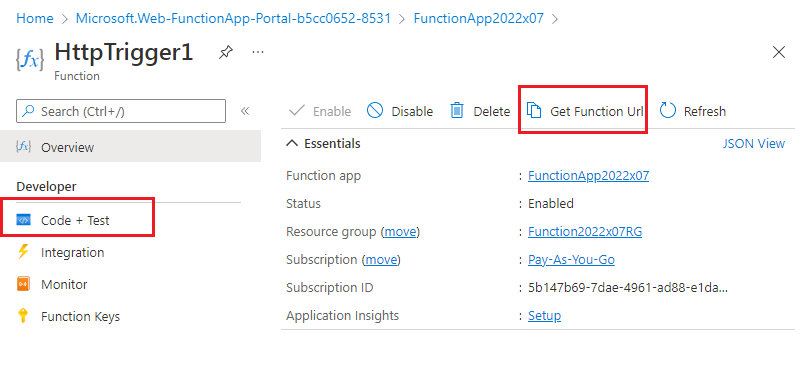
When you select a function that you created in your function app, the Function pane opens. By selecting Code + Test from the Function menu, you have access to actions in the command bar to test and run the code, to save or discard changes you make, or to obtain the published URL.
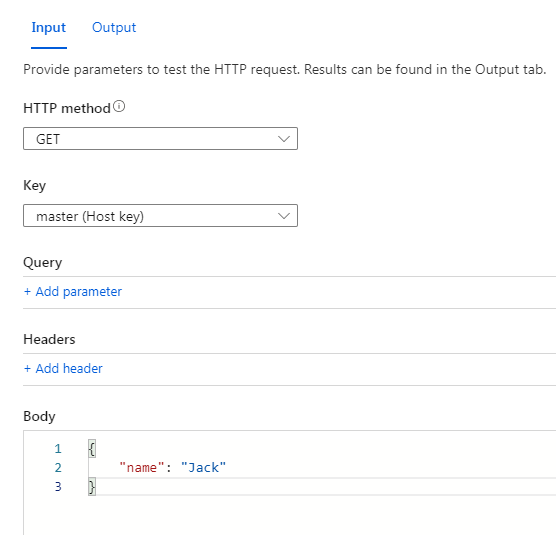
By selecting Test/Run from the command bar, you can run use cases for requests that include query strings and values. The function’s path above the code box displays the name of the file that is open. You can select a specific file from the dropdown to test or edit, for example, function.json.
__init__.py
import logging

import azure.functions as func


def main(req: func.HttpRequest) -> func.HttpResponse:
    logging.info('Python HTTP trigger function processed a request.')

    name = req.params.get('name')
    if not name:
        try:
            req_body = req.get_json()
        except ValueError:
            pass
        else:
            name = req_body.get('name')

    if name:
        return func.HttpResponse(f"Hello, {name}. This HTTP triggered function executed successfully.")
    else:
        return func.HttpResponse(
             "This HTTP triggered function executed successfully. Pass a name in the query string or in the request body for a personalized response.",
             status_code=200
        )
function.json
{
  "bindings": [
    {
      "authLevel": "function",
      "type": "httpTrigger",
      "direction": "in",
      "name": "req",
      "methods": [
        "get",
        "post"
      ]
    },
    {
      "type": "http",
      "direction": "out",
      "name": "$return"
    }
  ]
}
The bindings property is where you configure both triggers and bindings. Each binding shares a few common settings and some settings which are specific to a particular type of binding. Every binding requires the following settings:
| Property | Types | Comments |
|---|---|---|
type | string | Name of binding. For example, queueTrigger. |
direction | string | Indicates whether the binding is for receiving data into the function or sending data from the function. For example, in or out. |
name | string | The name that is used for the bound data in the function. For example, myQueue. |
6. Test in the Azure portal
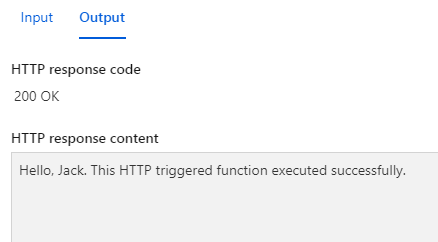
The portal also provides a convenient way to test your functions. As previously described, in the screenshot above. When you select Run in this pane, the results automatically appear in the Output tab, and the Logs pane opens to display the status.
7. Run function manually
You can start a function by manually triggering the configured trigger. For instance, if you’re using an HTTP trigger, you can use a tool, such as Postman or cURL, to initiate an HTTP request to your function endpoint URL, which is available from the function definition (Get function URL).
เช่นตัวอย่างนี้ก็ ต่อท้าย url ด้วย &name=jack
8. Other .Net
.Net 6
run.csx
#r "Newtonsoft.Json"

using System.Net;
using Microsoft.AspNetCore.Mvc;
using Microsoft.Extensions.Primitives;
using Newtonsoft.Json;

public static async Task<IActionResult> Run(HttpRequest req, ILogger log)
{
    log.LogInformation("C# HTTP trigger function processed a request.");

    string name = req.Query["name"];

    string requestBody = await new StreamReader(req.Body).ReadToEndAsync();
    dynamic data = JsonConvert.DeserializeObject(requestBody);
    name = name ?? data?.name;

    string responseMessage = string.IsNullOrEmpty(name)
        ? "This HTTP triggered function executed successfully. Pass a name in the query string or in the request body for a personalized response."
                : $"Hello, {name}. This HTTP triggered function executed successfully.";

            return new OkObjectResult(responseMessage);
}
function.json
{
  "bindings": [
    {
      "authLevel": "function",
      "name": "req",
      "type": "httpTrigger",
      "direction": "in",
      "methods": [
        "get",
        "post"
      ]
    },
    {
      "name": "$return",
      "type": "http",
      "direction": "out"
    }
  ]
}