คำสั่ง AzCopy

AzCopy is a command-line utility that you can use to copy blobs or files to or from a storage account.

Download AzCopy

First, download the AzCopy V10 executable file to any directory on your computer. AzCopy V10 is just an executable file, so there’s nothing to install.

These files are compressed as a zip file (Windows and Mac) or a tar file (Linux). To download and decompress the tar file on Linux, see the documentation for your Linux distribution.

ตรวจสอบเวอร์ชันบน Command prompts

> azcopy --version
azcopy version 10.17.0

ตรวจสอบเวอร์ชันบน PowerShell

> .\azcopy --version
azcopy version 10.17.0

ดู help

> azcopy --help
AzCopy 10.17.0
Project URL: github.com/Azure/azure-storage-azcopy

AzCopy is a command line tool that moves data into and out of Azure Storage.
To report issues or to learn more about the tool, go to github.com/Azure/azure-storage-azcopy

The general format of the commands is: 'azcopy [command] [arguments] --[flag-name]=[flag-value]'.

Usage:
  azcopy [command]

Available Commands:
  bench          Performs a performance benchmark
  completion     Generate the autocompletion script for the specified shell
  copy           Copies source data to a destination location
  doc            Generates documentation for the tool in Markdown format
  env            Shows the environment variables that you can use to configure the behavior of AzCopy.
  help           Help about any command
  jobs           Sub-commands related to managing jobs
  list           List the entities in a given resource
  login          Log in to Azure Active Directory (AD) to access Azure Storage resources.
  logout         Log out to terminate access to Azure Storage resources.
  make           Create a container or file share.
  remove         Delete blobs or files from an Azure storage account
  set-properties (Preview) Given a location, change all the valid system properties of that storage (blob or file)
  sync           Replicate source to the destination location

Flags:
      --cap-mbps float                      Caps the transfer rate, in megabits per second. Moment-by-moment throughput might vary slightly from the cap. If this option is set to zero, or it is omitted, the throughput isn't capped.
  -h, --help                                help for azcopy
      --log-level string                    Define the log verbosity for the log file, available levels: INFO(all requests/responses), WARNING(slow responses), ERROR(only failed requests), and NONE(no output logs). (default 'INFO'). (default "INFO")
      --output-level string                 Define the output verbosity. Available levels: essential, quiet. (default "default")
      --output-type string                  Format of the command's output. The choices include: text, json. The default value is 'text'. (default "text")
      --skip-version-check                  Do not perform the version check at startup. Intended for automation scenarios & airgapped use.      --trusted-microsoft-suffixes string   Specifies additional domain suffixes where Azure Active Directory login tokens may be sent.  The default is '*.core.windows.net;*.core.chinacloudapi.cn;*.core.cloudapi.de;*.core.usgovcloudapi.net;*.storage.azure.net'. Any listed here 
are added to the default. For security, you should only put Microsoft Azure domains here. Separate multiple entries with semi-colons.      
  -v, --version                             version for azcopy

Use "azcopy [command] --help" for more information about a command.

Authorize AzCopy

You can provide authorization credentials by using Azure Active Directory (AD), or by using a Shared Access Signature (SAS) token.

Use this table as a guide:

Storage typeCurrently supported method of authorization
Blob storageAzure AD & SAS
Blob storage (hierarchical namespace)Azure AD & SAS
File storageSAS only

Option 1: Use Azure Active Directory

ใช้คำสั่ง azcopy login

> azcopy login
To sign in, use a web browser to open the page https://microsoft.com/devicelogin and enter the code XXXXXXXXX to authenticate.

แล้วเปิด browser ไปที่ https://microsoft.com/devicelogin แล้วใส่ code

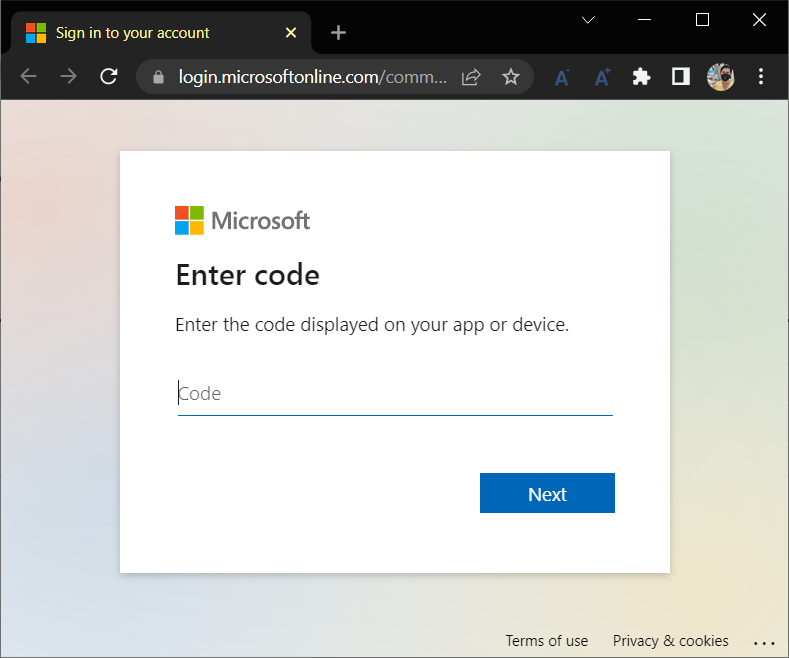
เลือก account เสร็จแล้ว จะมีหน้าถามว่า Are you trying to sign in to Azure Storage AzCopy? ให้กด Continue

กลับมาที่ terminal จะขึ้นว่า INFO: Login succeeded.

Option 2: Use a SAS token

You can append a SAS token to each source or destination URL that use in your AzCopy commands.

This example command recursively copies data from a local directory to a blob container. A fictitious SAS token is appended to the end of the container URL.

azcopy copy %LOCAL_PATH% %BLOB_PATH%?%SAS_KEY% --recursive=true
azcopy copy "C:\local\path" "https://account.blob.core.windows.net/mycontainer1/?sv=2018-xx-xx&ss...e=2019-05-01T05:01:17Z&st=2019-xx-xx....4%3D" --recursive=true

เมื่อทำงานเสร็จก็ logout

> azcopy logout
INFO: Logout succeeded.

WordPress – ปรับความกว้างให้ธีม Twenty Eleven

ไปที่ Appearance | Customize | Additional CSS แล้วเพิ่ม CSS ดังนี้

#page {
  max-width: 1300px;
}

/* One column */
.one-column #page {
  max-width: 1300px;
}

ติดตั้ง Apache บน Ubuntu 20.04

Step 1 — Installing Apache

sudo apt update
sudo apt install apache2

Step 2 — Adjusting the Firewall

อันนี้ข้ามได้

$ sudo ufw app list
Available applications:
  Apache
  Apache Full
  Apache Secure
  OpenSSH

As indicated by the output, there are three profiles available for Apache:

  • Apache: This profile opens only port 80 (normal, unencrypted web traffic)
  • Apache Full: This profile opens both port 80 (normal, unencrypted web traffic) and port 443 (TLS/SSL encrypted traffic)
  • Apache Secure: This profile opens only port 443 (TLS/SSL encrypted traffic)

It is recommended that you enable the most restrictive profile that will still allow the traffic you’ve configured. Since we haven’t configured SSL for our server yet in this guide, we will only need to allow traffic on port 80:

$ sudo ufw allow 'Apache'
Rules updated
Rules updated (v6)

You can verify the change by typing:

$ sudo ufw status
Status: inactive

ถ้าเป็น inactive ก็ทำการ enable ufwBasic UFW (Uncomplicated Firewall) commands – Serverspace.io

sudo ufw enable

แต่ถ้าใช้ Ubuntu บน WSL2 จะใช้ ufw ไม่ได้ – security – I can’t use ufw on WSL-Ubuntu – Ask Ubuntu

Step 3 — Checking your Web Server

$ systemctl status apache2

แต่ถ้ารันคำสั่งนี้ใน WSL2 จะไม่ได้

$ systemctl status apache2
System has not been booted with systemd as init system (PID 1). Can't operate.
Failed to connect to bus: Host is down

ถ้าใช้ Ubuntu 20.04 ใน WSL2 ใช้คำสั่ง

$ service apache2 status
● apache2.service - The Apache HTTP Server
     Loaded: loaded (/lib/systemd/system/apache2.service; enabled; vendor preset: enabled)
     Active: active (running) since Mon 2023-03-27 14:49:22 +07; 1min 2s ago
       Docs: https://httpd.apache.org/docs/2.4/
   Main PID: 4834 (apache2)
      Tasks: 55 (limit: 9444)
     Memory: 5.0M
     CGroup: /system.slice/apache2.service
             ├─4834 /usr/sbin/apache2 -k start
             ├─4835 /usr/sbin/apache2 -k start
             └─4836 /usr/sbin/apache2 -k start
$ sudo service apache2 reload
$ sudo service apache2 restart

ทดลองเข้าใช้งานที่ http://localhost/

หรือใช้คำสั่ง hostname เพื่อดู IP ของเครื่อง แล้วเข้าด้วย IP ได้

$ hostname -I

Step 4 — Other

ตรวจสอบไฟล์ /etc/apache2/sites-available/000-default.conf

$ cat /etc/apache2/sites-available/000-default.conf
<VirtualHost *:80>
        ServerAdmin webmaster@localhost
        DocumentRoot /var/www/html

        ErrorLog ${APACHE_LOG_DIR}/error.log
        CustomLog ${APACHE_LOG_DIR}/access.log combined
</VirtualHost>

APACHE_LOG_DIR ค่า default เป็น /var/log/apache2What is the Apache error log location on Linux (xmodulo.com)

$ ls -l /var/log/apache2/
total 36
-rw-r----- 1 root adm 16024 Mar 16 13:42 access.log
-rw-r----- 1 root adm 16683 Mar 16 13:42 error.log
-rw-r----- 1 root adm     0 Mar 14 16:42 other_vhosts_access.log

ติดตั้ง Django

เลือกเวอร์ชันของ Python ที่จะใช้

Django versionPython versions
2.23.5, 3.6, 3.7, 3.8 (added in 2.2.8), 3.9 (added in 2.2.17)
3.13.6, 3.7, 3.8, 3.9 (added in 3.1.3)
3.23.6, 3.7, 3.8, 3.9, 3.10 (added in 3.2.9)
4.03.8, 3.9, 3.10
4.13.8, 3.9, 3.10, 3.11 (added in 4.1.3)

ดาว์นโหลดและติดตั้ง Python จาก https://www.python.org/downloads/

Python versionMaintenance status End of support Release schedule
3.11bugfix2027-10 PEP 664
3.10bugfix2026-10 PEP 619
3.9security2025-10 PEP 596
3.8security2024-10 PEP 569

ติดตั้ง Django แบบ official release

$ python3 -m pip install Django

ตรวจสอบการติดตั้ง

>>> import django
>>> print(django.get_version())
4.1.7
$ python3 -m django --version
4.1.7

WSL 2

WSL 2 ติดตั้งได้บน Windows 11 หรือ Windows 10 version 2004+ (Build 19041 and higher)

การติดตั้ง WSL 2

  1. Open PowerShell or Windows Command Prompt in administrator mode by right-clicking and selecting “Run as administrator
  2. Enter the command: wsl --install
  3. You’ll need to restart your machine following this installation process to begin using WSL.

คำสั่ง wsl --install จะติดตั้ง Ubuntu distribution เป็นค่า default แต่เราสามารถติดตั้ง Linux distributions อื่นได้

ดู Linux distribution ที่มีใน Microsoft Store ใช้คำสั่ง wsl --list --online

> wsl --list --online
The following is a list of valid distributions that can be installed.
Install using 'wsl.exe --install <Distro>'.

NAME                                   FRIENDLY NAME
Ubuntu                                 Ubuntu
Debian                                 Debian GNU/Linux
kali-linux                             Kali Linux Rolling
Ubuntu-18.04                           Ubuntu 18.04 LTS
Ubuntu-20.04                           Ubuntu 20.04 LTS
Ubuntu-22.04                           Ubuntu 22.04 LTS
OracleLinux_8_5                        Oracle Linux 8.5
OracleLinux_7_9                        Oracle Linux 7.9
SUSE-Linux-Enterprise-Server-15-SP4    SUSE Linux Enterprise Server 15 SP4
openSUSE-Leap-15.4                     openSUSE Leap 15.4
openSUSE-Tumbleweed                    openSUSE Tumbleweed

เลือก Linux distribution ที่จะติดตั้งด้วยคำสั่ง wsl --install --distribution <Distribution Name>

> wsl --install Ubuntu-22.04
Installing: Ubuntu 22.04 LTS
[======                    11.0%                           ]

ถ้าจะ uninstall ใช้คำสั่ง

> wsl --unregister Ubuntu-22.04

หลังจาก WSL ติดตั้ง Linux distribution เสร็จ ให้ restart เครื่อง

เรียกใช้งาน installed Linux distribution ได้จาก Windows search แล้วค้นหาคำว่า Ubuntu หรือเปิด Windows Terminal แล้วเลือก Ubuntu

เมื่อเรียกใช้งานครั้งแรก จะให้ตั้ง username และ password.

เมื่อตั้งเสร็จ สามารถดูข้อมูลของ Linux distribution ที่ติดตั้งได้ด้วยคำสั่ง cat /etc/os-release

$ cat /etc/os-release
NAME="Ubuntu"
VERSION="20.04.5 LTS (Focal Fossa)"
ID=ubuntu
ID_LIKE=debian
PRETTY_NAME="Ubuntu 20.04.5 LTS"
VERSION_ID="20.04"
HOME_URL="https://www.ubuntu.com/"
SUPPORT_URL="https://help.ubuntu.com/"
BUG_REPORT_URL="https://bugs.launchpad.net/ubuntu/"
PRIVACY_POLICY_URL="https://www.ubuntu.com/legal/terms-and-policies/privacy-policy"
VERSION_CODENAME=focal
UBUNTU_CODENAME=focal

Update และ upgrade packages ของ Ubuntu ด้วยคำสั่ง sudo apt update && upgrade

Visual Studio Code

ติดตั้ง WSL Extension ให้กับ Visual Studio Code

เรียก Visual Studio Code จาก command line ของ Linux (Bash) ด้วยคำสั่ง code .

File system

ถ้าอยู่ที่ Bash ใน Linux สามารถอ้างถึง drive c บน Windows ได้ที่ /mnt/c/ (mounted C drive)

ถ้าจะกลับไปที่ home directory บน Linux ได้ด้วยคำสั่ง cd ~

ถ้าอยู่ที่ PowerShell สามารถอ้างถึง home directory บน Linux ได้ด้วยคำสั่ง cd \\wsl.localhost\Ubuntu\home\<username>

ถ้าอยู่ที่ Windows File Explorer (explorer.exe) สามารถดูได้ทั้ง Windows file system (c:\) และ Linux file system (\\wsl.localhost\Ubuntu)

WSL commands

ถ้ารันจาก PowerShell หรือ Windows Command Prompt (CMD) พิมพ์คำสั่ง wsl แต่ถ้ารันจาก Bash พิมพ์คำสั่ง wsl.exe

ดูเวอร์ชันของ WSL ด้วย wsl --version

  • WSL
  • the Linux Kernel used by WSL
  • the version for WSLg, which runs Linux GUI apps
  • the version for MSRDC, which represents the Microsoft Remote Desktop Client supporting WSL
  • the versions of Direct3D and DXCore, used for graphics rendering
  • the version of Windows that you’re running
> wsl --version
WSL version: 1.1.3.0
Kernel version: 5.15.90.1
WSLg version: 1.0.49
MSRDC version: 1.2.3770
Direct3D version: 1.608.2-61064218
DXCore version: 10.0.25131.1002-220531-1700.rs-onecore-base2-hyp
Windows version: 10.0.22621.1344

อัพเดท WSL ด้วย wsl --update

ดูรายการ Linux distributions ที่มีการิดตั้งด้วย wsl --list --verbose หรือ wsl -l -v

> wsl -l -v
  NAME      STATE           VERSION
* Ubuntu    Running         2

เปลี่ยน default Linux distribution ด้วย wsl --set-default <Distribution Name>

ที่ PowerShell เปิด Bash command line ไปที่ home directory ด้วย wsl ~ หรือ เปิด Bash command line โดยยังอยู่ที่พาทเดิมด้วย wsl และออกจาก Bash ด้วย exit

ที่ Bash เรียก Windows File Explorer ให้ชี้ไปที่ current directory path ด้วย explorer.exe . (อย่าลืมพิมพ์จุดด้วย)

คำสั่งของ Ubuntu ใน WSL2

คำสั่ง systemctl ใช้ไม่ได้

$ sudo systemctl status apache2
[sudo] password for jack:
System has not been booted with systemd as init system (PID 1). Can't operate.
Failed to connect to bus: Host is down

ให้ใช้คำสั่ง service แทน

$ sudo service apache2 status

Google Cloud Command Line Interface (gcloud CLI)

ดูเวอร์ชันของ gcloud

$ gcloud version
Google Cloud SDK 334.0.0
alpha 2021.03.26
beta 2021.03.26
bq 2.0.66
core 2021.03.26
gsutil 4.60

View information about gcloud commands and other topics:

$ gcloud help

List accounts whose credentials are stored on the local system:

$ gcloud auth list
Credentialed Accounts
ACTIVE             ACCOUNT
*                  example-user-1@gmail.com
                   example-user-2@gmail.com

To set the active account, run:
    $ gcloud config set account `ACCOUNT`

List the properties in your active gcloud CLI configuration:

$ gcloud config list
[core]
account = example-user-1@gmail.com
disable_usage_reporting = False
project = example-project

View information about your gcloud CLI installation and the active configuration:

$ gcloud info

Python subprocess

subprocess.call() – เก่าแล้ว Older high-level API

ใช้ subprocess.check_call() , subprocess.run() แทน

ตัวอย่าง 1

echo คำว่า test1 test2 ลงไปที่ไฟล์ /tmp/out.txt

%python
import subprocess
e = 'echo "test1 test2" > /tmp/out.txt'
subprocess.call(e, shell=True)

ตัวอย่าง 2

ตั้งชื่อไฟล์ของ log เป็นวันเวลาปัจจุบัน ไว้ใต้ /tmp แล้วใส่ข้อความ Hello World! ลงไป ด้วยการ echo

%python
import datetime
import subprocess
 
run_time = datetime.datetime.now() + datetime.timedelta(hours=7)
tmp_file = '/tmp/' + run_time.strftime("%Y-%m-%dT%H:%M:%S") + '.log'
print(tmp_file) # /tmp/2023-02-21T13:23:52.log

e = f'echo "Hello World!" >> {tmp_file}'
subprocess.call(e, shell=True)

ตรวจสอบว่าได้สร้างไฟล์ขึ้นมามั๊ย

%sh ls -l '/tmp/'

ดูเนื้อหาในไฟล์

%sh cat '/tmp/2023-02-21T13:23:52.log'

ใช้ Pandas อ่าน Text file

%python
import pandas as pd

# read text file
df = pd.read_fwf('/tmp/2023-02-21T14:55:00.log')
print(type(df))
print(df)
print(df.count())