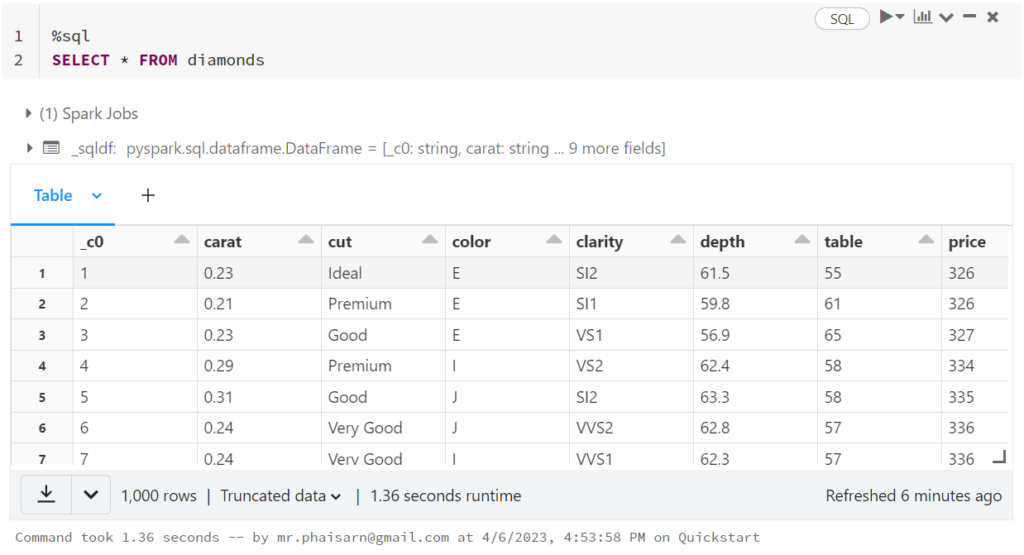
1. สร้างตาราง students
%sql
CREATE TABLE students (
  id INT, name STRING, value DOUBLE);
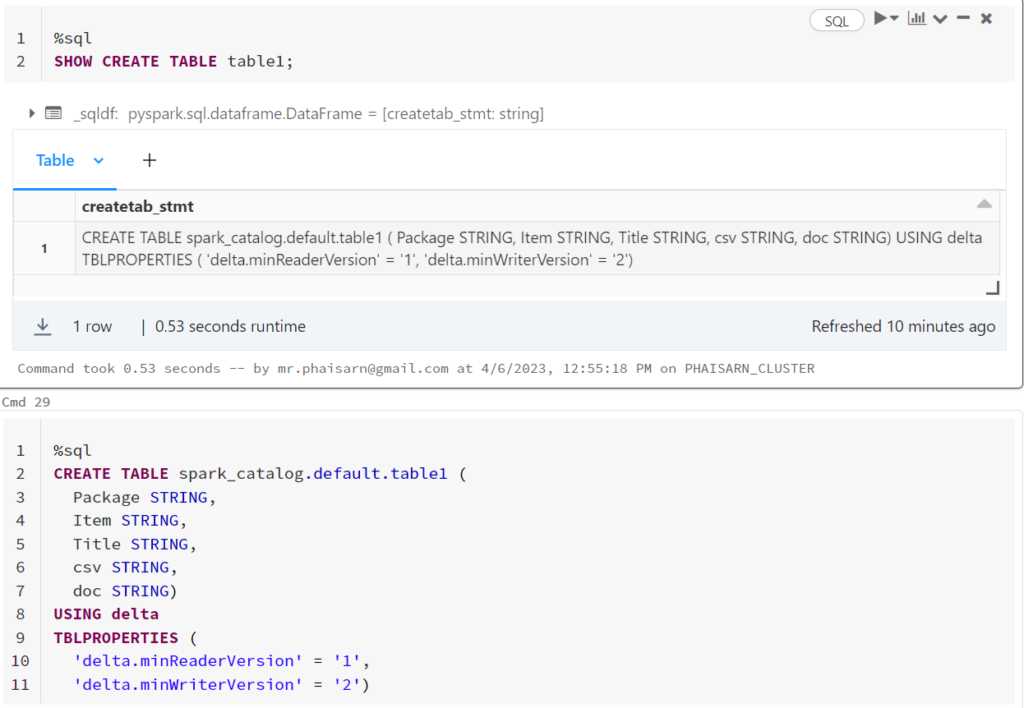
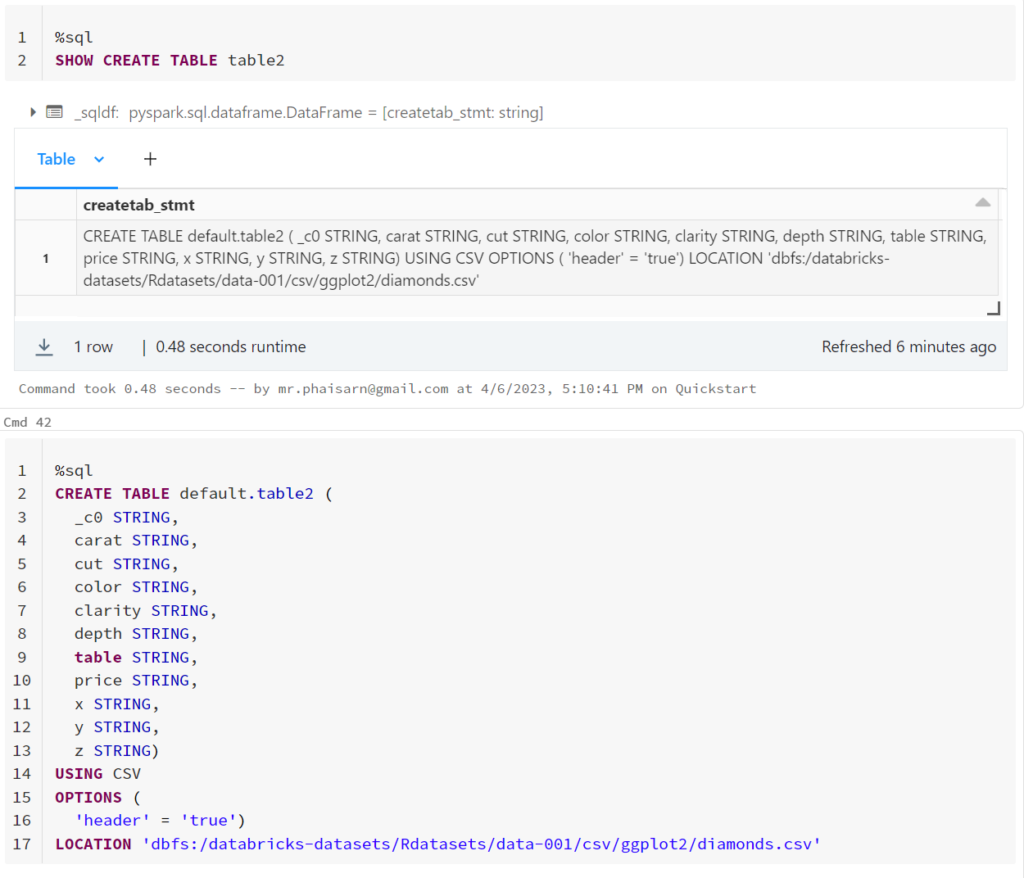
ดูคำสั่งสร้างตารางนี้ด้วย SHOW CREATE TABLE
%sql
SHOW CREATE TABLE students
%sql
CREATE TABLE spark_catalog.default.students (
  id INT,
  name STRING,
  value DOUBLE)
USING delta
TBLPROPERTIES (
  'delta.minReaderVersion' = '1',
  'delta.minWriterVersion' = '2')
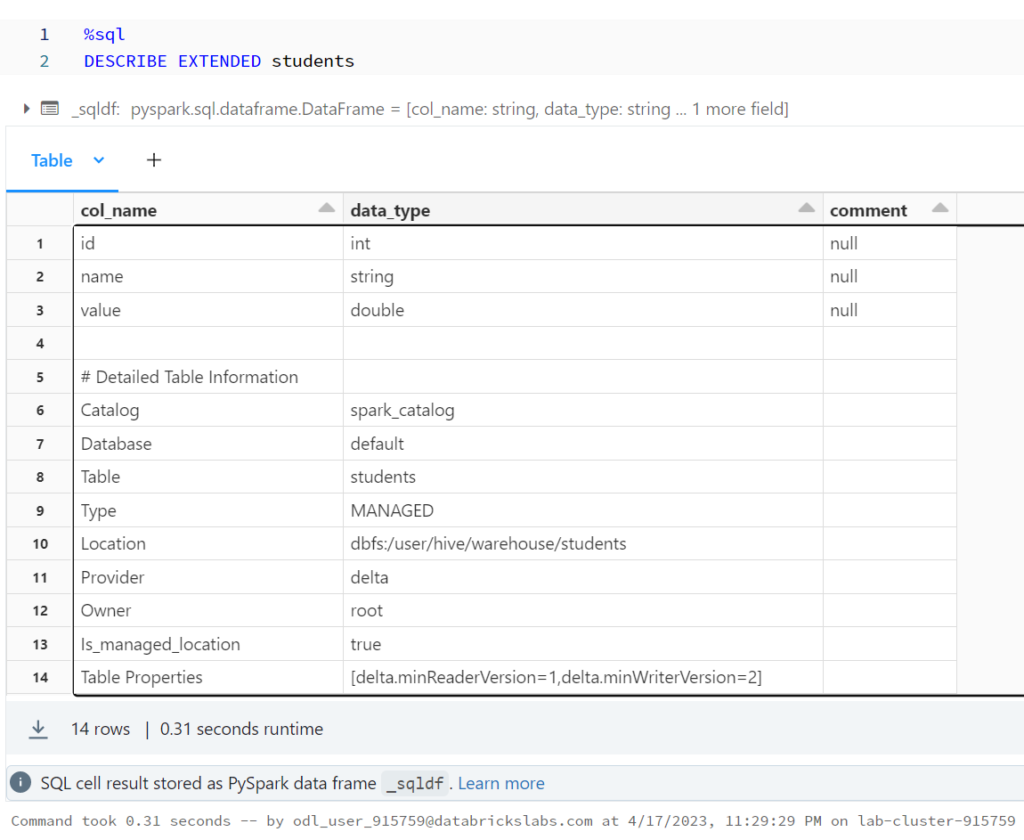
Using DESCRIBE EXTENDED allows us to see important metadata about our table.
%sql
DESCRIBE EXTENDED students
%python
df1 = spark.sql('DESCRIBE EXTENDED students')
df1.show()
+--------------------+--------------------+-------+
|            col_name|           data_type|comment|
+--------------------+--------------------+-------+
|                  id|                 int|   null|
|                name|              string|   null|
|               value|              double|   null|
|                    |                    |       |
|# Detailed Table ...|                    |       |
|             Catalog|       spark_catalog|       |
|            Database|             default|       |
|               Table|            students|       |
|                Type|             MANAGED|       |
|            Location|dbfs:/user/hive/w...|       |
|            Provider|               delta|       |
|               Owner|                root|       |
| Is_managed_location|                true|       |
|    Table Properties|[delta.minReaderV...|       |
+--------------------+--------------------+-------+
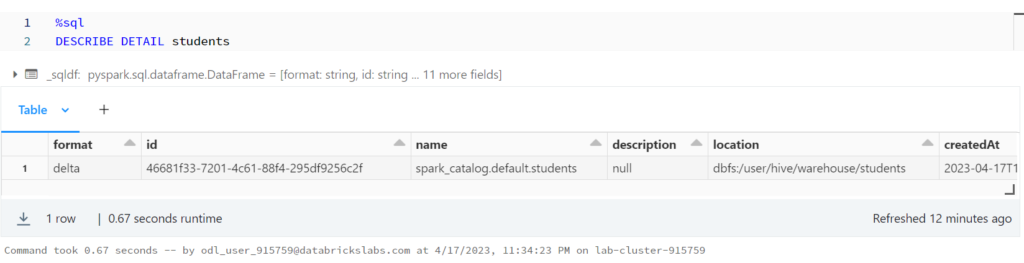
DESCRIBE DETAIL is another command that allows us to explore table metadata.
%sql
DESCRIBE DETAIL students
%python
df2 = spark.sql('DESCRIBE DETAIL students')
df2.show(vertical=True)
-RECORD 0--------------------------------
 format           | delta
 id               | 46681f33-7201-4c6...
 name             | spark_catalog.def...
 description      | null
 location         | dbfs:/user/hive/w...
 createdAt        | 2023-04-17 16:24:...
 lastModified     | 2023-04-17 16:24:32
 partitionColumns | []
 numFiles         | 0
 sizeInBytes      | 0
 properties       | {}
 minReaderVersion | 1
 minWriterVersion | 2
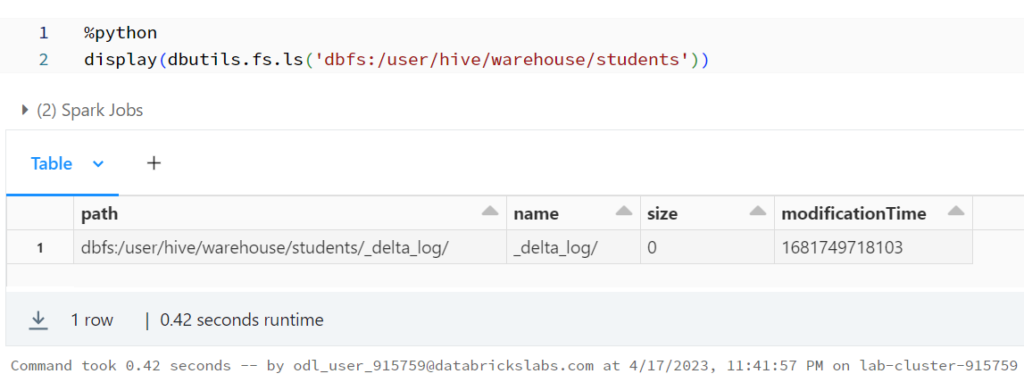
ดู Delta Lake Files
%python
display(dbutils.fs.ls('dbfs:/user/hive/warehouse/students'))
%python
li_file = dbutils.fs.ls('dbfs:/user/hive/warehouse/students')
df3 = sqlContext.createDataFrame(li_file)
df3.show()
+--------------------+--------------------+----+----------------+
|                path|                name|size|modificationTime|
+--------------------+--------------------+----+----------------+
|dbfs:/user/hive/w...|         _delta_log/|   0|   1681750558289|
+--------------------+--------------------+----+----------------+
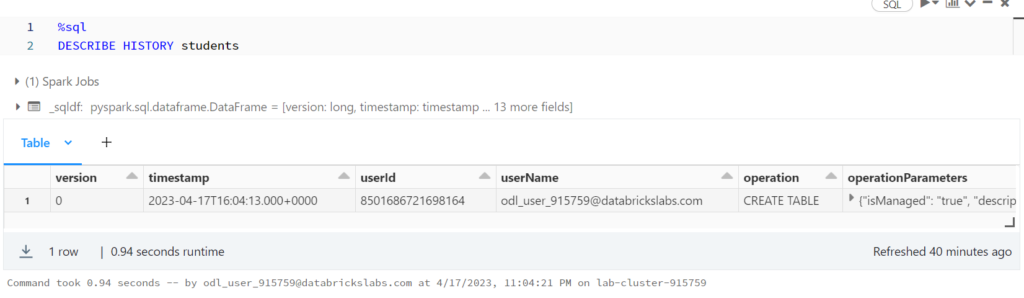
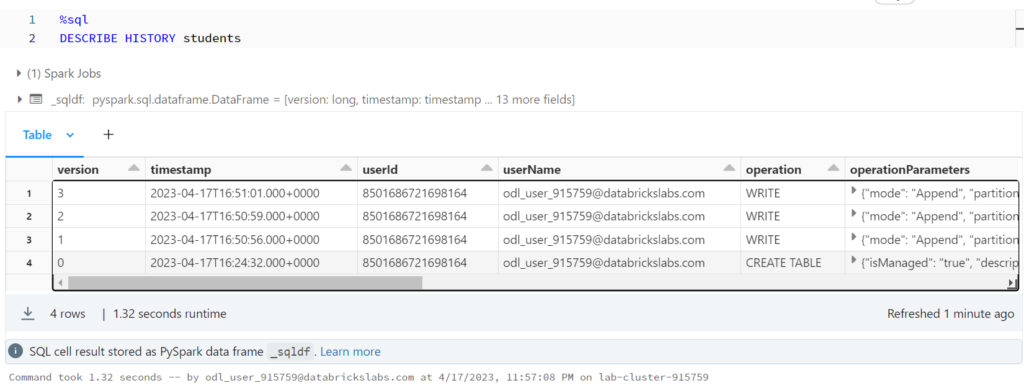
Reviewing Delta Lake Transactions
%sql
DESCRIBE HISTORY students
%python
df4 = spark.sql('DESCRIBE HISTORY students')
df4.show(vertical=True)
-RECORD 0-----------------------------------
 version             | 0
 timestamp           | 2023-04-17 16:24:32
 userId              | 8501686721698164
 userName            | odl_user_915759@d...
 operation           | CREATE TABLE
 operationParameters | {isManaged -> tru...
 job                 | null
 notebook            | {1477724271071511}
 clusterId           | 0415-162149-6ai590aw
 readVersion         | null
 isolationLevel      | WriteSerializable
 isBlindAppend       | true
 operationMetrics    | {}
 userMetadata        | null
 engineInfo          | Databricks-Runtim...
2. เพิ่มข้อมูล 3 ครั้ง
%sql
INSERT INTO students VALUES (1, "Yve", 1.0);
INSERT INTO students VALUES (2, "Omar", 2.5);
INSERT INTO students VALUES (3, "Elia", 3.3);
%python
df2 = spark.sql('DESCRIBE DETAIL students')
df2.show(vertical=True)
RECORD 0--------------------------------
 format           | delta
 id               | 46681f33-7201-4c6...
 name             | spark_catalog.def...
 description      | null
 location         | dbfs:/user/hive/w...
 createdAt        | 2023-04-17 16:24:...
 lastModified     | 2023-04-17 16:51:01
 partitionColumns | []
 numFiles         | 3
 sizeInBytes      | 2613
 properties       | {}
 minReaderVersion | 1
 minWriterVersion | 2
%python
li_file = dbutils.fs.ls('dbfs:/user/hive/warehouse/students')
df3 = sqlContext.createDataFrame(li_file)
df3.show()
+--------------------+--------------------+----+----------------+
|                path|                name|size|modificationTime|
+--------------------+--------------------+----+----------------+
|dbfs:/user/hive/w...|         _delta_log/|   0|   1681750558289|
|dbfs:/user/hive/w...|part-00000-1d6df3...| 868|   1681750256000|
|dbfs:/user/hive/w...|part-00000-57bc12...| 872|   1681750261000|
|dbfs:/user/hive/w...|part-00000-ec8db3...| 873|   1681750259000|
+--------------------+--------------------+----+----------------+
%python
display(spark.sql(f"SELECT * FROM json.`dbfs:/user/hive/warehouse/students/_delta_log/00000000000000000001.json`"))

รันคำสั่งนี้จะ error
%sql
SELECT * FROM parquet.`dbfs:/user/hive/warehouse/students/part-00000-1d6df344-3187-42fd-8591-df4ed47b403f.c000.snappy.parquet`
AnalysisException: Incompatible format detected.

A transaction log for Delta was found at `dbfs:/user/hive/warehouse/students/_delta_log`,
but you are trying to read from `dbfs:/user/hive/warehouse/students/part-00000-57bc1277-813b-41c0-990d-4ba8fd05c9b1.c000.snappy.parquet` using format("parquet"). You must use
'format("delta")' when reading and writing to a delta table.

To disable this check, SET spark.databricks.delta.formatCheck.enabled=false
To learn more about Delta, see https://docs.databricks.com/delta/index.html; line 1 pos 14
ให้ SET ค่านี้ก่อน
%sql
SET spark.databricks.delta.formatCheck.enabled=false
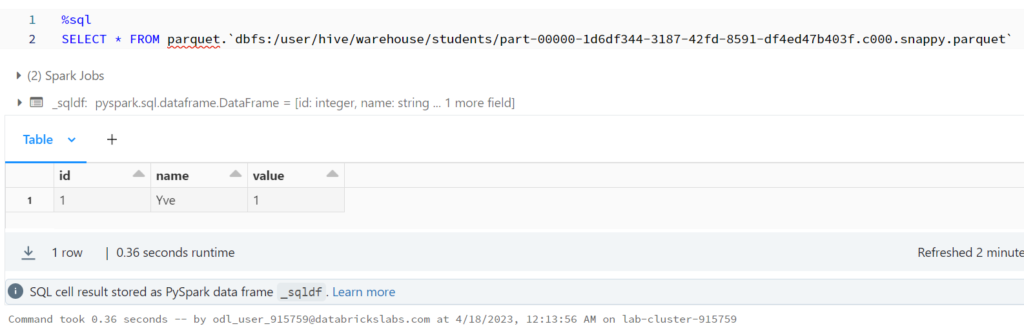
รันใหม่จะได้ละ
%sql
SELECT * FROM parquet.`dbfs:/user/hive/warehouse/students/part-00000-1d6df344-3187-42fd-8591-df4ed47b403f.c000.snappy.parquet`