$ sudo ufw app list
Available applications:
  Apache
  Apache Full
  Apache Secure
  OpenSSH
As indicated by the output, there are three profiles available for Apache:
Apache: This profile opens only port 80 (normal, unencrypted web traffic)
Apache Full: This profile opens both port 80 (normal, unencrypted web traffic) and port 443 (TLS/SSL encrypted traffic)
Apache Secure: This profile opens only port 443 (TLS/SSL encrypted traffic)
It is recommended that you enable the most restrictive profile that will still allow the traffic you’ve configured. Since we haven’t configured SSL for our server yet in this guide, we will only need to allow traffic on port 80:
WSL 2 ติดตั้งได้บน Windows 11 หรือ Windows 10 version 2004+ (Build 19041 and higher)
การติดตั้ง WSL 2
Open PowerShell or Windows Command Prompt in administrator mode by right-clicking and selecting “Run as administrator“
Enter the command: wsl --install
You’ll need to restart your machine following this installation process to begin using WSL.
คำสั่ง wsl --install จะติดตั้ง Ubuntu distribution เป็นค่า default แต่เราสามารถติดตั้ง Linux distributions อื่นได้
ดู Linux distribution ที่มีใน Microsoft Store ใช้คำสั่ง wsl --list --online
> wsl --list --online
The following is a list of valid distributions that can be installed.
Install using 'wsl.exe --install <Distro>'.

NAME                                   FRIENDLY NAME
Ubuntu                                 Ubuntu
Debian                                 Debian GNU/Linux
kali-linux                             Kali Linux Rolling
Ubuntu-18.04                           Ubuntu 18.04 LTS
Ubuntu-20.04                           Ubuntu 20.04 LTS
Ubuntu-22.04                           Ubuntu 22.04 LTS
OracleLinux_8_5                        Oracle Linux 8.5
OracleLinux_7_9                        Oracle Linux 7.9
SUSE-Linux-Enterprise-Server-15-SP4    SUSE Linux Enterprise Server 15 SP4
openSUSE-Leap-15.4                     openSUSE Leap 15.4
openSUSE-Tumbleweed                    openSUSE Tumbleweed
เลือก Linux distribution ที่จะติดตั้งด้วยคำสั่ง wsl --install --distribution <Distribution Name>
เปลี่ยน default Linux distribution ด้วย wsl --set-default <Distribution Name>
ที่ PowerShell เปิด Bash command line ไปที่ home directory ด้วย wsl ~ หรือ เปิด Bash command line โดยยังอยู่ที่พาทเดิมด้วย wsl และออกจาก Bash ด้วย exit
ที่ Bash เรียก Windows File Explorer ให้ชี้ไปที่ current directory path ด้วย explorer.exe . (อย่าลืมพิมพ์จุดด้วย)
คำสั่งของ Ubuntu ใน WSL2
คำสั่ง systemctl ใช้ไม่ได้
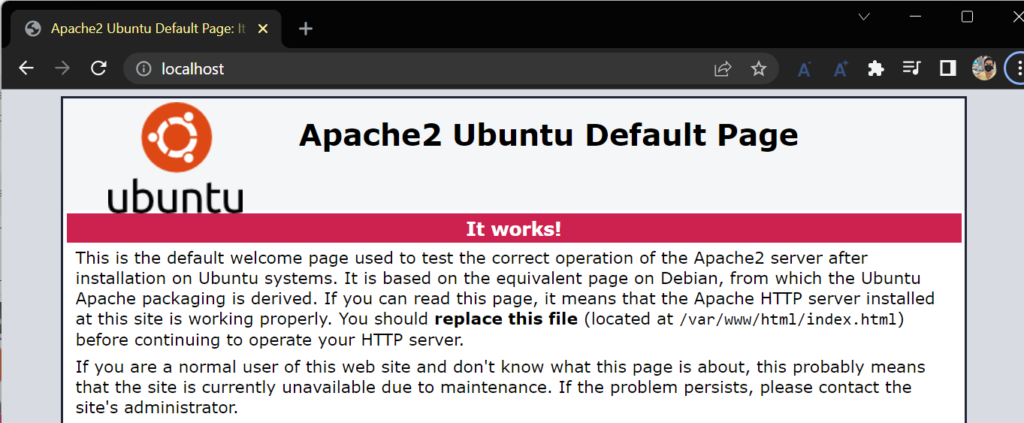
$ sudo systemctl status apache2
[sudo] password for jack:
System has not been booted with systemd as init system (PID 1). Can't operate.
Failed to connect to bus: Host is down
> wsl -l
Windows Subsystem for Linux Distributions:
Ubuntu (Default)
Show detailed information about all distributions
> wsl -l -v
NAME STATE VERSION
* Ubuntu Stopped 2
> wsl -l -v
  NAME      STATE           VERSION
* Ubuntu    Running         2
Prerequisites
You must be running Windows 10 version 2004 and higher (Build 19041 and higher) or Windows 11.
Install WSL command
You can now install everything you need to run Windows Subsystem for Linux (WSL) by entering this command in an administrator PowerShell or Windows Command Prompt and then restarting your machine.
wsl --install
This command will enable the required optional components, download the latest Linux kernel, set WSL 2 as your default, and install a Linux distribution for you (Ubuntu by default, see below to change this).
The first time you launch a newly installed Linux distribution, a console window will open and you’ll be asked to wait for files to de-compress and be stored on your machine. All future launches should take less than a second.
Basic commands for WSL
Install a specific Linux distribution
wsl --install --distribution <Distribution Name>
Designate a distribution of Linux for installation besides the default (Ubuntu) by replacing <Distribution Name> with the name of the distribution. This command can also be entered as: wsl -d <Distribution Name>.
List available Linux distributions
> wsl --list --online
The following is a list of valid distributions that can be installed.
The default distribution is denoted by '*'.
Install using 'wsl --install -d <Distro>'.

  NAME            FRIENDLY NAME
* Ubuntu          Ubuntu
  Debian          Debian GNU/Linux
  kali-linux      Kali Linux Rolling
  openSUSE-42     openSUSE Leap 42
  SLES-12         SUSE Linux Enterprise Server v12
  Ubuntu-16.04    Ubuntu 16.04 LTS
  Ubuntu-18.04    Ubuntu 18.04 LTS
  Ubuntu-20.04    Ubuntu 20.04 LTS
See a list of the Linux distributions available through the online store. This command can also be entered as: wsl -l -o.
List installed Linux distributions
> wsl --list --verbose
  NAME      STATE           VERSION
* Ubuntu    Running         2
See a list of the Linux distributions installed on your Windows machine, including the state (whether the distribution is running or stopped) and the version of WSL running the distribution (WSL 1 or WSL 2). Comparing WSL 1 and WSL 2. This command can also be entered as: wsl -l -v. Additional options that can be used with the list command include: --all to list all distributions, --running to list only distributions that are currently running, or --quiet to only show distribution names.
Check WSL status
> wsl --status
Default Distribution: Ubuntu
Default Version: 2

Windows Subsystem for Linux was last updated on 15-Jul-22
The Windows Subsystem for Linux kernel can be manually updated with 'wsl --update', but automatic updates cannot occur due to your system settings.
To receive automatic kernel updates, please enable the Windows Update setting: 'Receive updates for other Microsoft products when you update Windows'.
For more information please visit https://aka.ms/wsl2kernel.

Kernel version: 5.10.16
See general information about your WSL configuration, such as default distribution type, default distribution, and kernel version.
Update WSL
wsl --update
Manually update the version of your WSL Linux kernel. You can also use the command: wsl --update rollback to rollback to a previous version of the WSL Linux kernel.
Shutdown
wsl --shutdown
Immediately terminates all running distributions and the WSL 2 lightweight utility virtual machine. This command may be necessary in instances that require you to restart the WSL 2 virtual machine environment, such as changing memory usage limits or making a change to your .wslconfig file.
Terminate
wsl --terminate <Distribution Name>
To terminate the specified distribution, or stop it from running, replace <Distribution Name> with the name of the targeted distribution.
Help command
> wsl --help
Copyright (c) Microsoft Corporation. All rights reserved.

Usage: wsl.exe [Argument] [Options...] [CommandLine]

Arguments for running Linux binaries:

    If no command line is provided, wsl.exe launches the default shell.

    --exec, -e <CommandLine>
        Execute the specified command without using the default Linux shell.

    --
        Pass the remaining command line as is.

Options:
    --cd <Directory>
        Sets the specified directory as the current working directory.
        If ~ is used the Linux user's home path will be used. If the path begins
        with a / character, it will be interpreted as an absolute Linux path.
        Otherwise, the value must be an absolute Windows path.

    --distribution, -d <Distro>
        Run the specified distribution.

    --user, -u <UserName>
        Run as the specified user.

    --system
        Launches a shell for the system distribution.

Arguments for managing Windows Subsystem for Linux:

    --help
        Display usage information.

    --install [Options]
        Install additional Windows Subsystem for Linux distributions.
        For a list of valid distributions, use 'wsl --list --online'.

        Options:
            --distribution, -d [Argument]
                Downloads and installs a distribution by name.

                Arguments:
                    A valid distribution name (not case sensitive).

                Examples:
                    wsl --install -d Ubuntu
                    wsl --install --distribution Debian

    --set-default-version <Version>
        Changes the default install version for new distributions.

    --shutdown
        Immediately terminates all running distributions and the WSL 2
        lightweight utility virtual machine.

    --status
        Show the status of Windows Subsystem for Linux.

    --update [Options]
        If no options are specified, the WSL 2 kernel will be updated
        to the latest version.

        Options:
            --rollback
                Revert to the previous version of the WSL 2 kernel.

Arguments for managing distributions in Windows Subsystem for Linux:

    --export <Distro> <FileName>
        Exports the distribution to a tar file.
        The filename can be - for standard output.

    --import <Distro> <InstallLocation> <FileName> [Options]
        Imports the specified tar file as a new distribution.
        The filename can be - for standard input.

        Options:
            --version <Version>
                Specifies the version to use for the new distribution.

    --list, -l [Options]
        Lists distributions.

        Options:
            --all
                List all distributions, including distributions that are
                currently being installed or uninstalled.

            --running
                List only distributions that are currently running.

            --quiet, -q
                Only show distribution names.

            --verbose, -v
                Show detailed information about all distributions.

            --online, -o
                Displays a list of available distributions for install with 'wsl --install'.

    --set-default, -s <Distro>
        Sets the distribution as the default.

    --set-version <Distro> <Version>
        Changes the version of the specified distribution.

    --terminate, -t <Distro>
        Terminates the specified distribution.

    --unregister <Distro>
        Unregisters the distribution and deletes the root filesystem.

    --mount <Disk>
        Attaches and mounts a physical disk in all WSL2 distributions.

        Options:
            --bare
                Attach the disk to WSL2, but don't mount it.

            --type <Type>
                Filesystem to use when mounting a disk, if not specified defaults to ext4.

            --options <Options>
                Additional mount options.

            --partition <Index>
                Index of the partition to mount, if not specified defaults to the whole disk.

    --unmount [Disk]
        Unmounts and detaches a disk from all WSL2 distributions.
        Unmounts and detaches all disks if called without argument.
ขั้นตอนการติดตั้ง WSL 2 สำหรับ Windows 10 ที่ Build ต่ำกว่า 19041
1.update Windows ให้เป็นเวอร์ชันล่าสุด (1909) , ตรวจสอบเวอร์ชันด้วยคำสั่ง winver
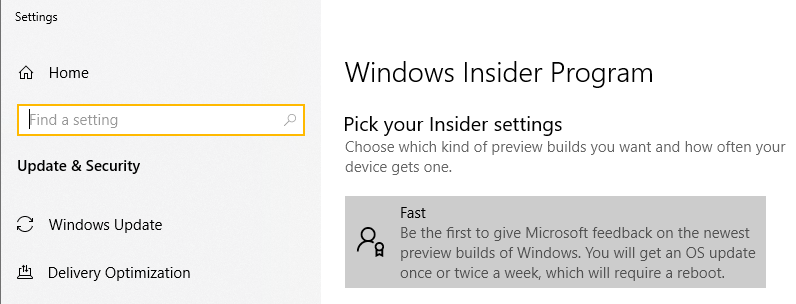
2.เปิด Windows Insider Program Settings แล้วเลือก Fast
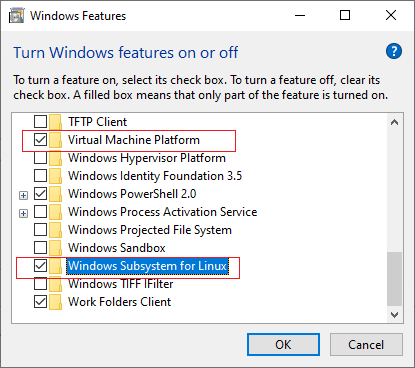
3.เปิด Turn Windows features on or off เลือก Windows Subsystem for Linux และ Virtual Machine Platform