การสร้าง/ให้ค่า environment variable บน Windows
set LOCALPATH=C:\TMP\
set FILENAME=dummy.parquet
ลอง echo ค่า environment variable ออกมาดู
echo %LOCALPATH%%FILENAME%

การสร้าง/ให้ค่า environment variable บน Windows
set LOCALPATH=C:\TMP\ set FILENAME=dummy.parquet
ลอง echo ค่า environment variable ออกมาดู
echo %LOCALPATH%%FILENAME%
You can use PowerToys Keyboard Manager to map Windows shortcuts to the shortcuts you use on a Mac.
| Operation | Mac | Windows |
|---|---|---|
| Copy | Command+C | Ctrl+C |
| Cut | Command+X | Ctrl+X |
| Paste | Command+V | Ctrl+V |
| Undo | Command+Z | Ctrl+Z |
| Save | Command+S | Ctrl+S |
| Open | Command+O | Ctrl+O |
| Lock computer | Command+Control+Q | WindowsKey+L |
| Show desktop | Command+F3 | WindowsKey+D |
| Open file browser | Command+N | WindowsKey+E |
| Minimize windows | Command+M | WindowsKey+M |
| Search | Command+Space | WindowsKey |
| Close active window | Command+W | Control+W |
| Switch current task | Command+Tab | Alt+Tab |
| Maximize a window to full screen | Control+Command+F | WindowsKey+Up |
| Save screen (Screenshot) | Command+Shift+3 | WindowsKey+Shift+S |
| Save window | Command+Shift+4 | WindowsKey+Shift+S |
| View item information or properties | Command+I | Alt+Enter |
| Select all items | Command+A | Ctrl+A |
| Select more than one item in a list (noncontiguous) | Command, then click each item | Control, then click each item |
| Type special characters | Option+ character key | Alt+ character key |
Some of these shortcuts require a “Precision Trackpad”, such as the trackpad on Surface devices and some other third-party laptops.
Trackpad options are configurable on both platforms.
| Operation | Mac | Windows |
|---|---|---|
| Scroll | Two finger vertical swipe | Two finger vertical swipe |
| Zoom | Two finger pinch in and out | Two finger pinch in and out |
| Swipe back and forward between views | Two finger sideways swipe | Two finger sideways swipe |
| Switch virtual workspaces | Four fingers sideways swipe | Four fingers sideways swipe |
| Display currently open apps | Four fingers upward swipe | Three fingers upward swipe |
| Switch between apps | N/A | Slow three finger sideways swipe |
| Go to desktop | Spread out four fingers | Three finger swipe downwards |
| Open Cortana / Action center | Two finger slide from right | Three finger tap |
| Open extra information | Three finger tap | N/A |
| Show launchpad / start an app | Pinch with four fingers | Tap with four fingers |
Windows Terminal requires Windows 10 2004 (build 19041) or later
Install the Windows Terminal from the Microsoft Store. This allows you to always be on the latest version when we release new builds with automatic upgrades.
winget users can download and install the latest Terminal release by installing the Microsoft.WindowsTerminal package:
> winget install --id=Microsoft.WindowsTerminal -e
The `msstore` source requires that you view the following agreements before using.
Terms of Transaction: https://aka.ms/microsoft-store-terms-of-transaction
The source requires the current machine's 2-letter geographic region to be sent to the backend service to function properly (ex. "US").

Do you agree to all the source agreements terms?
[Y] Yes  [N] No: y
Found Windows Terminal [Microsoft.WindowsTerminal] Version 1.13.11431.0
This application is licensed to you by its owner.
Microsoft is not responsible for, nor does it grant any licenses to, third-party packages.
Successfully verified installer hash
Starting package install...
  ██████████████████████████████  100%
Successfully installed
กด Windows + S แล้วพิมพ์ cmd แล้วคลิกขวาเลือก Run Administrator แล้วพิมพ์คำสั่ง
powercfg -h off
แต่ถ้าเจอแค่ OpenSSH Client ไม่เจอ OpenSSH Server ให้ติดตั้งด้วย PowerShell
To install OpenSSH using PowerShell, run PowerShell as an Administrator. To make sure that OpenSSH is available, run the following cmdlet:
Get-WindowsCapability -Online | Where-Object Name -like 'OpenSSH*'
This should return the following output if neither are already installed:
Name  : OpenSSH.Client~~~~0.0.1.0
State : NotPresent

Name  : OpenSSH.Server~~~~0.0.1.0
State : NotPresent
Then, install the server or client components as needed:
# Install the OpenSSH Client
Add-WindowsCapability -Online -Name OpenSSH.Client~~~~0.0.1.0

# Install the OpenSSH Server
Add-WindowsCapability -Online -Name OpenSSH.Server~~~~0.0.1.0
Both of these should return the following output:
Path          :
Online        : True
RestartNeeded : False
To start and configure OpenSSH Server for initial use, open PowerShell as an administrator, then run the following commands
# Start the sshd service
Start-Service sshd

# OPTIONAL but recommended:
Set-Service -Name sshd -StartupType 'Automatic'

# Confirm the Firewall rule is configured. It should be created automatically by setup. Run the following to verify
if (!(Get-NetFirewallRule -Name "OpenSSH-Server-In-TCP" -ErrorAction SilentlyContinue | Select-Object Name, Enabled)) {
    Write-Output "Firewall Rule 'OpenSSH-Server-In-TCP' does not exist, creating it..."
    New-NetFirewallRule -Name 'OpenSSH-Server-In-TCP' -DisplayName 'OpenSSH Server (sshd)' -Enabled True -Direction Inbound -Protocol TCP -Action Allow -LocalPort 22
} else {
    Write-Output "Firewall rule 'OpenSSH-Server-In-TCP' has been created and exists."
}
Lists distributions
> wsl -l
Windows Subsystem for Linux Distributions:
Ubuntu (Default)
Show detailed information about all distributions
> wsl -l -v
  NAME      STATE           VERSION
* Ubuntu    Stopped         2

> wsl -l -v
  NAME      STATE           VERSION
* Ubuntu    Running         2
You must be running Windows 10 version 2004 and higher (Build 19041 and higher) or Windows 11.
You can now install everything you need to run Windows Subsystem for Linux (WSL) by entering this command in an administrator PowerShell or Windows Command Prompt and then restarting your machine.
wsl --install
This command will enable the required optional components, download the latest Linux kernel, set WSL 2 as your default, and install a Linux distribution for you (Ubuntu by default, see below to change this).
The first time you launch a newly installed Linux distribution, a console window will open and you’ll be asked to wait for files to de-compress and be stored on your machine. All future launches should take less than a second.
Install a specific Linux distribution
wsl --install --distribution <Distribution Name>
Designate a distribution of Linux for installation besides the default (Ubuntu) by replacing <Distribution Name> with the name of the distribution. This command can also be entered as: wsl -d <Distribution Name>.
List available Linux distributions
> wsl --list --online
The following is a list of valid distributions that can be installed.
The default distribution is denoted by '*'.
Install using 'wsl --install -d <Distro>'.

  NAME            FRIENDLY NAME
* Ubuntu          Ubuntu
  Debian          Debian GNU/Linux
  kali-linux      Kali Linux Rolling
  openSUSE-42     openSUSE Leap 42
  SLES-12         SUSE Linux Enterprise Server v12
  Ubuntu-16.04    Ubuntu 16.04 LTS
  Ubuntu-18.04    Ubuntu 18.04 LTS
  Ubuntu-20.04    Ubuntu 20.04 LTS
See a list of the Linux distributions available through the online store. This command can also be entered as: wsl -l -o.
List installed Linux distributions
> wsl --list --verbose
  NAME      STATE           VERSION
* Ubuntu    Running         2
See a list of the Linux distributions installed on your Windows machine, including the state (whether the distribution is running or stopped) and the version of WSL running the distribution (WSL 1 or WSL 2). Comparing WSL 1 and WSL 2. This command can also be entered as: wsl -l -v. Additional options that can be used with the list command include: --all to list all distributions, --running to list only distributions that are currently running, or --quiet to only show distribution names.
Check WSL status
> wsl --status
Default Distribution: Ubuntu
Default Version: 2

Windows Subsystem for Linux was last updated on 15-Jul-22
The Windows Subsystem for Linux kernel can be manually updated with 'wsl --update', but automatic updates cannot occur due to your system settings.
To receive automatic kernel updates, please enable the Windows Update setting: 'Receive updates for other Microsoft products when you update Windows'.
For more information please visit https://aka.ms/wsl2kernel.

Kernel version: 5.10.16
See general information about your WSL configuration, such as default distribution type, default distribution, and kernel version.
Update WSL
wsl --update
Manually update the version of your WSL Linux kernel. You can also use the command: wsl --update rollback to rollback to a previous version of the WSL Linux kernel.
Shutdown
wsl --shutdown
Immediately terminates all running distributions and the WSL 2 lightweight utility virtual machine. This command may be necessary in instances that require you to restart the WSL 2 virtual machine environment, such as changing memory usage limits or making a change to your .wslconfig file.
Terminate
wsl --terminate <Distribution Name>
To terminate the specified distribution, or stop it from running, replace <Distribution Name> with the name of the targeted distribution.
Help command
> wsl --help
Copyright (c) Microsoft Corporation. All rights reserved.

Usage: wsl.exe [Argument] [Options...] [CommandLine]

Arguments for running Linux binaries:

    If no command line is provided, wsl.exe launches the default shell.

    --exec, -e <CommandLine>
        Execute the specified command without using the default Linux shell.

    --
        Pass the remaining command line as is.

Options:
    --cd <Directory>
        Sets the specified directory as the current working directory.
        If ~ is used the Linux user's home path will be used. If the path begins
        with a / character, it will be interpreted as an absolute Linux path.
        Otherwise, the value must be an absolute Windows path.

    --distribution, -d <Distro>
        Run the specified distribution.

    --user, -u <UserName>
        Run as the specified user.

    --system
        Launches a shell for the system distribution.

Arguments for managing Windows Subsystem for Linux:

    --help
        Display usage information.

    --install [Options]
        Install additional Windows Subsystem for Linux distributions.
        For a list of valid distributions, use 'wsl --list --online'.

        Options:
            --distribution, -d [Argument]
                Downloads and installs a distribution by name.

                Arguments:
                    A valid distribution name (not case sensitive).

                Examples:
                    wsl --install -d Ubuntu
                    wsl --install --distribution Debian

    --set-default-version <Version>
        Changes the default install version for new distributions.

    --shutdown
        Immediately terminates all running distributions and the WSL 2
        lightweight utility virtual machine.

    --status
        Show the status of Windows Subsystem for Linux.

    --update [Options]
        If no options are specified, the WSL 2 kernel will be updated
        to the latest version.

        Options:
            --rollback
                Revert to the previous version of the WSL 2 kernel.

Arguments for managing distributions in Windows Subsystem for Linux:

    --export <Distro> <FileName>
        Exports the distribution to a tar file.
        The filename can be - for standard output.

    --import <Distro> <InstallLocation> <FileName> [Options]
        Imports the specified tar file as a new distribution.
        The filename can be - for standard input.

        Options:
            --version <Version>
                Specifies the version to use for the new distribution.

    --list, -l [Options]
        Lists distributions.

        Options:
            --all
                List all distributions, including distributions that are
                currently being installed or uninstalled.

            --running
                List only distributions that are currently running.

            --quiet, -q
                Only show distribution names.

            --verbose, -v
                Show detailed information about all distributions.

            --online, -o
                Displays a list of available distributions for install with 'wsl --install'.

    --set-default, -s <Distro>
        Sets the distribution as the default.

    --set-version <Distro> <Version>
        Changes the version of the specified distribution.

    --terminate, -t <Distro>
        Terminates the specified distribution.

    --unregister <Distro>
        Unregisters the distribution and deletes the root filesystem.

    --mount <Disk>
        Attaches and mounts a physical disk in all WSL2 distributions.

        Options:
            --bare
                Attach the disk to WSL2, but don't mount it.

            --type <Type>
                Filesystem to use when mounting a disk, if not specified defaults to ext4.

            --options <Options>
                Additional mount options.

            --partition <Index>
                Index of the partition to mount, if not specified defaults to the whole disk.

    --unmount [Disk]
        Unmounts and detaches a disk from all WSL2 distributions.
        Unmounts and detaches all disks if called without argument.
1.update Windows ให้เป็นเวอร์ชันล่าสุด (1909) , ตรวจสอบเวอร์ชันด้วยคำสั่ง winver
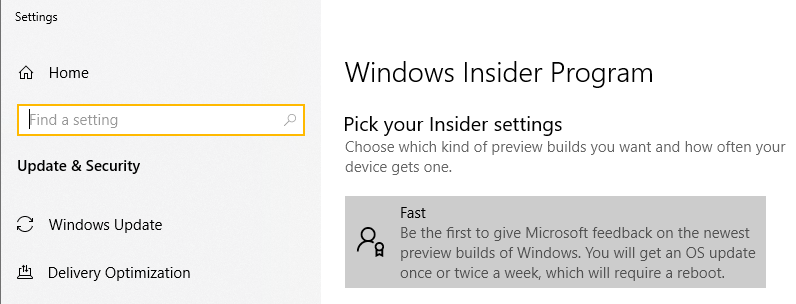
2.เปิด Windows Insider Program Settings แล้วเลือก Fast
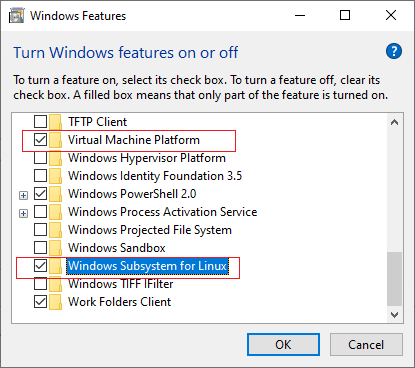
3.เปิด Turn Windows features on or off เลือก Windows Subsystem for Linux และ Virtual Machine Platform
4.เปิด Microsoft Store เลือกติดตั้ง Ubuntu 18.04
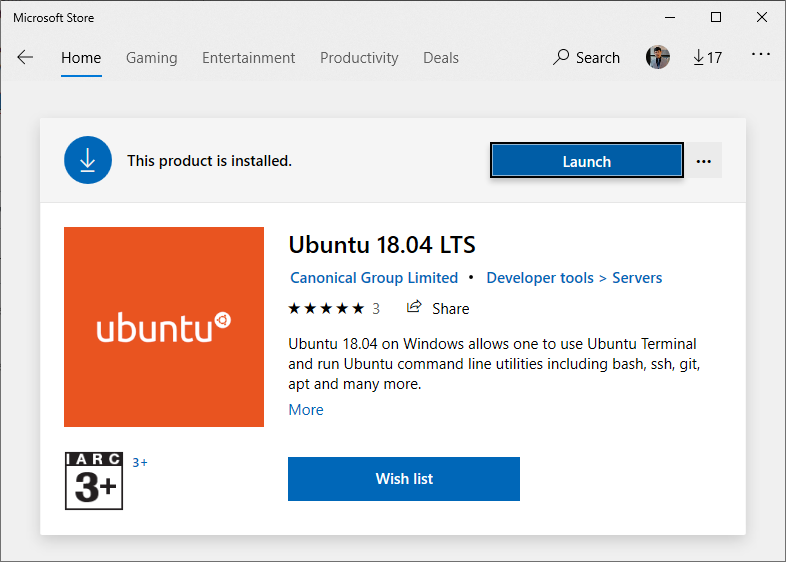
หลังจากติดตั้งเสร็จ จะให้เราตั้ง username และ password
5.เปิด Power Shell
list ดู Distro ที่ติดตั้ง
> wsl -l
Windows Subsystem for Linux Distributions:
Ubuntu-18.04 (Default)
กำหนดให้ Ubuntu-18.04 ที่พึ่งติดตั้ง ใช้ WSL 2
> wsl --set-version Ubuntu-18.04 2
กำหนดให้ default เป็นเวอร์ชัน 2 เลย
> wsl --set-default-version 2
ตรวจสอบดูว่าเป็น version 2 แล้วหรือยัง
> wsl -l -v
  NAME            STATE           VERSION
* Ubuntu-18.04    Stopped         2
ถ้ารันแล้วไม่เจอคำสั่ง -v แสดงว่ายังเป็น WSL 1
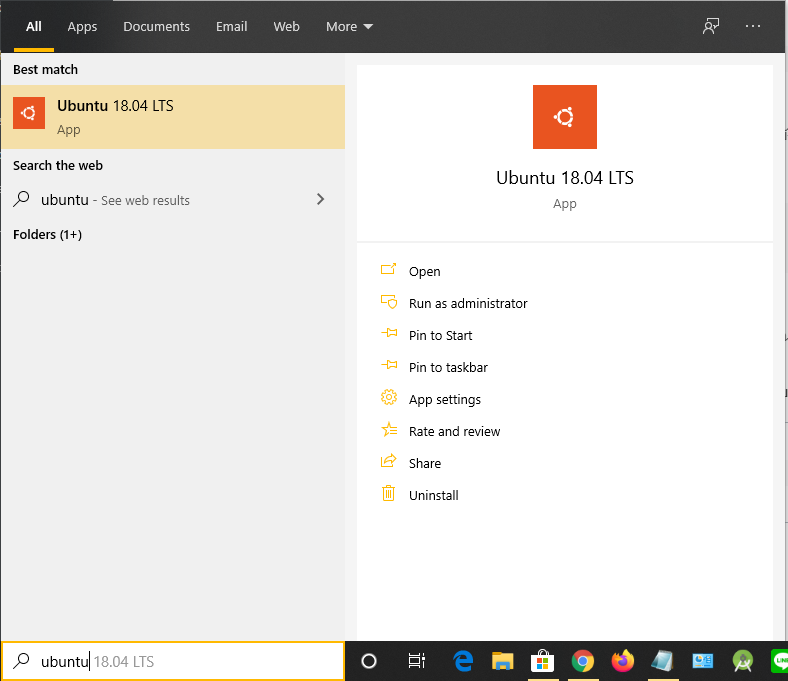
6.กลับมาที่ app Ubuntu18.04 แล้วลองเรียก VS Code
> wsl -d Ubuntu-18.04
หรือ
$ code .
เปิด cmd แล้วพิมพ์
> ver
Microsoft Windows [Version 10.0.19551.1005]
นำเลข build ที่ได้ไปเทียบดูเวอร์ชันที่ Windows 10 release information
| Version | Availability date | OS build | Latest revision date |
| 1909 | 12-11-19 | 18363.592 | 14-01-20 |
| 1903 | 21-05-19 | 18362.592 | 14-01-20 |
| 1809 | 28-03-19 | 17763.101 | 23-01-20 |
| 1809 | 13-11-18 | 17763.101 | 23-01-20 |
| 1803 | 10-07-18 | 17134.128 | 23-01-20 |
| 1803 | 30-04-18 | 17134.128 | 23-01-20 |
| 1709 | 18-01-18 | 16299.165 | 23-01-20 |
| 1709 | 17-10-17 | 16299.165 | 23-01-20 |
หรือดู Version จากค่า register
> Reg Query "HKLM\SOFTWARE\Microsoft\Windows NT\CurrentVersion" /v ReleaseId
HKEY_LOCAL_MACHINE\SOFTWARE\Microsoft\Windows NT\CurrentVersion
    ReleaseId    REG_SZ    2004
ดูด้วย GUI ง่ายสุด เปิด cmd หรือกด Win+R แล้วพิมพ์
> winver
