ติดตั้ง Apache Spark บน Ubuntu 22.04

ติดตั้ง java

update packages

$ sudo apt update

ติดตั้ง Java JDK (openjdk)

$ sudo apt install default-jdk

ตรวจสอบการติดตั้งบน Ubuntu 22.04.2

$ java --version
openjdk 11.0.19 2023-04-18
OpenJDK Runtime Environment (build 11.0.19+7-post-Ubuntu-0ubuntu122.04.1)
OpenJDK 64-Bit Server VM (build 11.0.19+7-post-Ubuntu-0ubuntu122.04.1, mixed mode, sharing)

ติดตั้ง Apache Spark

ติดตั้ง package curl , mlocate , git , scala

$ sudo apt install curl mlocate git scala 

ดาว์นโหลด Apache Spark จาก Download Apache Spark™

$ wget https://dlcdn.apache.org/spark/spark-3.3.2/spark-3.3.2-bin-hadoop3.tgz

แตกไฟล์

$ tar xvf spark-3.3.2-bin-hadoop3.tgz

ย้ายไฟล์

$ sudo mv spark-3.3.2-bin-hadoop3/ /opt/spark 

Set Spark environment

$ sudo nano ~/.bashrc

ใส่ค่านี้ต่อที่ด้านล่างของไฟล์ .bashrc

export SPARK_HOME=/opt/spark

export PATH=$PATH:$SPARK_HOME/bin:$SPARK_HOME/sbin

export SPARK_LOCAL_IP=localhost

export PYSPARK_PYTHON=/usr/bin/python3

export PYTHONPATH=$(ZIPS=("$SPARK_HOME"/python/lib/*.zip); IFS=:; echo "${ZIPS[*]}"):$PYTHONPATH
$ source .bashrc

run Spark shell

$ spark-shell

run Pyspark

$ pyspark
Python 3.10.6 (main, Nov 14 2022, 16:10:14) [GCC 11.3.0] on linux
Type "help", "copyright", "credits" or "license" for more information.
Setting default log level to "WARN".
To adjust logging level use sc.setLogLevel(newLevel). For SparkR, use setLogLevel(newLevel).
23/07/28 23:41:19 WARN NativeCodeLoader: Unable to load native-hadoop library for your platform... using builtin-java classes where applicable
Welcome to
      ____              __
     / __/__  ___ _____/ /__
    _\ \/ _ \/ _ `/ __/  '_/
   /__ / .__/\_,_/_/ /_/\_\   version 3.3.2
      /_/

Using Python version 3.10.6 (main, Nov 14 2022 16:10:14)
Spark context Web UI available at http://localhost:4040
Spark context available as 'sc' (master = local[*], app id = local-1690562479751).
SparkSession available as 'spark'.
>>>

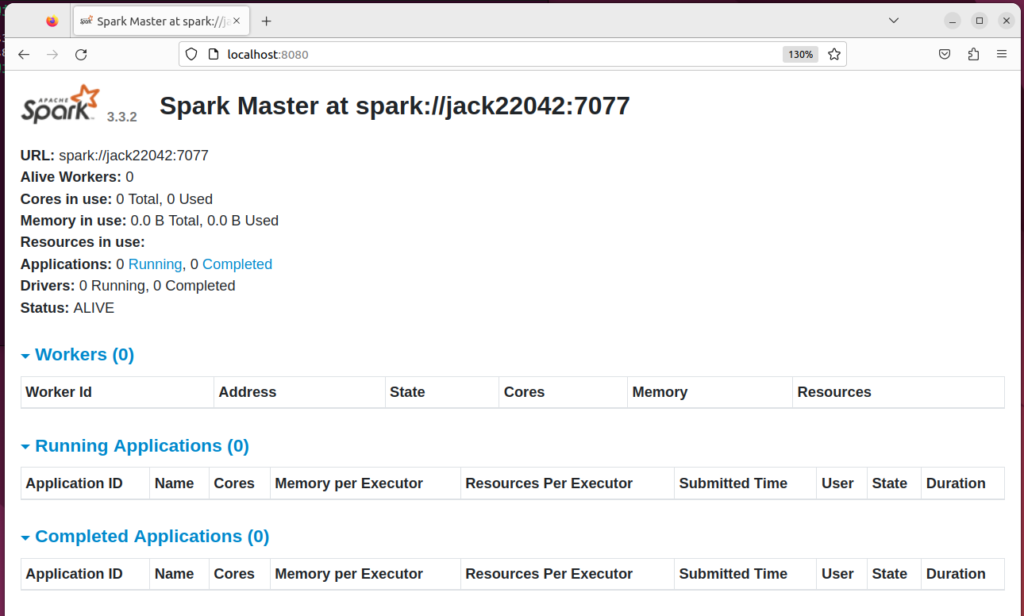
Start a standalone master server

$ start-master.sh
starting org.apache.spark.deploy.master.Master, logging to /opt/spark/logs/spark-jack-org.apache.spark.deploy.master.Master-1-jack22042.out

The process will be listening on TCP port 8080.

$ sudo ss -tunelp | grep 8080
tcp   LISTEN 0      1      [::ffff:127.0.0.1]:8080             *:*    users:(("java",pid=6346,fd=283)) uid:1000 ino:63398 sk:e cgroup:/user.slice/user-1000.slice/session-4.scope v6only:0 <->

The Web UI looks like below. http://localhost:8080

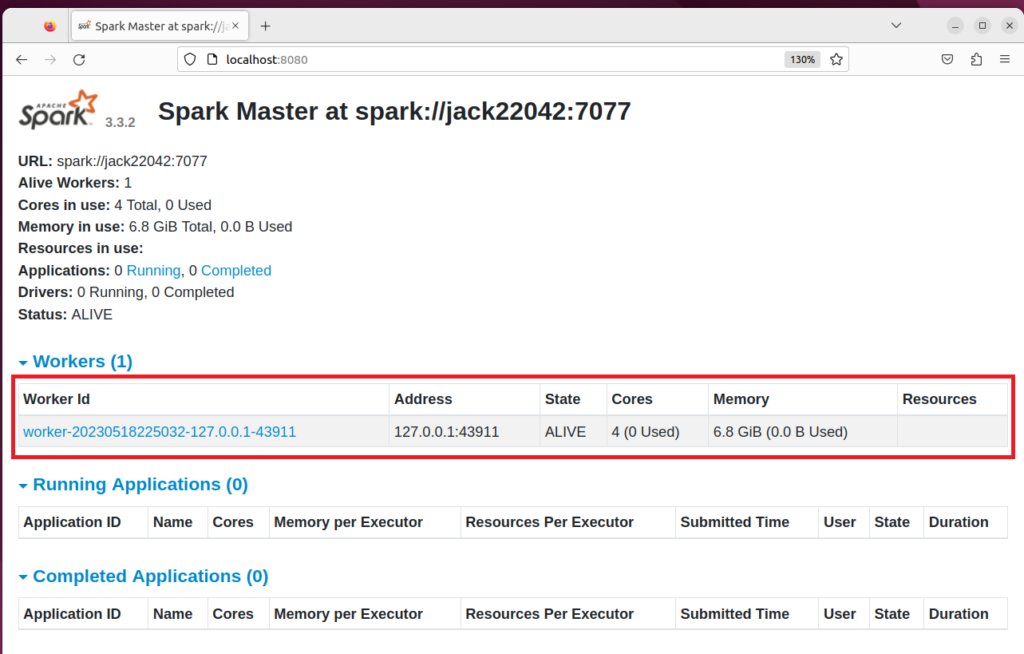
Starting Spark Worker Process

$ start-worker.sh spark://jack22042:7077
starting org.apache.spark.deploy.worker.Worker, logging to /opt/spark/logs/spark-jack-org.apache.spark.deploy.worker.Worker-1-jack22042.out

 shut down the master and slave Spark processes

$ stop-worker.sh
$ stop-master.sh

ติดตั้ง Java JDK บน Ubuntu 20.04

Installing Java

update packages ก่อน

$ sudo apt update

ติดตั้ง Java JDK 11 (openjdk)

$ sudo apt install default-jdk

แต่ถ้าจะติดตั้ง Java 8 ใช้คำสั่ง

sudo apt install openjdk-8-jdk

โปรแกรมจะติดตั้งอยู่ที่ /usr/lib/jvm/java-11-openjdk-amd64/bin/

    $ ls -l /usr/lib/jvm/java-11-openjdk-amd64/bin/java*
    -rwxr-xr-x 1 root root 14560 ม.ค.  20 16:07 /usr/lib/jvm/java-11-openjdk-amd64/bin/java
    -rwxr-xr-x 1 root root 14608 ม.ค.  20 16:07 /usr/lib/jvm/java-11-openjdk-amd64/bin/javac
    -rwxr-xr-x 1 root root 14608 ม.ค.  20 16:07 /usr/lib/jvm/java-11-openjdk-amd64/bin/javadoc
    -rwxr-xr-x 1 root root 14576 ม.ค.  20 16:07 /usr/lib/jvm/java-11-openjdk-amd64/bin/javap

    ตรวจสอบการติดตั้งบน Ubuntu 20.04.6

    $ java --version
    openjdk 11.0.18 2023-01-17
    OpenJDK Runtime Environment (build 11.0.18+10-post-Ubuntu-0ubuntu120.04.1)
    OpenJDK 64-Bit Server VM (build 11.0.18+10-post-Ubuntu-0ubuntu120.04.1, mixed mode, sharing)
    $ javac --version
    javac 11.0.18

    ตรวจสอบการติดตั้งบน Ubuntu 22.04.2

    $ java --version
    openjdk 11.0.18 2023-01-17
    OpenJDK Runtime Environment (build 11.0.18+10-post-Ubuntu-0ubuntu122.04)
    OpenJDK 64-Bit Server VM (build 11.0.18+10-post-Ubuntu-0ubuntu122.04, mixed mode, sharing)
    $ javac --version
    javac 11.0.18

    Managing Java

    ใช้คำสั่ง update-alternatives

    $ update-alternatives --help
    Usage: update-alternatives [<option> ...] <command>
    
    Commands:
      --install <link> <name> <path> <priority>
        [--slave <link> <name> <path>] ...
                               add a group of alternatives to the system.
      --remove <name> <path>   remove <path> from the <name> group alternative.
      --remove-all <name>      remove <name> group from the alternatives system.
      --auto <name>            switch the master link <name> to automatic mode.
      --display <name>         display information about the <name> group.
      --query <name>           machine parseable version of --display <name>.
      --list <name>            display all targets of the <name> group.
      --get-selections         list master alternative names and their status.
      --set-selections         read alternative status from standard input.
      --config <name>          show alternatives for the <name> group and ask the
                               user to select which one to use.
      --set <name> <path>      set <path> as alternative for <name>.
      --all                    call --config on all alternatives.
    
    <link> is the symlink pointing to /etc/alternatives/<name>.
      (e.g. /usr/bin/pager)
    <name> is the master name for this link group.
      (e.g. pager)
    <path> is the location of one of the alternative target files.
      (e.g. /usr/bin/less)
    <priority> is an integer; options with higher numbers have higher priority in
      automatic mode.
    
    Options:
      --altdir <directory>     change the alternatives directory.
      --admindir <directory>   change the administrative directory.
      --log <file>             change the log file.
      --force                  allow replacing files with alternative links.
      --skip-auto              skip prompt for alternatives correctly configured
                               in automatic mode (relevant for --config only)
      --quiet                  quiet operation, minimal output.
      --verbose                verbose operation, more output.
      --debug                  debug output, way more output.
      --help                   show this help message.
      --version                show the version.

    You can have multiple Java installations on one server. You can configure which version is the default for use on the command line by using the update-alternatives command.

    $ sudo update-alternatives --config java

    ถ้ามี java ตัวเดียวก็จะขึ้นประมาณนี้

    $ sudo update-alternatives --config java
    There is only one alternative in link group java (providing /usr/bin/java): /usr/lib/jvm/java-11-openjdk-amd64/bin/java
    Nothing to configure.

    แต่ถ้ามี java หลายตัว ก็จะแสดงให้เราเลือก

    javac ก็เหมือนกัน ใช้คำสั่ง

    $ sudo update-alternatives --config javac

    Setting the JAVA_HOME

    $ sudo nano /etc/environment

    At the end of this file, add the following line, and to not include the bin/ portion of the path: (หา path ได้ด้วยคำสั่ง update-alternatives)

    JAVA_HOME="/usr/lib/jvm/java-11-openjdk-amd64"
    JAVA_HOME="/usr/lib/jvm/java-8-openjdk-amd64"

    Modifying this file will set the JAVA_HOME path for all users on your system.

    Save the file and exit the editor.

    Now reload this file to apply the changes to your current session:

    $ source /etc/environment

    Verify that the environment variable is set:

    $ echo $JAVA_HOME

    Link

    คำสั่ง apt

    ดู help ของคำสั่ง apt

    $ apt --help
    apt 2.4.8 (amd64)
    Usage: apt [options] command
    
    apt is a commandline package manager and provides commands for
    searching and managing as well as querying information about packages.
    It provides the same functionality as the specialized APT tools,
    like apt-get and apt-cache, but enables options more suitable for
    interactive use by default.
    
    Most used commands:
      list - list packages based on package names
      search - search in package descriptions
      show - show package details
      install - install packages
      reinstall - reinstall packages
      remove - remove packages
      autoremove - Remove automatically all unused packages
      update - update list of available packages
      upgrade - upgrade the system by installing/upgrading packages
      full-upgrade - upgrade the system by removing/installing/upgrading packages
      edit-sources - edit the source information file
      satisfy - satisfy dependency strings
    
    See apt(8) for more information about the available commands.
    Configuration options and syntax is detailed in apt.conf(5).
    Information about how to configure sources can be found in sources.list(5).
    Package and version choices can be expressed via apt_preferences(5).
    Security details are available in apt-secure(8).
                                            This APT has Super Cow Powers.

    Update and Upgrade packages

    update list of available packages

    $ sudo apt update

    list packages ที่สามารถอัพเกรดได้

    $ apt list --upgradable

    upgrade the system by installing/upgrading packages

    $ sudo apt upgrade

    ทำคำสั่ง apt update และต่อด้วย apt upgrade ด้วยการใช้คำสั่ง &&

    When using the && command, the second command will be executed only when the first one has been succcefully executed.

    $ sudo apt update && sudo apt upgrade

    Install or Remove package

    install packages

    $ sudo apt install <package_name>

    remove packages

    $ sudo apt remove <package_name>

    Remove automatically all unused packages

    $ sudo apt autoremove

    reinstall packages

    sudo apt reinstall <package_name>
    sudo apt reinstall lighttpd

    hold a package ด้วย apt-mark

    sudo apt-mark hold <package_name>
    sudo apt-mark hold sudo

    unhold a package ด้วย apt-mark

    sudo apt-mark unhold <package_name>
    sudo apt-mark unhold sudo

    Other

    show package details

    To show or see information about the given package(s) including its dependencies, installation and download size, sources the package is available from, the description of the packages content and much more:

    $ apt show <package_name>
    $ apt show sudo

    List package dependency

    apt depends <package_name>
    apt depends sudo

    search in package descriptions

    apt search php
    apt search mysql-5.?
    apt search mysql-server-5.?
    apt search httpd*
    apt search ^apache
    apt search ^nginx
    apt search ^nginx$

    apt search ค้นหาใน package descriptions ทำให้ได้ข้อมูลเยอะเกิน หา pakcage ที่ต้องการยาก ให้ลองใช้ apt list แทน

    apt list
    apt list | more
    apt list | grep foo
    apt list | grep php7-
    
    apt list nginx
    apt list 'php7*'

    List all installed packages

    apt list --installed
    apt list --installed | grep <package_name>

    Ref