การสร้าง/ให้ค่า environment variable บน Windows
set LOCALPATH=C:\TMP\
set FILENAME=dummy.parquet
ลอง echo ค่า environment variable ออกมาดู
echo %LOCALPATH%%FILENAME%

การสร้าง/ให้ค่า environment variable บน Windows
set LOCALPATH=C:\TMP\ set FILENAME=dummy.parquet
ลอง echo ค่า environment variable ออกมาดู
echo %LOCALPATH%%FILENAME%
subprocess.call() – เก่าแล้ว Older high-level API
ใช้ subprocess.check_call() , subprocess.run() แทน
echo คำว่า test1 test2 ลงไปที่ไฟล์ /tmp/out.txt
%python
import subprocess
e = 'echo "test1 test2" > /tmp/out.txt'
subprocess.call(e, shell=True)
ตั้งชื่อไฟล์ของ log เป็นวันเวลาปัจจุบัน ไว้ใต้ /tmp แล้วใส่ข้อความ Hello World! ลงไป ด้วยการ echo
%python
import datetime
import subprocess

run_time = datetime.datetime.now() + datetime.timedelta(hours=7)
tmp_file = '/tmp/' + run_time.strftime("%Y-%m-%dT%H:%M:%S") + '.log'
print(tmp_file) # /tmp/2023-02-21T13:23:52.log

e = f'echo "Hello World!" >> {tmp_file}'
subprocess.call(e, shell=True)
ตรวจสอบว่าได้สร้างไฟล์ขึ้นมามั๊ย
%sh ls -l '/tmp/'
ดูเนื้อหาในไฟล์
%sh cat '/tmp/2023-02-21T13:23:52.log'
ใช้ Pandas อ่าน Text file
%python
import pandas as pd

# read text file
df = pd.read_fwf('/tmp/2023-02-21T14:55:00.log')
print(type(df))
print(df)
print(df.count())
login เข้าหน้า WordPress admin
1. ที่เมนูทางซ้ายเลือก Appearance
2. เลือก Theme File Editor

3. ที่หน้า Edit Themes เลือก header.php

DB Browser for SQLite (DB4S) is a high quality, visual, open source tool to create, design, and edit database files compatible with SQLite.
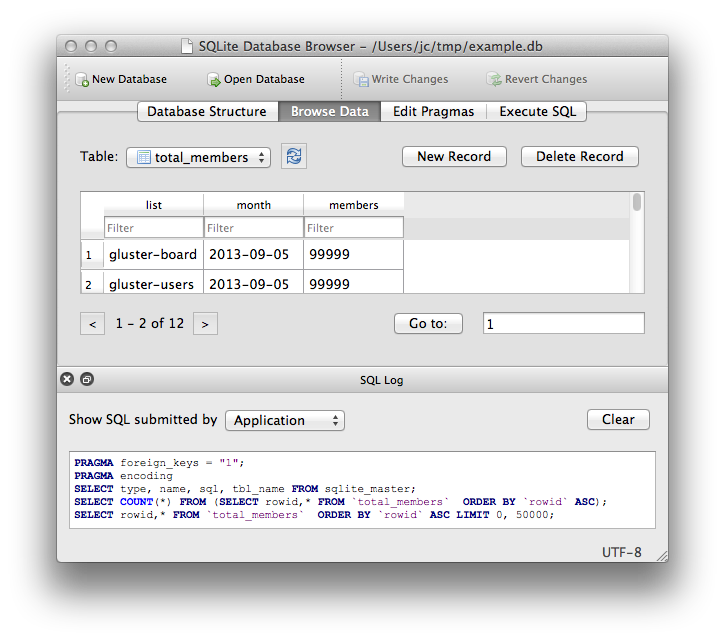
Download
สร้างดาต้าเบส หรือเปิดดาต้าเบส
import sqlite3
con = sqlite3.connect("tutorial.db")
เตรียม cursor
cur = con.cursor()
สร้างตาราง
cur.execute("CREATE TABLE movie(title, year, score)")
ตรวจสอบตารางที่มีจาก sqlite_master
res = cur.execute("SELECT name FROM sqlite_master")
print(res.fetchone())
# ('movie',)
insert ข้อมูล
cur.execute("""
    INSERT INTO movie VALUES
        ('Monty Python and the Holy Grail', 1975, 8.2),
        ('And Now for Something Completely Different', 1971, 7.5)
""")
con.commit()
select ข้อมูล
res = cur.execute("SELECT score FROM movie")
print(res.fetchall())
insert ข้อมูลด้วย executemany()
data = [
    ("Monty Python Live at the Hollywood Bowl", 1982, 7.9),
    ("Monty Python's The Meaning of Life", 1983, 7.5),
    ("Monty Python's Life of Brian", 1979, 8.0),
]
cur.executemany("INSERT INTO movie VALUES(?, ?, ?)", data)
con.commit()  # Remember to commit the transaction after executing INSERT.
for row in cur.execute("SELECT year, title FROM movie ORDER BY year"):
    print(row)
Verify that the database has been written to disk by calling con.close() to close the existing connection
con.close()
Tool
สร้างโปรเจ็กส์แบบ Blazor Server App
ที่ไฟล์ Pages/Counter.razor เพิ่มโค๊ด _logger.* ไว้ดูผลการ log
@page "/counter"
@inject ILogger<Counter> logger

<PageTitle>Counter</PageTitle>

<h1>Counter</h1>

<p role="status">Current count: @currentCount</p>

<button class="btn btn-primary" @onclick="IncrementCount">Click me</button>

@code {
    private int currentCount = 0;

    private void IncrementCount()
    {
        logger.LogInformation("This is an INFORMATION message.");
        logger.LogWarning("This is a WARNING message.");
        logger.LogError("This is an ERROR message.");

        currentCount++;
    }
}
เปิดหน้าต่าง Output โดยไปที่เมนู View | Output
ทดลองเรียกไปที่หน้า Counter เช่น https://localhost:7180/counter แล้วดูที่หน้าต่าง Output
BlazorServerApp6.Pages.Counter: Information: This is an INFORMATION message.
BlazorServerApp6.Pages.Counter: Warning: This is a WARNING message.
BlazorServerApp6.Pages.Counter: Error: This is an ERROR message.
ติดตั้ง Package log4net และ Microsoft.Extensions.Logging.Log4Net.AspNetCore
PM> NuGet\Install-Package log4net -Version 2.0.15
PM> NuGet\Install-Package Microsoft.Extensions.Logging.Log4Net.AspNetCore -Version 6.1.0
สร้างไฟล์ log4net.config
<?xml version="1.0" encoding="utf-8" ?>
<log4net>
  <appender name="RollingLogFileAppender" type="log4net.Appender.RollingFileAppender">
    <lockingModel type="log4net.Appender.FileAppender+MinimalLock"/>
    <file value="log/" />
    <datePattern value="yyMMdd'Jack.log'" />
    <staticLogFileName value="false"/>
    <appendToFile value="true"/>
    <rollingStyle value="Date"/>
    <maxSizeRollBackups value="100"/>
    <maximumFileSize value="15MB"/>
    <encoding value="UTF-8"/>
    <layout type="log4net.Layout.PatternLayout">
      <param name="ConversionPattern" value="%-5p%d{ HH:mm:ss} li:%line - [%method] %m  %n" />
    </layout>
  </appender>
  <root>
    <level value="ALL"/>
    <appender-ref ref="RollingLogFileAppender"/>
  </root>
</log4net>
แก้ไขไฟล์ Program.cs
using BlazorServerApp6.Data;
using Microsoft.AspNetCore.Components;
using Microsoft.AspNetCore.Components.Web;

var builder = WebApplication.CreateBuilder(args);

ILoggerFactory _loggerFactory = (ILoggerFactory)new LoggerFactory();
_loggerFactory.AddLog4Net();
builder.Services.AddSingleton(_loggerFactory);

// Add services to the container.
builder.Services.AddRazorPages();
builder.Services.AddServerSideBlazor();
builder.Services.AddSingleton<WeatherForecastService>();

var app = builder.Build();

// Configure the HTTP request pipeline.
if (!app.Environment.IsDevelopment())
{
    app.UseExceptionHandler("/Error");
    // The default HSTS value is 30 days. You may want to change this for production scenarios, see https://aka.ms/aspnetcore-hsts.
    app.UseHsts();
}

app.UseHttpsRedirection();

app.UseStaticFiles();

app.UseRouting();

app.MapBlazorHub();
app.MapFallbackToPage("/_Host");

app.Run();
ทดลองเรียกหน้า Counter อีกครั้งจะได้ไฟล์ .log
สร้างโปรเจ็กส์แบบ ASP.NET Core Web App (Model-View-Controller)
ที่ไฟล์ Controllers/HomeController.cs เพิ่มโค๊ด _logger.* ไว้ดูผลการ log
using Microsoft.AspNetCore.Mvc;
using System.Diagnostics;
using WebMvc6.Models;

namespace WebMvc6.Controllers
{
    public class HomeController : Controller
    {
        private readonly ILogger<HomeController> _logger;

        public HomeController(ILogger<HomeController> logger)
        {
            _logger = logger;
        }

        public IActionResult Index()
        {
            _logger.LogInformation("This is an INFORMATION message.");
            _logger.LogWarning("This is a WARNING message.");
            _logger.LogError("This is an ERROR message.");

            return View();
        }

        public IActionResult Privacy()
        {
            return View();
        }

        [ResponseCache(Duration = 0, Location = ResponseCacheLocation.None, NoStore = true)]
        public IActionResult Error()
        {
            return View(new ErrorViewModel { RequestId = Activity.Current?.Id ?? HttpContext.TraceIdentifier });
        }
    }
}
เปิดหน้าต่าง Output โดยไปที่เมนู View | Output
ทดลองเรียกไปที่หน้า Home เช่น https://localhost:7138/ แล้วดูที่หน้าต่าง Output
WebMvc6.Controllers.HomeController: Information: This is an INFORMATION message.
WebMvc6.Controllers.HomeController: Warning: This is a WARNING message.
WebMvc6.Controllers.HomeController: Error: This is an ERROR message.
ติดตั้ง Package log4net และ Microsoft.Extensions.Logging.Log4Net.AspNetCore
PM> NuGet\Install-Package log4net -Version 2.0.15
PM> NuGet\Install-Package Microsoft.Extensions.Logging.Log4Net.AspNetCore -Version 6.1.0
สร้างไฟล์ log4net.config
<?xml version="1.0" encoding="utf-8" ?>
<log4net>
  <appender name="RollingLogFileAppender" type="log4net.Appender.RollingFileAppender">
    <lockingModel type="log4net.Appender.FileAppender+MinimalLock"/>
    <file value="log/" />
    <datePattern value="yyMMdd'Jack.log'" />
    <staticLogFileName value="false"/>
    <appendToFile value="true"/>
    <rollingStyle value="Date"/>
    <maxSizeRollBackups value="100"/>
    <maximumFileSize value="15MB"/>
    <encoding value="UTF-8"/>
    <layout type="log4net.Layout.PatternLayout">
      <param name="ConversionPattern" value="%-5p%d{ HH:mm:ss} li:%line - [%method] %m  %n" />
    </layout>
  </appender>
  <root>
    <level value="ALL"/>
    <appender-ref ref="RollingLogFileAppender"/>
  </root>
</log4net>
แก้ไขไฟล์ Program.cs
var builder = WebApplication.CreateBuilder(args);

ILoggerFactory _loggerFactory = (ILoggerFactory)new LoggerFactory();
_loggerFactory.AddLog4Net();
builder.Services.AddSingleton(_loggerFactory);

// Add services to the container.
builder.Services.AddControllersWithViews();

var app = builder.Build();

// Configure the HTTP request pipeline.
if (!app.Environment.IsDevelopment())
{
    app.UseExceptionHandler("/Home/Error");
    // The default HSTS value is 30 days. You may want to change this for production scenarios, see https://aka.ms/aspnetcore-hsts.
    app.UseHsts();
}

app.UseHttpsRedirection();
app.UseStaticFiles();

app.UseRouting();

app.UseAuthorization();

app.MapControllerRoute(
    name: "default",
    pattern: "{controller=Home}/{action=Index}/{id?}");

app.Run();
ทดลองเรียกหน้า Home อีกครั้งจะได้ไฟล์ .log
สร้างโปรเจ็กส์แบบ ASP.NET Core Web App
ที่ไฟล์ Pages/Index.cshtml.cs เพิ่มโค๊ด _logger.* ไว้ดูผลการ log
using Microsoft.AspNetCore.Mvc;
using Microsoft.AspNetCore.Mvc.RazorPages;

namespace WebApp6.Pages
{
    public class IndexModel : PageModel
    {
        private readonly ILogger<IndexModel> _logger;

        public IndexModel(ILogger<IndexModel> logger)
        {
            _logger = logger;
        }

        public void OnGet()
        {
            _logger.LogInformation("This is an INFORMATION message.");
            _logger.LogWarning("This is a WARNING message.");
            _logger.LogError("This is an ERROR message.");
        }
    }
}
เปิดหน้าต่าง Output โดยไปที่เมนู View | Output
ทดลองเรียกไปที่หน้า Home เช่น https://localhost:7138/ แล้วดูที่หน้าต่าง Output
WebApp6.Pages.IndexModel: Information: This is an INFORMATION message.
WebApp6.Pages.IndexModel: Warning: This is a WARNING message.
WebApp6.Pages.IndexModel: Error: This is an ERROR message.
ติดตั้ง Package log4net และ Microsoft.Extensions.Logging.Log4Net.AspNetCore
PM> NuGet\Install-Package log4net -Version 2.0.15
PM> NuGet\Install-Package Microsoft.Extensions.Logging.Log4Net.AspNetCore -Version 6.1.0
สร้างไฟล์ log4net.config
<?xml version="1.0" encoding="utf-8" ?>
<log4net>
  <appender name="RollingLogFileAppender" type="log4net.Appender.RollingFileAppender">
    <lockingModel type="log4net.Appender.FileAppender+MinimalLock"/>
    <file value="log/" />
    <datePattern value="yyMMdd'Jack.log'" />
    <staticLogFileName value="false"/>
    <appendToFile value="true"/>
    <rollingStyle value="Date"/>
    <maxSizeRollBackups value="100"/>
    <maximumFileSize value="15MB"/>
    <encoding value="UTF-8"/>
    <layout type="log4net.Layout.PatternLayout">
      <param name="ConversionPattern" value="%-5p%d{ HH:mm:ss} li:%line - [%method] %m  %n" />
    </layout>
  </appender>
  <root>
    <level value="ALL"/>
    <appender-ref ref="RollingLogFileAppender"/>
  </root>
</log4net>
แก้ไขไฟล์ Program.cs
var builder = WebApplication.CreateBuilder(args);

ILoggerFactory _loggerFactory = (ILoggerFactory)new LoggerFactory();
_loggerFactory.AddLog4Net();
builder.Services.AddSingleton(_loggerFactory);

// Add services to the container.
builder.Services.AddRazorPages();

var app = builder.Build();

// Configure the HTTP request pipeline.
if (!app.Environment.IsDevelopment())
{
    app.UseExceptionHandler("/Error");
    // The default HSTS value is 30 days. You may want to change this for production scenarios, see https://aka.ms/aspnetcore-hsts.
    app.UseHsts();
}

app.UseHttpsRedirection();
app.UseStaticFiles();

app.UseRouting();

app.UseAuthorization();

app.MapRazorPages();

app.Run();
ทดลองเรียกหน้า Home อีกครั้งจะได้ไฟล์ .log
สร้าง directory ชื่อ log
#!/bin/bash

dir=log
if [ ! -d $dir ]
then
  mkdir $dir
  echo "create directory $dir"
else
  echo "Directory exists"
fi
$ date --help
Usage: date [OPTION]... [+FORMAT]
  or:  date [-u|--utc|--universal] [MMDDhhmm[[CC]YY][.ss]]
Display the current time in the given FORMAT, or set the system date.

Mandatory arguments to long options are mandatory for short options too.
  -d, --date=STRING         display time described by STRING, not 'now'
  -f, --file=DATEFILE       like --date once for each line of DATEFILE
  -I[TIMESPEC], --iso-8601[=TIMESPEC]  output date/time in ISO 8601 format.
                            TIMESPEC='date' for date only (the default),
                            'hours', 'minutes', 'seconds', or 'ns' for date
                            and time to the indicated precision.
  -r, --reference=FILE      display the last modification time of FILE
  -R, --rfc-2822            output date and time in RFC 2822 format.
                            Example: Mon, 07 Aug 2006 12:34:56 -0600
      --rfc-3339=TIMESPEC   output date and time in RFC 3339 format.
                            TIMESPEC='date', 'seconds', or 'ns' for
                            date and time to the indicated precision.
                            Date and time components are separated by
                            a single space: 2006-08-07 12:34:56-06:00
  -s, --set=STRING          set time described by STRING
  -u, --utc, --universal    print or set Coordinated Universal Time (UTC)
      --help     display this help and exit
      --version  output version information and exit

FORMAT controls the output.  Interpreted sequences are:

  %%   a literal %
  %a   locale's abbreviated weekday name (e.g., Sun)
  %A   locale's full weekday name (e.g., Sunday)
  %b   locale's abbreviated month name (e.g., Jan)
  %B   locale's full month name (e.g., January)
  %c   locale's date and time (e.g., Thu Mar  3 23:05:25 2005)
  %C   century; like %Y, except omit last two digits (e.g., 20)
  %d   day of month (e.g., 01)
  %D   date; same as %m/%d/%y
  %e   day of month, space padded; same as %_d
  %F   full date; same as %Y-%m-%d
  %g   last two digits of year of ISO week number (see %G)
  %G   year of ISO week number (see %V); normally useful only with %V
  %h   same as %b
  %H   hour (00..23)
  %I   hour (01..12)
  %j   day of year (001..366)
  %k   hour, space padded ( 0..23); same as %_H
  %l   hour, space padded ( 1..12); same as %_I
  %m   month (01..12)
  %M   minute (00..59)
  %n   a newline
  %N   nanoseconds (000000000..999999999)
  %p   locale's equivalent of either AM or PM; blank if not known
  %P   like %p, but lower case
  %r   locale's 12-hour clock time (e.g., 11:11:04 PM)
  %R   24-hour hour and minute; same as %H:%M
  %s   seconds since 1970-01-01 00:00:00 UTC
  %S   second (00..60)
  %t   a tab
  %T   time; same as %H:%M:%S
  %u   day of week (1..7); 1 is Monday
  %U   week number of year, with Sunday as first day of week (00..53)
  %V   ISO week number, with Monday as first day of week (01..53)
  %w   day of week (0..6); 0 is Sunday
  %W   week number of year, with Monday as first day of week (00..53)
  %x   locale's date representation (e.g., 12/31/99)
  %X   locale's time representation (e.g., 23:13:48)
  %y   last two digits of year (00..99)
  %Y   year
  %z   +hhmm numeric time zone (e.g., -0400)
  %:z  +hh:mm numeric time zone (e.g., -04:00)
  %::z  +hh:mm:ss numeric time zone (e.g., -04:00:00)
  %:::z  numeric time zone with : to necessary precision (e.g., -04, +05:30)
  %Z   alphabetic time zone abbreviation (e.g., EDT)

By default, date pads numeric fields with zeroes.
The following optional flags may follow '%':

  -  (hyphen) do not pad the field
  _  (underscore) pad with spaces
  0  (zero) pad with zeros
  ^  use upper case if possible
  #  use opposite case if possible

After any flags comes an optional field width, as a decimal number;
then an optional modifier, which is either
E to use the locale's alternate representations if available, or
O to use the locale's alternate numeric symbols if available.

Examples:
Convert seconds since the epoch (1970-01-01 UTC) to a date
  $ date --date='@2147483647'

Show the time on the west coast of the US (use tzselect(1) to find TZ)
  $ TZ='America/Los_Angeles' date

Show the local time for 9AM next Friday on the west coast of the US
  $ date --date='TZ="America/Los_Angeles" 09:00 next Fri'

GNU coreutils online help: <http://www.gnu.org/software/coreutils/>
For complete documentation, run: info coreutils 'date invocation'
$ date --version
date (GNU coreutils) 8.22
Copyright (C) 2013 Free Software Foundation, Inc.
License GPLv3+: GNU GPL version 3 or later <http://gnu.org/licenses/gpl.html>.
This is free software: you are free to change and redistribute it.
There is NO WARRANTY, to the extent permitted by law.

Written by David MacKenzie.
ตัวอย่าง
Open a terminal application and type the following command:
$ date
Tue Feb  7 15:23:13 +07 2023
format the date
$ date +"%y-%m-%d"
23-02-07
$ date +"%Y-%m-%d"
2023-02-07
Simply display the current time on Linux:
]$ date "+%T"
15:24:15
To print the date of the day before yesterday, run:
$ date --date='2 days ago'
Sun Feb  5 15:25:37 +07 2023
Want to see the day of year of Christmas in the current year? Try:
$ date --date='25 Dec' +%j
359
Display the current full month name and the day of the month:
$ date '+%B %d'
February 07