Python DateTime

datetime.date

from datetime import date
today = date.today()

print(type(today))
# <class 'datetime.date'>
print(today)
# 2022-08-19

datetime.datetime

เวลาปัจจุบันของ server

from datetime import datetime
now = datetime.now() # current date and time

print(type(now))
# <class 'datetime.datetime'>
print(now)
# 2022-08-19 07:51:55.893002

นำเวลาปัจจุบันของ server มาบวก 7 ชั่วโมง

import datetime
now = datetime.datetime.now()
print(now)
# 2022-08-19 08:32:36.803853

now = now + datetime.timedelta(hours=7)
print(now)
# 2022-08-19 15:32:36.803853
from datetime import datetime
now = datetime.now() # current date and time

year = now.strftime("%Y")
print("year:", year)
# year: 2022

month = now.strftime("%m")
print("month:", month)
# month: 08

day = now.strftime("%d")
print("day:", day)
# day: 19

time = now.strftime("%H:%M:%S")
print("time:", time)
# time: 08:12:42

date_time = now.strftime("%m/%d/%Y, %H:%M:%S")
print("date and time:",date_time)	
# date and time: 08/19/2022, 08:12:42

time.struct_time

from datetime import datetime
now = datetime.now() # current date and time
time_tuple = now.timetuple()

print(type(time_tuple))
# <class 'time.struct_time'>

print(now)
# 2022-08-19 07:55:03.144893

print(time_tuple)
# time.struct_time(tm_year=2022, tm_mon=8, tm_mday=19, tm_hour=7, tm_min=55, tm_sec=3, tm_wday=4, tm_yday=231, tm_isdst=-1)

timestamp

หาค่า timestamp จาก current date และ time

import time
from datetime import datetime
now = datetime.now() # current date and time
time_tuple = now.timetuple()
timestamp = int(time.mktime(time_tuple))

print(now)
# 2022-08-19 07:59:21.232243

print(timestamp)
# 1660895961

เปลี่ยน type ของข้อมูล (float, int, str, bytes)

import time
from datetime import datetime
now = datetime.now() # current date and time
time_tuple = now.timetuple()
timestamp = time.mktime(time_tuple)

print(type(timestamp))
print(timestamp)
# <class 'float'>
# 1660898887.0

timestamp = int(timestamp)
print(type(timestamp))
print(timestamp)
# <class 'int'>
# 1660898887

timestamp = str(timestamp)
print(type(timestamp))
print(timestamp)
# <class 'str'>
# 1660898887

timestamp = str.encode(timestamp)
print(type(timestamp))
print(timestamp)
# <class 'bytes'>
# b'1660898887'

timestamp = timestamp.decode()
print(type(timestamp))
print(timestamp)
# <class 'str'>
# 1660898887

หาค่า timestamp จากวันที่ ที่กำหนด

import time
from datetime import datetime

# date in string format
dt="19/08/2022"

time_tuple = datetime.strptime(dt, "%d/%m/%Y").timetuple()
print(time_tuple)
# time.struct_time(tm_year=2022, tm_mon=8, tm_mday=19, tm_hour=0, tm_min=0, tm_sec=0, tm_wday=4, tm_yday=231, tm_isdst=-1)

timestamp = time.mktime(time_tuple)
print(timestamp)
# 1660867200.0

day of a week from Datetime

The weekday() method we used above returns the day of the week as an integer, where Monday is 0 and Sunday is 6.

from datetime import datetime

# get current datetime
dt = datetime.now()
print('Datetime is:', dt)

# get day of week as an integer
x = dt.weekday()
print('Day of a week is:', x)

# output
# Datetime is: 2023-03-20 15:50:11.044832
# Day of a week is: 0
from datetime import datetime, timedelta

dt = datetime.now() - timedelta(days=1)
print('Datetime is:', dt)

x = dt.weekday()
print('Day of a week is:', x)


# Datetime is: 2023-03-19 15:52:50.568494
# Day of a week is: 6

The isoweekday() method to get the day of the week as an integer, where Monday is 1 and Sunday is 7. i.e., To start from the weekday number from 1, we can use isoweekday() in place of weekday().

from datetime import datetime

# get current datetime
dt = datetime.now()
print('Datetime is:', dt)
print('Weekday is:', dt.isoweekday())

Python cryptography 

Installation

pip install cryptography

Introduction

cryptography includes both high level recipes and low level interfaces to common cryptographic algorithms such as symmetric ciphers, message digests, and key derivation functions. For example, to encrypt something with cryptography’s high level symmetric encryption recipe:

from cryptography.fernet import Fernet
# Put this somewhere safe!
key = Fernet.generate_key()
print(key.hex())
f = Fernet(key)
token = f.encrypt(b"A really secret message. Not for prying eyes.")
print(token)
# b'...'
print(f.decrypt(token))
# b'A really secret message. Not for prying eyes.'
print(token.hex())

Layout

cryptography is broadly divided into two levels. One with safe cryptographic recipes that require little to no configuration choices. These are safe and easy to use and don’t require developers to make many decisions.

The other level is low-level cryptographic primitives. These are often dangerous and can be used incorrectly. They require making decisions and having an in-depth knowledge of the cryptographic concepts at work. Because of the potential danger in working at this level, this is referred to as the “hazardous materials” or “hazmat” layer. These live in the cryptography.hazmat package, and their documentation will always contain an admonition at the top.

We recommend using the recipes layer whenever possible, and falling back to the hazmat layer only when necessary.

Example

สร้าง key แล้วเก็บไว้ในไฟล์ secret.key

from cryptography.fernet import Fernet

# Use Fernet to generate the key file.
key = Fernet.generate_key()

# Store the file to disk to be accessed for en/de:crypting later.
with open('secret.key', 'wb') as new_key_file:
    new_key_file.write(key)
print(key)
# print(key.decode('utf-8'))
print(key.hex())

นำ key จากในไฟล์ secret.key มา encrypt ข้อความ

from cryptography.fernet import Fernet
# Load the private key from a file.
with open('secret.key', 'rb') as my_private_key:
    key = my_private_key.read()

msg = "Into the valley of death, rode the 600."
# Encode this as bytes to feed into the algorithm.
# (Refer to Encoding types above).
msg = msg.encode()
# print(msg)

# Instantiate the object with your key.
f = Fernet(key)
# Pass your bytes type message into encrypt.
ciphertext = f.encrypt(msg)
print(ciphertext)

นำ key จากในไฟล์ secret.key มา decrypt ข้อความ

from cryptography.fernet import Fernet
# Load the private key from a file.
with open('secret.key', 'rb') as my_private_key:
    key = my_private_key.read()

# Instantiate Fernet on the recip system.
f = Fernet(key)

ciphertext = b'gAAAAABi9LSeFJbUUaMH3Ra-xDJkj_U_1xbs2dpzhoHQT2mTCSLIYQYBMvqYIJtrkzu1jI-IyTQCiLGCvKZfcB09Fq_wfUuAVZneIn3mg3Nz3QV4vUvT3N5xk0Iu1VfpGmdWIkrUET8_'

# Decrypt the message.
cleartext = f.decrypt(ciphertext)
# Decode the bytes back into a string.
cleartext = cleartext.decode()
print(cleartext)

Using passwords with Fernet

import base64
import os
from cryptography.fernet import Fernet
from cryptography.hazmat.primitives import hashes
from cryptography.hazmat.primitives.kdf.pbkdf2 import PBKDF2HMAC
password = b"password"
salt = os.urandom(16)  # IV
print(salt.hex())
kdf = PBKDF2HMAC(
    algorithm=hashes.SHA256(),
    length=32,
    salt=salt,
    iterations=390000,
)
key = base64.urlsafe_b64encode(kdf.derive(password))
f = Fernet(key)
token = f.encrypt(b"Secret message!")
print(token)
# b'...'
print(f.decrypt(token))
# b'Secret message!'

In this scheme, the salt has to be stored in a retrievable location in order to derive the same key from the password in the future.

The iteration count used should be adjusted to be as high as your server can tolerate. A good default is at least 480,000 iterations, which is what Django recommends as of July 2022.

Implementation

Fernet is built on top of a number of standard cryptographic primitives. Specifically it uses:

  • AES in CBC mode with a 128-bit key for encryption; using PKCS7 padding.
  • HMAC using SHA256 for authentication.
  • Initialization vectors are generated using os.urandom().

The CBC mode requires an IV, and this IV is generated by os.urandom(). (Python 3 Fernet encrypting same message different ways – Stack Overflow)

Python ECDSA and ECDH

The Elliptic Curve Diffie Hellman (ECDH) for key agreement and Elliptic Curve Digital Signature Algorithm (ECDSA) for signing/verifying.

This is an easy-to-use implementation of ECC (Elliptic Curve Cryptography) with support for ECDSA (Elliptic Curve Digital Signature Algorithm), EdDSA (Edwards-curve Digital Signature Algorithm) and ECDH (Elliptic Curve Diffie-Hellman), implemented purely in Python, released under the MIT license. With this library, you can quickly create key pairs (signing key and verifying key), sign messages, and verify the signatures. You can also agree on a shared secret key based on exchanged public keys. The keys and signatures are very short, making them easy to handle and incorporate into other protocols.

NOTE: This library should not be used in production settings, see Security for more details.

Installation

pip install ecdsa

Usage

You start by creating a SigningKey. You can use this to sign data, by passing in data as a byte string and getting back the signature (also a byte string). You can also ask a SigningKey to give you the corresponding VerifyingKey. The VerifyingKey can be used to verify a signature, by passing it both the data string and the signature byte string: it either returns True or raises BadSignatureError.

from ecdsa import SigningKey
sk = SigningKey.generate() # uses NIST192p
vk = sk.verifying_key
signature = sk.sign(b"message")
assert vk.verify(signature, b"message")
from ecdsa import SigningKey
sk = SigningKey.generate()  # uses NIST192p
vk = sk.verifying_key
bytes_text = bytes("The first sample string|The second sample string", 'utf-8')
signature = sk.sign(bytes_text)
assert vk.verify(signature, bytes_text)

Each SigningKey/VerifyingKey is associated with a specific curve, like NIST192p (the default one). Longer curves are more secure, but take longer to use, and result in longer keys and signatures.

from ecdsa import SigningKey, NIST384p
sk = SigningKey.generate(curve=NIST384p)
vk = sk.verifying_key
signature = sk.sign(b"message")
assert vk.verify(signature, b"message")

The SigningKey can be serialized into several different formats: the shortest is to call s=sk.to_string(), and then re-create it with SigningKey.from_string(s, curve) . This short form does not record the curve, so you must be sure to pass to from_string() the same curve you used for the original key. The short form of a NIST192p-based signing key is just 24 bytes long. If a point encoding is invalid or it does not lie on the specified curve, from_string() will raise MalformedPointError.

from ecdsa import SigningKey, NIST384p
sk = SigningKey.generate(curve=NIST384p)
sk_string = sk.to_string()
sk2 = SigningKey.from_string(sk_string, curve=NIST384p)
print(sk_string.hex())
print(sk2.to_string().hex())
from ecdsa import SigningKey, NIST256p
sk = SigningKey.generate(curve=NIST256p)
vk = sk.verifying_key
signature = sk.sign(b"message")
assert vk.verify(signature, b"message")
print("OK")

sk_string = sk.to_string()
sk_hex = sk_string.hex()
print(sk_hex)

sig_hex = signature.hex()
print(sig_hex)

Note: while the methods are called to_string() the type they return is actually bytes, the “string” part is leftover from Python 2.

sk.to_pem() and sk.to_der() will serialize the signing key into the same formats that OpenSSL uses. The PEM file looks like the familiar ASCII-armored "-----BEGIN EC PRIVATE KEY-----" base64-encoded format, and the DER format is a shorter binary form of the same data. SigningKey.from_pem()/.from_der() will undo this serialization. These formats include the curve name, so you do not need to pass in a curve identifier to the deserializer. In case the file is malformed from_der() and from_pem() will raise UnexpectedDER or MalformedPointError.

from ecdsa import SigningKey, NIST384p
sk = SigningKey.generate(curve=NIST384p)
sk_pem = sk.to_pem()
sk2 = SigningKey.from_pem(sk_pem)
# sk and sk2 are the same key

Likewise, the VerifyingKey can be serialized in the same way: vk.to_string()/VerifyingKey.from_string()to_pem()/from_pem(), and to_der()/from_der(). The same curve= argument is needed for VerifyingKey.from_string().

from ecdsa import SigningKey, VerifyingKey, NIST384p
sk = SigningKey.generate(curve=NIST384p)
vk = sk.verifying_key
vk_string = vk.to_string()
vk2 = VerifyingKey.from_string(vk_string, curve=NIST384p)
# vk and vk2 are the same key

from ecdsa import SigningKey, VerifyingKey, NIST384p
sk = SigningKey.generate(curve=NIST384p)
vk = sk.verifying_key
vk_pem = vk.to_pem()
vk2 = VerifyingKey.from_pem(vk_pem)
# vk and vk2 are the same key

There are a couple of different ways to compute a signature. Fundamentally, ECDSA takes a number that represents the data being signed, and returns a pair of numbers that represent the signature. The hashfunc= argument to sk.sign() and vk.verify() is used to turn an arbitrary string into a fixed-length digest, which is then turned into a number that ECDSA can sign, and both sign and verify must use the same approach. The default value is hashlib.sha1, but if you use NIST256p or a longer curve, you can use hashlib.sha256 instead.

Python List

What is a List in Python?

A list is a data type in Python where you can store multiple values of different data types (including nested lists).

numList = [1, 2, 3, 4, 5]

stringList = ["banana", "orange", "apple"]

mixedList = [1, "banana", "orange", [5, 6]]

You can access items in a list using their index position. Index positions start from 0 in lists:

stringList = ["banana", "orange", "apple"]

print(stringList[1])
# "orange"

another example

li = ['a', 0, 1.234]
# ['a', 0, 1.234]

li.append(True)
# ['a', 0, 1.234, True]

li[0]
# 'a'

li[-1]
# True

li[1:3]
# [0, 1.234]

li[2:]
# [1.234, True]

li[:2]
# ['a', 0]

li[-3:-1]
# [0, 1.234]
li = [1,2,3]
li.append(4)
print(li)
li.pop()
print(li)
li.pop(0)
print(li)
# [1, 2, 3, 4]
# [1, 2, 3]
# [2, 3]
li = [1,2,3]
print(3 in li)
print(4 in li)
# True
# False
nested = [1,2,['a','b']]
# [1, 2, ['a', 'b']]

nested[2]
# ['a', 'b']

nested[2][1]
# 'b'

How to Sort Lists in Python

You can sort a list in Python using the sort() method.

The sort() method allows you to order items in a list. Here’s the syntax:

list.sort(reverse=True|False, key=sortFunction)

By default, you can order strings and numbers in ascending order, without passing an argument to this method:

items = ["orange", "cashew", "banana"]

items.sort()
# ['banana', 'cashew', 'orange']

For descending order, you can pass the reverse argument:

items = [6, 8, 10, 5, 7, 2]

items.sort(reverse=True)
# [10, 8, 7, 6, 5, 2]

How to specify a sort function

items = [
  {
    'name': 'John',
    'age': 40
  },
  {   
    'name': 'Mike',
    'age': 45
  },
  {   
    'name': 'Jane',
    'age': 33
  },
  {   
    'name': 'Asa',
    'age': 42
  }
]

def sortFn(dict):
  return dict['age']

items.sort(key=sortFn)
# [
#   {'name': 'Jane', 'age': 33},
#   {'name': 'John', 'age': 40},
#   {'name': 'Asa', 'age': 42},
#   {'name': 'Mike', 'age': 45}
# ]

If the reverse argument is passed as True here, the sorted dictionaries will be in descending order.

items = ["cow", "elephant", "duck"]

def sortFn(value):
    return len(value)

items.sort(key=sortFn, reverse=True)
# ['elephant', 'duck', 'cow']

Create and run Azure Functions locally by using the Core Tools (Python)

Note: สร้าง functions project ด้วย vscode extension ง่ายกว่าสร้างด้วยคำสั่ง func init (Create an Azure Function by using Visual Studio Code) เพราะจะสร้างไฟล์ config ต่างๆของ vscode และ .venv มาให้ด้วย , สร้างด้วยคำสั่งมีประโยชน์ตอนสร้าง function ด้วย func new

Create a new functions project with func init

สร้าง functions project ชื่อ FunctionPy2207

> mkdir FunctionPy2207
> cd .\FunctionPy2207\

To create a new functions project, run func init on the command line.

> func init
Use the up/down arrow keys to select a worker runtime:
dotnet
dotnet (isolated process)
node
python
powershell
custom

> func init
Use the up/down arrow keys to select a worker runtime:python
Found Python version 3.9.10 (py).
Writing requirements.txt
Writing getting_started.md
Writing .gitignore
Writing host.json
Writing local.settings.json
Writing C:\Project\FunctionPy2207\.vscode\extensions.json

ดูไฟล์ที่คำสั่ง func init สร้างมาให้ เมื่อเลือกเป็น python

$ tree
.
├── getting_started.md
├── host.json
├── local.settings.json
└── requirements.txt

0 directories, 4 files

host.json

{
  "version": "2.0",
  "logging": {
    "applicationInsights": {
      "samplingSettings": {
        "isEnabled": true,
        "excludedTypes": "Request"
      }
    }
  },
  "extensionBundle": {
    "id": "Microsoft.Azure.Functions.ExtensionBundle",
    "version": "[2.*, 3.0.0)"
  }
}

local.settings.json

{
  "IsEncrypted": false,
  "Values": {
    "FUNCTIONS_WORKER_RUNTIME": "python",
    "AzureWebJobsStorage": "UseDevelopmentStorage=true"
  }
}

requirements.txt

# Do not include azure-functions-worker as it may conflict with the Azure Functions platform

azure-functions

getting_started.md

## Getting Started with Azure Function
### Last updated: March 8th 2021

#### Project Structure
The main project folder (<project_root>) can contain the following files:

* **local.settings.json** - Used to store app settings and connection strings when running locally. This file doesn't get published to Azure. To learn more, see [local.settings.file](https://aka.ms/azure-functions/python/local-settings).
* **requirements.txt** - Contains the list of Python packages the system installs when publishing to Azure.
* **host.json** - Contains global configuration options that affect all functions in a function app. This file does get published to Azure. Not all options are supported when running locally. To learn more, see [host.json](https://aka.ms/azure-functions/python/host.json).
* **.vscode/** - (Optional) Contains store VSCode configuration. To learn more, see [VSCode setting](https://aka.ms/azure-functions/python/vscode-getting-started).
* **.venv/** - (Optional) Contains a Python virtual environment used by local development.
* **Dockerfile** - (Optional) Used when publishing your project in a [custom container](https://aka.ms/azure-functions/python/custom-container).
* **tests/** - (Optional) Contains the test cases of your function app. For more information, see [Unit Testing](https://aka.ms/azure-functions/python/unit-testing).
* **.funcignore** - (Optional) Declares files that shouldn't get published to Azure. Usually, this file contains .vscode/ to ignore your editor setting, .venv/ to ignore local Python virtual environment, tests/ to ignore test cases, and local.settings.json to prevent local app settings being published.

Each function has its own code file and binding configuration file ([**function.json**](https://aka.ms/azure-functions/python/function.json)).

#### Developing your first Python function using VS Code

If you have not already, please checkout our [quickstart](https://aka.ms/azure-functions/python/quickstart) to get you started with Azure Functions developments in Python. 

#### Publishing your function app to Azure 

For more information on deployment options for Azure Functions, please visit this [guide](https://docs.microsoft.com/en-us/azure/azure-functions/create-first-function-vs-code-python#publish-the-project-to-azure).

#### Next Steps

* To learn more about developing Azure Functions, please visit [Azure Functions Developer Guide](https://aka.ms/azure-functions/python/developer-guide).

* To learn more specific guidance on developing Azure Functions with Python, please visit [Azure Functions Developer Python Guide](https://aka.ms/azure-functions/python/python-developer-guide).

Create a new function with func new

สร้าง function ชื่อ HttpExample โดยใช้ template แบบ HttpTrigger

> func new
Use the up/down arrow keys to select a template:
Azure Blob Storage trigger
Azure Cosmos DB trigger
Durable Functions activity
Durable Functions entity
Durable Functions HTTP starter
Durable Functions orchestrator
Azure Event Grid trigger
Azure Event Hub trigger
HTTP trigger
Kafka output
Kafka trigger
Azure Queue Storage trigger
RabbitMQ trigger
Azure Service Bus Queue trigger
Azure Service Bus Topic trigger
Timer trigger

> func new
Use the up/down arrow keys to select a template:HTTP trigger
Function name: [HttpTrigger] HttpExample
Writing C:\Project\FunctionPy2207\HttpExample\__init__.py
Writing C:\Project\FunctionPy2207\HttpExample\function.json
The function "HttpExample" was created successfully from the "HTTP trigger" template.

จะได้ไฟล์ HttpExample/__init__.py และไฟล์ HttpExample/function.json

HttpExample/__init__.py

import logging

import azure.functions as func


def main(req: func.HttpRequest) -> func.HttpResponse:
    logging.info('Python HTTP trigger function processed a request.')

    name = req.params.get('name')
    if not name:
        try:
            req_body = req.get_json()
        except ValueError:
            pass
        else:
            name = req_body.get('name')

    if name:
        return func.HttpResponse(f"Hello, {name}. This HTTP triggered function executed successfully.")
    else:
        return func.HttpResponse(
             "This HTTP triggered function executed successfully. Pass a name in the query string or in the request body for a personalized response.",
             status_code=200
        )

HttpExample/function.json

{
  "scriptFile": "__init__.py",
  "bindings": [
    {
      "authLevel": "function",
      "type": "httpTrigger",
      "direction": "in",
      "name": "req",
      "methods": [
        "get",
        "post"
      ]
    },
    {
      "type": "http",
      "direction": "out",
      "name": "$return"
    }
  ]
}

Run functions locally

> func start
Found Python version 3.9.10 (py).

Azure Functions Core Tools
Core Tools Version:       4.0.4629 Commit hash: N/A  (64-bit)
Function Runtime Version: 4.6.1.18388


Functions:

        HttpExample: [GET,POST] http://localhost:7071/api/HttpExample

For detailed output, run func with --verbose flag.

ติดตั้ง package เพิ่ม

สร้าง Virtual Environments ชื่อ .venv

> python -m venv .venv

activate

> .\.venv\Scripts\activate

ติดตั้ง numpy

> python -m pip install numpy

ไฟล์ requirements.txt

# Do not include azure-functions-worker as it may conflict with the Azure Functions platform

azure-functions
numpy

เพิ่ม import ที่ไฟล์ __init__.py

import numpy

ลองรัน func start ถ้าไม่ error ก็ติดตั้ง package สำเร็จ

Python Try Except

  • The try block lets you test a block of code for errors.
  • The except block lets you handle the error.
  • The else block lets you execute code when there is no error.
  • The finally block lets you execute code, regardless of the result of the try- and except blocks.

The try block will generate an error, because x is not defined:

try:
  print(x)
except:
  print("An exception occurred")

Print one message if the try block raises a NameError and another for other errors:

try:
  print(x)
except NameError:
  print("Variable x is not defined")
except:
  print("Something else went wrong")

You can use the else keyword to define a block of code to be executed if no errors were raised:

try:
  print("Hello")
except:
  print("Something went wrong")
else:
  print("Nothing went wrong")

The finally block, if specified, will be executed regardless if the try block raises an error or not.

try:
  print(x)
except:
  print("Something went wrong")
finally:
  print("The 'try except' is finished")

ดัก java.io exception

def read_file(path):
  try:
    dbutils.fs.ls(path)
    return spark.read.option("inferschema","true").csv(path)
  except Exception as e:
    if 'java.io.FileNotFoundException' in str(e):
      print('File does not exists')
    else:
      print('Other error')

read_file('mnt/pnt/abc.csv')

Raise an exception

As a Python developer you can choose to throw an exception if a condition occurs.

To throw (or raise) an exception, use the raise keyword.

Raise an error and stop the program if x is lower than 0:

x = -1

if x < 0:
  raise Exception("Sorry, no numbers below zero")

Raise a TypeError if x is not an integer:

x = "hello"

if not type(x) is int:
  raise TypeError("Only integers are allowed")

สร้าง Azure Functions แบบ HTTP trigger ด้วย Python

  1. Create a function app
  2. Triggers
  3. Bindings
  4. Create a function in the Azure portal
  5. Navigate to your function and its files
  6. Test in the Azure portal
  7. Run function manually
  8. Other .Net

Azure Functions allow developers to host business logic that can be executed without managing or provisioning infrastructure.

1. Create a function app

Let’s create a function app in the Azure portal.

  1. Sign in to the Azure portal
  2. Under Azure services, select Create a resource.
  3. In the menu, select Compute, and then select Function App in the Popular products list.
  4. On the Basics tab, enter the following values for each setting.
SettingValue
PublishCode
Runtime stackPython
Version*3.8
Play typeConsumption (Serverless)

*Python มีเวอร์ชันให้เลือกเป็น 3.7 , 3.8 , 3.9

When deployment completes, select Go to resource

2. Triggers

Functions are event driven, which means they run in response to an event. The type of event that starts a function is called a trigger. Each function must be configured with exactly one trigger.

Azure supports triggers for the following services.

ServiceTrigger description
Blob StorageStarts a function when a new or updated blob is detected.
Azure Cosmos DBStart a function when inserts and updates are detected.
Event GridStarts a function when an event is received from Event Grid.
HTTPStarts a function with an HTTP request.
Microsoft Graph EventsStarts a function in response to an incoming webhook from the Microsoft Graph. Each instance of this trigger can react to one Microsoft Graph resource type.
Queue StorageStarts a function when a new item is received on a queue. The queue message is provided as input to the function.
Service BusStarts a function in response to messages from a Service Bus queue.
TimerStarts a function on a schedule.

3. Bindings

A binding is a declarative way to connect data and services to your function. Bindings interact with various data sources, which means you don’t have to write the code in your function to connect to data sources and manage connections. The platform takes care of that complexity for you as part of the binding code.

Each binding has a direction–your code reads data from input bindings, and writes data to output bindings. Each function can have zero or more bindings to manage the input and output data processed by the function.

A trigger is a type of input binding that has the ability to initiate execution of some code.

Azure provides a large number of bindings to connect to different storage and messaging services.

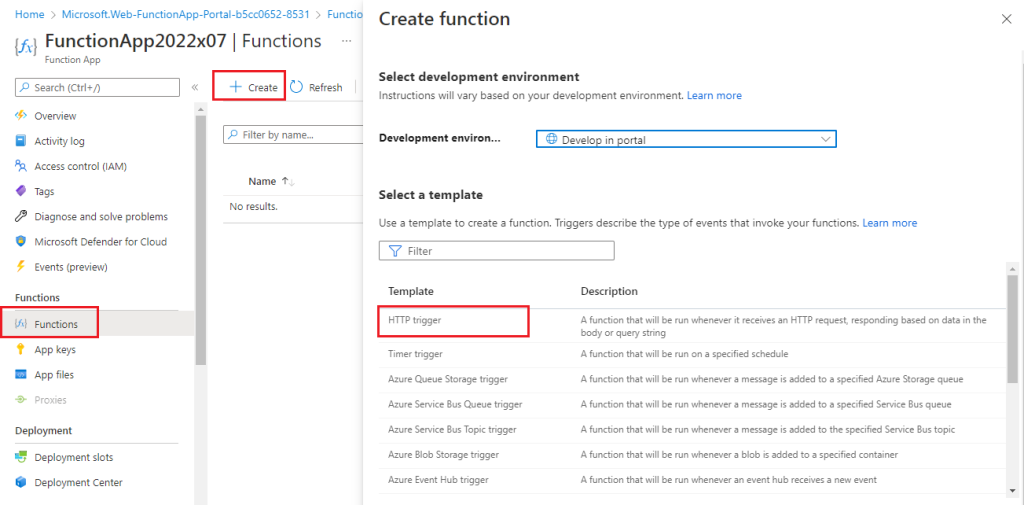
4. Create a function in the Azure portal

When you create your first function in the Azure Create function pane, you can select a predefined trigger for your function. Based on your selections, Azure generates default code and configuration information, such as creating an event log entry when input data is received.

When you create a function from a template, several files are created, including a configuration file, function.json, and a source code file, __init__.py.

When you select a function that you created in your function app, the Function pane opens. By selecting Code + Test from the Function menu, you have access to actions in the command bar to test and run the code, to save or discard changes you make, or to obtain the published URL.

By selecting Test/Run from the command bar, you can run use cases for requests that include query strings and values. The function’s path above the code box displays the name of the file that is open. You can select a specific file from the dropdown to test or edit, for example, function.json.

__init__.py

import logging

import azure.functions as func


def main(req: func.HttpRequest) -> func.HttpResponse:
    logging.info('Python HTTP trigger function processed a request.')

    name = req.params.get('name')
    if not name:
        try:
            req_body = req.get_json()
        except ValueError:
            pass
        else:
            name = req_body.get('name')

    if name:
        return func.HttpResponse(f"Hello, {name}. This HTTP triggered function executed successfully.")
    else:
        return func.HttpResponse(
             "This HTTP triggered function executed successfully. Pass a name in the query string or in the request body for a personalized response.",
             status_code=200
        )

function.json

{
  "bindings": [
    {
      "authLevel": "function",
      "type": "httpTrigger",
      "direction": "in",
      "name": "req",
      "methods": [
        "get",
        "post"
      ]
    },
    {
      "type": "http",
      "direction": "out",
      "name": "$return"
    }
  ]
}

The bindings property is where you configure both triggers and bindings. Each binding shares a few common settings and some settings which are specific to a particular type of binding. Every binding requires the following settings:

PropertyTypesComments
typestringName of binding. For example, queueTrigger.
directionstringIndicates whether the binding is for receiving data into the function or sending data from the function. For example, in or out.
namestringThe name that is used for the bound data in the function. For example, myQueue.

6. Test in the Azure portal

The portal also provides a convenient way to test your functions. As previously described, in the screenshot above. When you select Run in this pane, the results automatically appear in the Output tab, and the Logs pane opens to display the status.

7. Run function manually

You can start a function by manually triggering the configured trigger. For instance, if you’re using an HTTP trigger, you can use a tool, such as Postman or cURL, to initiate an HTTP request to your function endpoint URL, which is available from the function definition (Get function URL).

เช่นตัวอย่างนี้ก็ ต่อท้าย url ด้วย &name=jack

8. Other .Net

.Net 6

run.csx

#r "Newtonsoft.Json"

using System.Net;
using Microsoft.AspNetCore.Mvc;
using Microsoft.Extensions.Primitives;
using Newtonsoft.Json;

public static async Task<IActionResult> Run(HttpRequest req, ILogger log)
{
    log.LogInformation("C# HTTP trigger function processed a request.");

    string name = req.Query["name"];

    string requestBody = await new StreamReader(req.Body).ReadToEndAsync();
    dynamic data = JsonConvert.DeserializeObject(requestBody);
    name = name ?? data?.name;

    string responseMessage = string.IsNullOrEmpty(name)
        ? "This HTTP triggered function executed successfully. Pass a name in the query string or in the request body for a personalized response."
                : $"Hello, {name}. This HTTP triggered function executed successfully.";

            return new OkObjectResult(responseMessage);
}

function.json

{
  "bindings": [
    {
      "authLevel": "function",
      "name": "req",
      "type": "httpTrigger",
      "direction": "in",
      "methods": [
        "get",
        "post"
      ]
    },
    {
      "name": "$return",
      "type": "http",
      "direction": "out"
    }
  ]
}

uuid

What is UUID

UUID is a Universally Unique Identifier. You can also call it as GUID, i.e., Globally Unique Identifier.

A UUID is 128 bits long number or ID to uniquely identify the documents, Users, resources or information in computer systems.

  • UUID can guarantee the uniqueness of Identifiers across space and time. when we talk about space and time means when UUID generated according to the standard then the identifier does not duplicate one that has already been created or will be created to identify something else.

Python UUID module implemented as per RFC 4122. RFC 4122 is a standard and Copyright (C) of The Internet Society. RFC 4122 specification includes all the details and algorithms to generate the Unique Identifiers of all the versions. RFC 4122 document specifies three algorithms to generate UUIDs.

Hence using Python UUID module, you can generate versions 1, 3, 4, and 5 UUIDs. UUID generated using this module is immutable.

Python UUID module supports the following versions of UUIDs.

  • UUID1 – Generate UUID using a Host MAC address, sequence number and the current time. This version uses the IEEE 802 MAC addresses.
  • UUID3 and UUID 5 uses cryptographic hashing and application-provided text strings to generate UUID. UUID 3 uses MD5 hashing, and UUID 5 uses SHA-1 hashing.
  • UUID4 uses pseudo-random number generators to generate UUID.

Structure of UUID

As you can see in the output UUID is made up of five components, and each component has a fixed length. A hyphen symbol separates each component. UUID’s presented in the format “8-4-4-4-12”.

UUID 1 to Generate a unique ID using MAC Address

The uuid.uuid1() function is used to generate a UUID from the host ID, sequence number, and the current time. It uses the MAC address of a host as a source of uniqueness.

import uuid

# make a UUID based on the host address and current time
uuidOne = uuid.uuid1()
print(uuidOne)

# f8adce75-04f3-11ed-9cc3-0456e5e23db1

UUID 4 to generate a random UUID

The UUID generated using a uuid4() function is created using a truly Random or Pseudo-Random generator.

import uuid

uuidFour = uuid.uuid4()
print(uuidFour)

UUID 3 and UUID 5 to Create a Name-Based UUID

Version 3 or 5 UUID meant for generating UUIDs from “names.” we can use name and namespace to create a series of unique UUIDs. In simple words version, 3 and  5 UUIDs is nothing but hashing namespace identifier with a name.

The uuid.uuid3(namespace, name) generate a UUID based on the MD5 hash of a namespace identifier (which is a UUID) and a string.

Similarly, the uuid.uuid5(namespace, name) generate a UUID based on the SHA-1 hashing technique of a namespace identifier (which is a UUID) and a name.

The UUID module defines the following namespace identifiers to use with uuid3() or uuid5().

  • UUID.NAMESPACE_DNS means a fully qualified domain name. For example, https://pynative.com.
  • UUID.NAMESPACE_URL When this namespace is specified, It means it is a URL.
  • UUID.NAMESPACE_OID When this namespace is specified, the name string is an ISO OID.
  • UUID.NAMESPACE_X500 When this namespace is specified, the name string is an X.500 DN in DER or a text output format.
import uuid

hostNames = ['pynative.com', 'phaisarn.com']

for host in hostNames:
    print(uuid.uuid3(uuid.NAMESPACE_DNS, host))
    print(uuid.uuid5(uuid.NAMESPACE_DNS, host))
    print()

Extract UUID attributes read-only attributes

The internal representation of a UUID is a specific sequence of bits in memory, as described in RFC4211. It is necessary to convert the bit sequence to a string representation to represent UUID in string format.

UUID module provides the various read-only argument to access the value of each component of the UUID object. You can extract the values from UUID so we can use this value for a different purpose. For example, You want to Extract the time from a UUID version1 in python.

import uuid

UUID = uuid.uuid1()

print("UUID is ", UUID)
print("UUID Type is   ",type(UUID))
print('UUID.bytes    :', UUID.bytes)
print('UUID.bytes_le :', UUID.bytes_le)
print('UUID.hex      :', UUID.hex)
print('UUID.int      :', UUID.int)
print('UUID.urn      :', UUID.urn)
print('UUID.variant  :', UUID.variant)
print('UUID.version  :', UUID.version)
print('UUID.fields   :', UUID.fields)
print("Prining each field seperately")
print('UUID.time_low            : ', UUID.time_low)
print('UUID.time_mid            : ', UUID.time_mid)
print('UUID.time_hi_version     : ', UUID.time_hi_version)
print('UUID.clock_seq_hi_variant: ', UUID.clock_seq_hi_variant)
print('UUID.clock_seq_low       : ', UUID.clock_seq_low)
print('UUID.node                : ', UUID.node)
print('UUID.time                : ', UUID.time)
print('UUID.clock_seq           : ', UUID.clock_seq)
print('UUID.SafeUUID            : ', UUID.is_safe)

UUID to String and String to UUID in Python

When we call a uuid.uuid1 or any other version of UUID you will get an instance of UUID class. When we want UUID in string format for comparison, manipulation or maybe for any reason we can get its string representation using a str class. Let see how do change a UUID to a string.

create string from uuid

import uuid

UUID1 = uuid.uuid1()
print(type(UUID1))
print(UUID1)
print(type(str(UUID1)))
print(str(UUID1))
print(str(UUID1).replace("-", "")) # remove dash

create uuid from string

import uuid

uuid_str = ["{55da37d1-d481-11e8-9013-adaf456d94a0}",
            "018c168c-d509-11e8-b096-ccaf789d94a0",
            "urn:uuid:e5e9394c-daed-498e-b9f3-69228b44fbfa"]

for string in uuid_str:
    # make a UUID from a string of hex digits
    # (braces and hyphens ignored)
    myUUID = uuid.UUID(string)
    print("UUID is", myUUID)
    print("UUID time component is", myUUID.time)
    print()