
- Installing PHP
- Configure Nginx for PHP
- Creating a PHP File to Test Configuration
Category Archives: Ubuntu 18.04
ติดตั้ง MySql บน Ubuntu 18.04
1.Installing MySQL
sudo apt update
sudo apt install mysql-server
2.Configuring MySQL
sudo mysql_secure_installation
In order to use a password to connect to MySQL as root, you will need to switch its authentication method from auth_socket to mysql_native_password. To do this, open up the MySQL prompt from your terminal:
sudo mysql
Next, check which authentication method each of your MySQL user accounts use with the following command:
SELECT user,authentication_string,plugin,host FROM mysql.user;
Output
+------------------+-------------------------------------------+-----------------------+-----------+
| user             | authentication_string                     | plugin                | host      |
+------------------+-------------------------------------------+-----------------------+-----------+
| root             |                                           | auth_socket           | localhost |
| mysql.session    | *THISISNOTAVALIDPASSWORDTHATCANBEUSEDHERE | mysql_native_password | localhost |
| mysql.sys        | *THISISNOTAVALIDPASSWORDTHATCANBEUSEDHERE | mysql_native_password | localhost |
| debian-sys-maint | *CC744277A401A7D25BE1CA89AFF17BF607F876FF | mysql_native_password | localhost |
+------------------+-------------------------------------------+-----------------------+-----------+
4 rows in set (0.00 sec)
ALTER USER 'root'@'localhost' IDENTIFIED WITH mysql_native_password BY 'password';
FLUSH PRIVILEGES;
Check the authentication methods employed by each of your users again to confirm that root no longer authenticates using the auth_socket plugin:
SELECT user,authentication_string,plugin,host FROM mysql.user;
Output
+------------------+-------------------------------------------+-----------------------+-----------+
| user             | authentication_string                     | plugin                | host      |
+------------------+-------------------------------------------+-----------------------+-----------+
| root             | *3636DACC8616D997782ADD0839F92C1571D6D78F | mysql_native_password | localhost |
| mysql.session    | *THISISNOTAVALIDPASSWORDTHATCANBEUSEDHERE | mysql_native_password | localhost |
| mysql.sys        | *THISISNOTAVALIDPASSWORDTHATCANBEUSEDHERE | mysql_native_password | localhost |
| debian-sys-maint | *CC744277A401A7D25BE1CA89AFF17BF607F876FF | mysql_native_password | localhost |
+------------------+-------------------------------------------+-----------------------+-----------+
4 rows in set (0.00 sec)
ทีนี้ก็จะ login ด้วย $ mysql -u root -p ได้ละ
3.Adjusting User Authentication and Privileges
$ mysql -u root -p
mysql> GRANT ALL ON *.* TO 'sammy'@'localhost' IDENTIFIED BY 'password';
mysql> FLUSH PRIVILEGES;
4.Testing MySQL
$ systemctl status mysql.service
● mysql.service - MySQL Community Server
   Loaded: loaded (/lib/systemd/system/mysql.service; enabled; vendor preset: enabled)
   Active: active (running) since Thu 2020-02-06 15:32:25 +07; 17min ago
 Main PID: 3831 (mysqld)
    Tasks: 28 (limit: 4915)
   CGroup: /system.slice/mysql.service
           └─3831 /usr/sbin/mysqld --daemonize --pid-file=/run/mysqld/mysqld.pid
ถ้า mysql ไม่ start ให้ start ด้วย
$ sudo systemctl start mysql
ดูเวอร์ชันของ mysqladmin
$ sudo mysqladmin -p -u root version
Enter password:
mysqladmin  Ver 8.42 Distrib 5.7.29, for Linux on x86_64
Copyright (c) 2000, 2020, Oracle and/or its affiliates. All rights reserved.

Oracle is a registered trademark of Oracle Corporation and/or its
affiliates. Other names may be trademarks of their respective
owners.

Server version		5.7.29-0ubuntu0.18.04.1
Protocol version	10
Connection		Localhost via UNIX socket
UNIX socket		/var/run/mysqld/mysqld.sock
Uptime:			18 min 31 sec

Threads: 1  Questions: 21  Slow queries: 0  Opens: 113  Flush tables: 1  Open tables: 106  Queries per second avg: 0.018
5.ติดตั้ง Workbench
sudo apt install mysql-workbench
ติดตั้ง Nginx บน Ubuntu 18.04
1.Installing Nginx
$ sudo apt update
$ sudo apt install nginx
2.Adjusting the Firewall
$ sudo ufw app list
Available applications:
  CUPS
  Nginx Full
  Nginx HTTP
  Nginx HTTPS
- Nginx Full: This profile opens both port 80 (normal, unencrypted web traffic) and port 443 (TLS/SSL encrypted traffic)
- Nginx HTTP: This profile opens only port 80 (normal, unencrypted web traffic)
- Nginx HTTPS: This profile opens only port 443 (TLS/SSL encrypted traffic)
$ sudo ufw allow 'Nginx Full'
$ sudo ufw allow 'Nginx HTTP'
$ sudo ufw status
Status: inactive
$ sudo ufw enable
$ sudo ufw status
Status: active

To                         Action      From
--                         ------      ----
Nginx Full                 ALLOW       Anywhere
Nginx HTTP                 ALLOW       Anywhere
Nginx Full (v6)            ALLOW       Anywhere (v6)
Nginx HTTP (v6)            ALLOW       Anywhere (v6)
เปิดพอร์ทแบบกำหนดไปเลย
$ sudo ufw allow 22/tcp
$ sudo ufw allow 80/tcp
$ sudo ufw allow 443/tcp
3.Checking your Web Server
$ systemctl status nginx
● nginx.service - A high performance web server and a reverse proxy server
   Loaded: loaded (/lib/systemd/system/nginx.service; enabled; vendor preset: enabled)
   Active: active (running) since Thu 2020-02-06 14:26:15 +07; 33min ago
     Docs: man:nginx(8)
 Main PID: 5720 (nginx)
    Tasks: 5 (limit: 4915)
   CGroup: /system.slice/nginx.service
           ├─5720 nginx: master process /usr/sbin/nginx -g daemon on; master_process on;
           ├─5721 nginx: worker process
           ├─5722 nginx: worker process
           ├─5723 nginx: worker process
           └─5724 nginx: worker process
ติดตั้ง Visual Studio Code บน Ubuntu 18.04
ติดตั้งด้วย Snap
sudo snap install --classic code
Once installed, the Snap daemon will take care of automatically updating VS Code in the background. You will get an in-product update notification whenever a new update is available.
เรียกใช้ vscode
code .
code . &
ดูต่อที่ Visual Studio Code | Phaisarn.com
ติดตั้ง .NET Core บน Ubuntu 18.04, WSL-2
- ติดตั้ง WSL 2
- ติดตั้ง .NET Core SDK
- สร้างโปรเจ็กส์ webapp
- เรียกเว็บจาก Windows
- เก็บ code ด้วย local git
Ubuntu 18.04.3 LTS (Bionic Beaver)
releases http://releases.ubuntu.com/18.04/
สร้าง shortcut ที่ home ชื่อ shared ให้ชี้ไปที่ /media/sf_shared
$ sudo ln -s /media/sf_shared /home/username/shared
chown
$ sudo chown username filename
restart
$ reboot
Fixed phpMyAdmin ใน Ubuntu 18.04 “Warning in ./libraries/plugin_interface.lib.php#551 count()”
ปัญหา
Warning in ./libraries/plugin_interface.lib.php#551
 count(): Parameter must be an array or an object that implements Countable
วิธีแก้
backup ไฟล์ plugin_interface.lib.php ไว้ก่อน
$ sudo cp /usr/share/phpmyadmin/libraries/plugin_interface.lib.php /usr/share/phpmyadmin/libraries/plugin_interface.lib.php.bak
เข้าไปแก้ไขไฟล์ plugin_interface.lib.php
$ sudo nano /usr/share/phpmyadmin/libraries/plugin_interface.lib.php
กด CTRL + W แล้วค้นหาคำว่า
if ($options != null && count($options) > 0) {
ให้แทนด้วย
if ($options != null && count((array)$options) > 0) {
Link
Fixed phpMyAdmin ใน Ubuntu 18.04 “Warning in ./libraries/sql.lib.php#613 count()”
ปัญหา
Warning in ./libraries/sql.lib.php#613 count(): Parameter must be an array or an object that implements Countable
วิธีแก้
backup ไฟล์ sql.lib.php ไว้ก่อน
$ sudo cp /usr/share/phpmyadmin/libraries/sql.lib.php /usr/share/phpmyadmin/libraries/sql.lib.php.bak
เข้าไปแก้ไขไฟล์ sql.lib.php
$ sudo nano /usr/share/phpmyadmin/libraries/sql.lib.php
กด CTRL + W แล้วค้นหาคำว่า
(count($analyzed_sql_results['select_expr'] == 1)
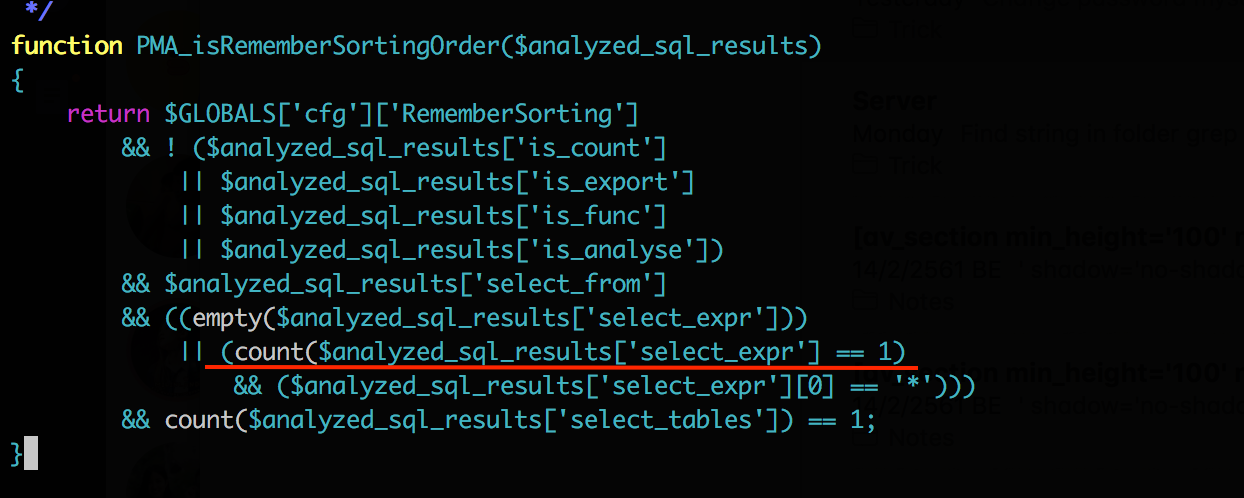
ให้แทนด้วย
((count($analyzed_sql_results['select_expr']) == 1

Link
Install .NET Core SDK on Linux Ubuntu 18.04 – x64
Register Microsoft key and feed
Before installing .NET, you’ll need to register the Microsoft key, register the product repository, and install required dependencies. This only needs to be done once per machine.
$ wget -q https://packages.microsoft.com/config/ubuntu/18.04/packages-microsoft-prod.deb -O packages-microsoft-prod.deb
$ sudo dpkg -i packages-microsoft-prod.deb
Install the .NET SDK
Update the products available for installation, then install the .NET SDK.
$ sudo add-apt-repository universe
$ sudo apt-get install apt-transport-https
$ sudo apt-get update
$ sudo apt-get install dotnet-sdk-2.2
ตรวจสอบหลังการติดตั้ง
$ dotnet --version
2.2.402
Link
ติดตั้ง SSH Server บน Ubuntu 18.04
การติดตั้ง openssh
$ sudo apt install openssh-server
การตรวจสอบสถานะ ssh
ตรวจสอบสถานะ ssh ด้วยคำสั่ง service หรือ systemctl
$ service ssh status
● ssh.service - OpenBSD Secure Shell server
     Loaded: loaded (/lib/systemd/system/ssh.service; enabled; vendor preset: enabled)
     Active: active (running) since Mon 2023-03-27 14:23:15 +07; 2min 15s ago
       Docs: man:sshd(8)
             man:sshd_config(5)
   Main PID: 2518 (sshd)
      Tasks: 1 (limit: 9444)
     Memory: 2.7M
     CGroup: /system.slice/ssh.service
             └─2518 sshd: /usr/sbin/sshd -D [listener] 0 of 10-100 startups
Continue reading