# Required for StructField, StringType, IntegerType, etc.
from pyspark.sql.types import *

jsonSchema = StructType([
  StructField("id", LongType(), True),
  StructField("father", StringType(), True),
  StructField("mother", StringType(), True),
  StructField("children", ArrayType(StringType()), True)
])
jsonFile = "/mnt/training/sample.json"

testDF = (spark.read    # The DataFrameReader
  .schema(jsonSchema)   # Use the specified schema
  .json(jsonFile)       # Creates a DataFrame from JSON after reading in the file
)
assert len(columns) == 4, "Expected 4 columns but found " + str(len(columns))

assert columns[0][0] == "id",            "Expected column 0 to be \"id\" but found \"" + columns[0][0] + "\"."
assert columns[0][1] == "bigint",        "Expected column 0 to be of type \"bigint\" but found \"" + columns[0][1] + "\"."

assert columns[1][0] == "father",        "Expected column 0 to be \"father\" but found \"" + columns[0][0] + "\"."
assert columns[1][1] == "string",        "Expected column 0 to be of type \"string\" but found \"" + columns[0][1] + "\"."

assert columns[2][0] == "mother",        "Expected column 0 to be \"father\" but found \"" + columns[0][0] + "\"."
assert columns[2][1] == "string",        "Expected column 0 to be of type \"string\" but found \"" + columns[0][1] + "\"."

assert columns[3][0] == "children",      "Expected column 0 to be \"father\" but found \"" + columns[0][0] + "\"."
assert columns[3][1] == "array<string>", "Expected column 0 to be of type \"array<string>\" but found \"" + columns[0][1] + "\"."

print("Congratulations, all tests passed... that is if no jobs were triggered :-)\n")
Congratulations, all tests passed... that is if no jobs were triggered :-)
An Azure Databricks database (schema) is a collection of tables. An Azure Databricks table is a collection of structured data. You can cache, filter, and perform any operations supported by Apache Spark DataFrames on Azure Databricks tables. You can query tables with Spark APIs and Spark SQL.
Constructs a virtual table that has no physical data based on the result-set of a SQL query. ALTER VIEW and DROP VIEW only change metadata.
3. Reading from a Table/View
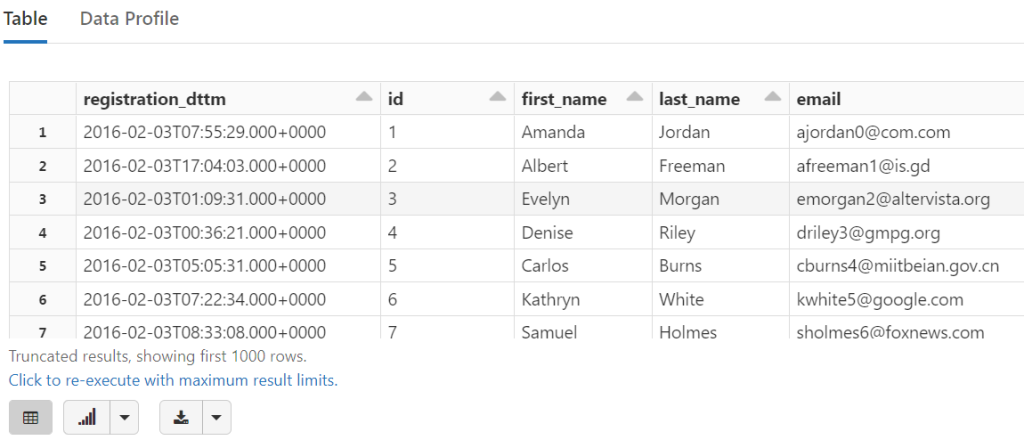
tempDF = spark.read.table("jack_db.jack_table1")
tempDF.printSchema()
display(tempDF)
%sql
SELECT *
FROM jack_db.jack_table1
LIMIT(5)
Review: Reading from Tables
No job is executed – the schema is stored in the table definition on Databricks.
The file is stored on the DBFS. If we used JDBC, it would open the connection to the database and read it in. If we used an object store (like what is backing the DBFS), it would read the data from source.
4. Temporary Views
We can create a [temporary] view with createOrReplaceTempView()
# create a temporary view from the resulting DataFrame
tempDF.createOrReplaceTempView("jack_view1")
%sql
SELECT *
FROM jack_view1
ORDER BY user_id
DESC LIMIT (5)
** Note #1: ** The method createOrReplaceTempView(..) is bound to the SparkSession meaning it will be discarded once the session ends.
** Note #2: ** On the other hand, the method createOrReplaceGlobalTempView(..) is bound to the spark application.*
Or to put that another way, I can use createOrReplaceTempView(..) in this notebook only. However, I can call createOrReplaceGlobalTempView(..) in this notebook and then access it from another.
We do not need to specify the schema – the column names and data types are stored in the parquet files.
Only one job is required to read that schema from the parquet file’s metadata.
The parquet reader can “read” the schema very quickly because it’s reading that schema from the metadata.
3. Read in the Parquet Files – Schema
If you want to avoid the extra job entirely, we can, again, specify the schema even for parquet files:
** WARNING ** Providing a schema may avoid this one-time hit to determine the DataFrame's schema.However, if you specify the wrong schema it will conflict with the true schema and will result in an analysis exception at runtime.
(spark.read               # The DataFrameReader
  .schema(parquetSchema)  # Use the specified schema
  .parquet(parquetFile)   # Creates a DataFrame from Parquet after reading in the file
  .printSchema()          # Print the DataFrame's schema
)
CREATE OR REPLACE TEMP VIEW tmp_json
AS
SELECT *
FROM   JSON.`path/to/file.json`
2. Reading from JSON – InferSchema
JSON Lines
That there is one JSON object per line and…
That it’s delineated by a new-line.
This format is referred to as JSON Lines or newline-delimited JSON. More information about this format can be found at http://jsonlines.org.
** Note: ** Spark 2.2 was released on July 11th 2016. With that comes File IO improvements for CSV & JSON, but more importantly, Support for parsing multi-line JSON and CSV files. You can read more about that (and other features in Spark 2.2) in the Databricks Blog.
Read The JSON Fileตัวอย่าง 1
The command to read in JSON looks very similar to that of CSV.
jsonFile = "/mnt/training/sample.json"
tempDF = (spark.read           # The DataFrameReader
   .option("inferSchema", "true")   # Automatically infer data types & column names
   .json(jsonFile)              # Creates a DataFrame from CSV after reading in the file
)
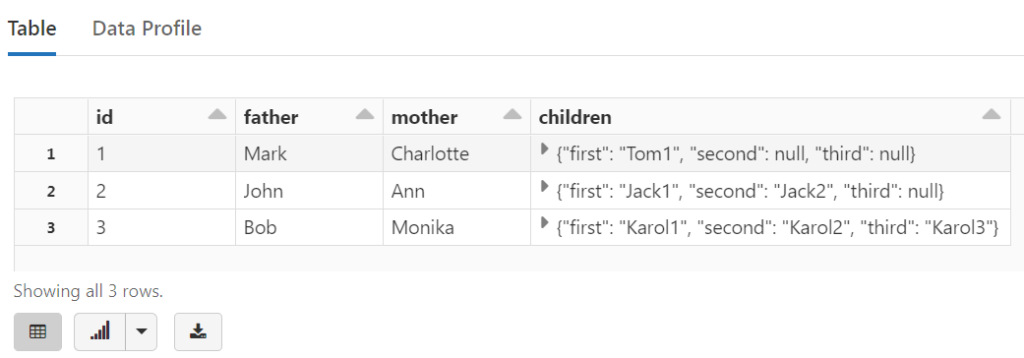
With our DataFrame created, we can now take a peak at the data. But to demonstrate a unique aspect of JSON data (or any data with embedded fields), we will first create a temporary view and then view the data via SQL:
# create a view called temp_view
tempDF.createOrReplaceTempView("temp_view")
And now we can take a peak at the data with simple SQL SELECT statement:
%sql
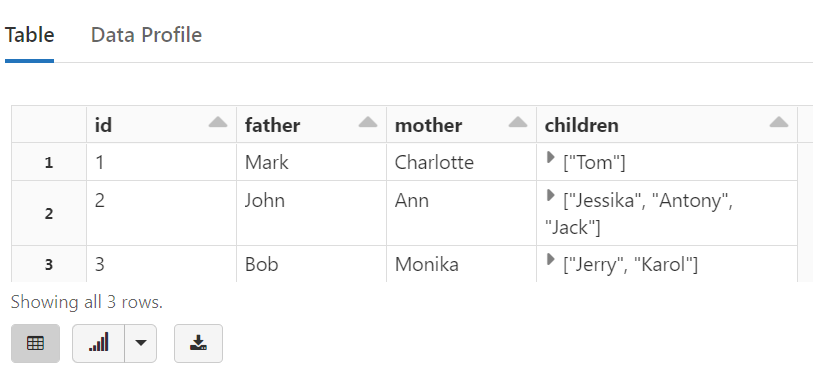
SELECT * FROM temp_view
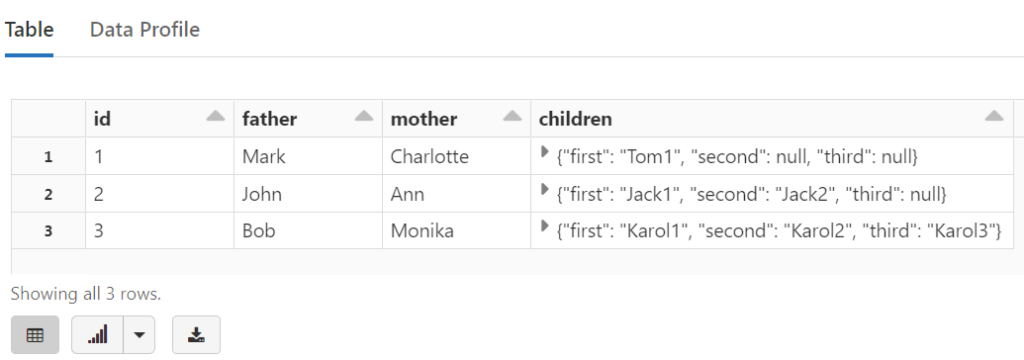
%sql
SELECT id, father, mother, children
FROM temp_view
Read The JSON Fileตัวอย่าง 2
jsonFile2 = "/mnt/training/sample2.json"

tempDF2 = (spark.read           # The DataFrameReader
   .option("inferSchema", "true")   # Automatically infer data types & column names
   .json(jsonFile2)              # Creates a DataFrame from CSV after reading in the file
)
For a small file, manually creating the the schema may not be worth the effort. However, for a large file, the time to manually create the schema may be worth the trade off of a really long infer-schema process.
ตัวอย่าง 1Step #2 – Read in the JSON
Next, we will read in the JSON file and print its schema.
(spark.read             # The DataFrameReader
  .schema(jsonSchema)   # Use the specified schema
  .json(jsonFile)       # Creates a DataFrame from JSON after reading in the file
  .printSchema()
)
(spark.read             # The DataFrameReader
  .schema(jsonSchema2)  # Use the specified schema
  .json(jsonFile2)      # Creates a DataFrame from JSON after reading in the file
  .printSchema()
)
Let’s start with the bare minimum by specifying the tab character as the delimiter and the location of the file:
# A reference to our tab-separated-file
csvFile = "/mnt/training/sample.tsv"

tempDF = (spark.read           # The DataFrameReader
   .option("sep", "\t")        # Use tab delimiter (default is comma-separator)
   .csv(csvFile)               # Creates a DataFrame from CSV after reading in the file
)
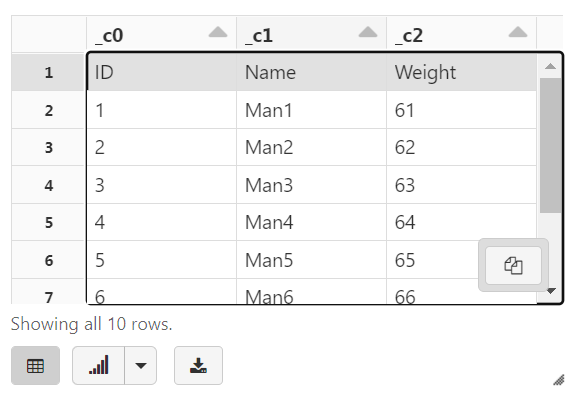
This is guaranteed to trigger one job. A Job is triggered anytime we are “physically” required to touch the data. In some cases, one action may create multiple jobs (multiple reasons to touch the data). In this case, the reader has to “peek” at the first line of the file to determine how many columns of data we have.
We can see the structure of the DataFrame by executing the command printSchema()
the column names _c0, _c1, and _c2 (automatically generated names)
display(tempDF)
รายการแรกกลายเป็นข้อมูลไปด้วย แทนที่จะเป็น header
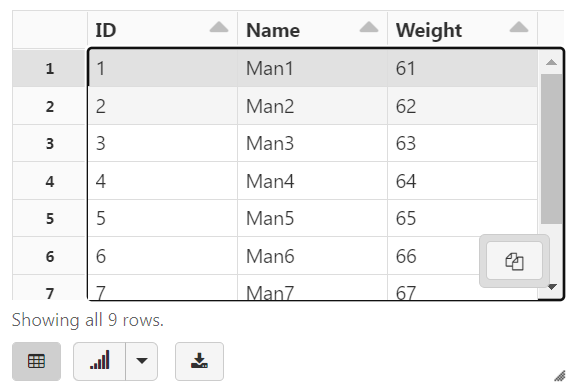
Step #2 – Use the File’s Header
tempDF2 = (spark.read          # The DataFrameReader
   .option("sep", "\t")        # Use tab delimiter (default is comma-separator)
   .option("header", "true")   # Use first line of all files as header
   .csv(csvFile)               # Creates a DataFrame from CSV after reading in the file
)
Lastly, we can add an option that tells the reader to infer each column’s data type (aka the schema)
tempDF3 = (spark.read              # The DataFrameReader
   .option("header", "true")       # Use first line of all files as header
   .option("sep", "\t")            # Use tab delimiter (default is comma-separator)
   .option("inferSchema", "true")  # Automatically infer data types
   .csv(csvFile)                   # Creates a DataFrame from CSV after reading in the file
)
Two Spark jobs were executed (not one as in the previous example)
3. Reading from CSV – User-Defined Schema
The difference here is that we are going to define the schema beforehand and hopefully avoid the execution of any extra jobs.
Step #1
Declare the schema. This is just a list of field names and data types.
# Required for StructField, StringType, IntegerType, etc.
from pyspark.sql.types import *

csvSchema = StructType([
  StructField("ID", IntegerType(), False),
  StructField("Name", StringType(), False),
  StructField("Weight", IntegerType(), False)
])
Step #2
Read in our data (and print the schema). We can specify the schema, or rather the StructType, with the schema(..) command:
tempDF4 = (spark.read         # The DataFrameReader
  .option('header', 'true')   # Ignore line #1 - it's a header
  .option('sep', "\t")        # Use tab delimiter (default is comma-separator)
  .schema(csvSchema)          # Use the specified schema
  .csv(csvFile)               # Creates a DataFrame from CSV after reading in the file
)
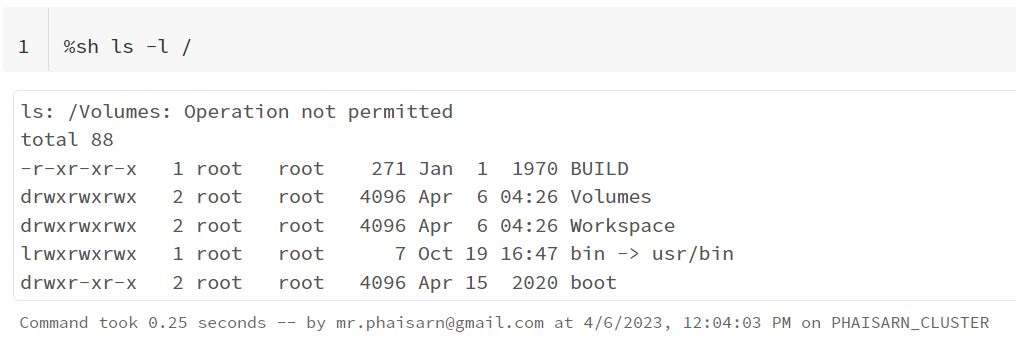
The lifetime of files in the DBFS are NOT tied to the lifetime of our cluster
Magic Command: Other Languages
%python

print("Hello Python!")
%scala

println("Hello Scala!")
%sql

select "Hello SQL!"
%r

print("Hello R!", quote=FALSE)
Magic Command: %md
%md
%md
### Magic Command: %md
Our favorite Magic Command **%md** allows us to render Markdown in a cell:
* Double click this cell to begin editing it
* Then hit `Esc` to stop editing
# Title One
## Title Two
### Title Three
This is a test of the emergency broadcast system. This is only a test.
This is text with a **bold** word in it.
This is text with an *italicized* word in it.
This is an ordered list
0. once
0. two
0. three
This is an unordered list
* apples
* peaches
* bananas
Links/Embedded HTML: <a href="http://bfy.tw/19zq" target="_blank">What is Markdown?</a>
Images:

And of course, tables:
| Name | Age | Sex |
|-------|-----|--------|
| Tom | 32 | Male |
| Mary | 29 | Female |
| Dick | 73 | Male |
| Sally | 55 | Female |
Magic Command: %run
You can run a notebook from another notebook by using the Magic Command %run
All variables & functions defined in that other notebook will become available in your current notebook
%run "./Includes/Classroom-Setup"
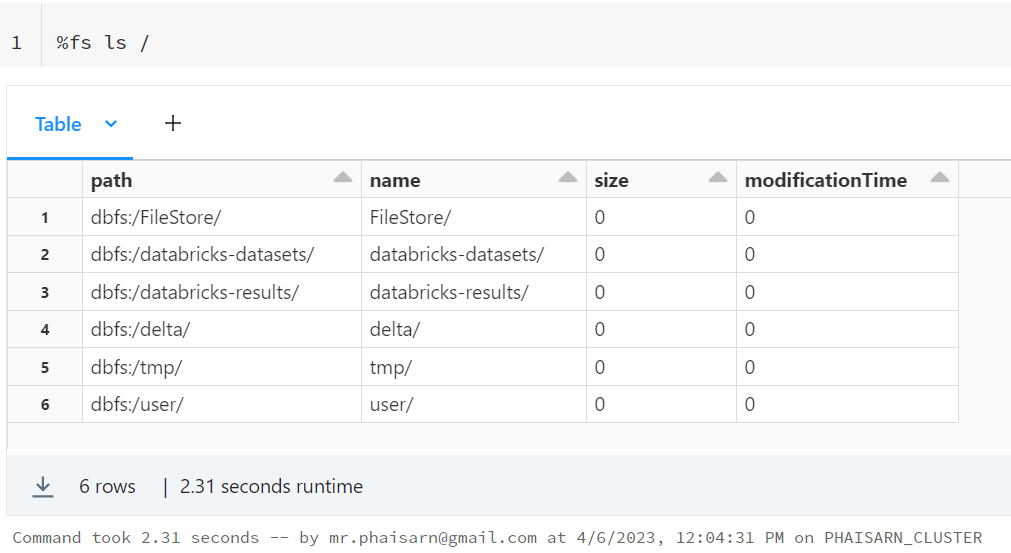
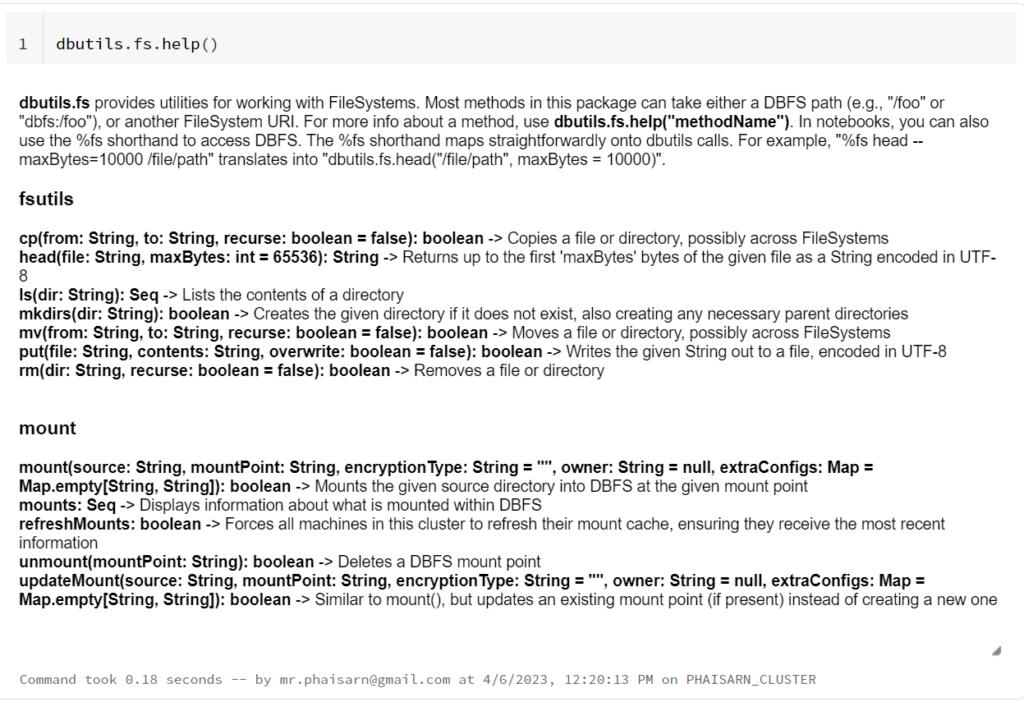
Magic Command: %fs
It is a wrapper around dbutils.fs and it is the Magic Command known as %fs.
The following call is equivalent to the display( dbutils.fs.ls("/mnt/training") ) – there is no real difference between the two.
Forces all machines in the cluster to refresh their mount cache, ensuring they receive the most recent information.
dbutils.fs.refreshMounts()
rm command (dbutils.fs.rm)
Removes a file or directory.
dbutils.fs.rm("/tmp/hello_db.txt")
unmount command (dbutils.fs.unmount)
Deletes a DBFS mount point.
dbutils.fs.unmount("/mnt/<mount-name>")
updateMount command (dbutils.fs.updateMount)
Similar to the dbutils.fs.mount command, but updates an existing mount point instead of creating a new one. Returns an error if the mount point is not present.
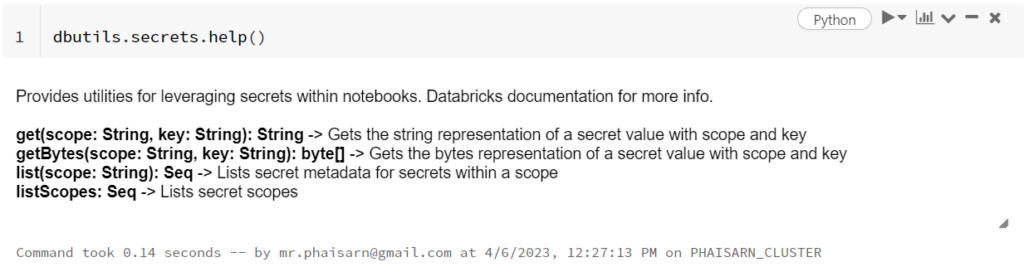
The secrets utility allows you to store and access sensitive credential information without making them visible in notebooks. See Secret management and Use the secrets in a notebook. To list the available commands, run dbutils.secrets.help().
dbutils.widgets.getArgument('fruits_combobox', 'Error: Cannot find fruits combobox')

# Deprecation warning: Use dbutils.widgets.text() or dbutils.widgets.dropdown() to create a widget and dbutils.widgets.get() to get its bound value.
# Out[3]: 'banana'
multiselect command (dbutils.widgets.multiselect)
Creates and displays a multiselect widget with the specified programmatic name, default value, choices, and optional label.
dbutils.widgets.multiselect(
  name='days_multiselect',
  defaultValue='Tuesday',
  choices=['Monday', 'Tuesday', 'Wednesday', 'Thursday',
    'Friday', 'Saturday', 'Sunday'],
  label='Days of the Week'
)

print(dbutils.widgets.get("days_multiselect"))

# Tuesday
remove command (dbutils.widgets.remove)
Removes the widget with the specified programmatic name.
If you add a command to remove a widget, you cannot add a subsequent command to create a widget in the same cell. You must create the widget in another cell.
dbutils.widgets.remove('fruits_combobox')
removeAll command (dbutils.widgets.removeAll)
Removes all widgets from the notebook.
If you add a command to remove all widgets, you cannot add a subsequent command to create any widgets in the same cell. You must create the widgets in another cell.
dbutils.widgets.removeAll()
text command (dbutils.widgets.text)
Creates and displays a text widget with the specified programmatic name, default value, and optional label.
dbutils.widgets.text(
  name='your_name_text',
  defaultValue='Enter your name',
  label='Your name'
)

print(dbutils.widgets.get("your_name_text"))

# Enter your name
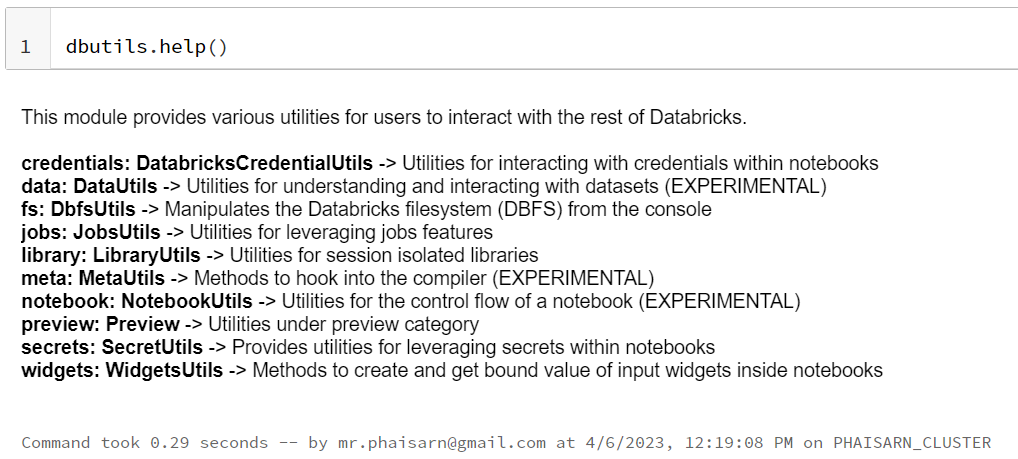
8. Databricks Utilities API library
To accelerate application development, it can be helpful to compile, build, and test applications before you deploy them as production jobs. To enable you to compile against Databricks Utilities, Databricks provides the dbutils-api library.
9. Limitations
Calling dbutilsinside of executors can produce unexpected results or potentially result in errors.
If you need to run file system operations on executors using dbutils, there are several faster and more scalable alternatives available:
For file copy or move operations, you can check a faster option of running filesystem operations described in Parallelize filesystem operations.
In solo server mode, the DB is embedded H2 and both web server and executor server run in the same process.
The multiple executor mode is for most serious production environment. Its DB should be backed by MySQL instances with master-slave set up. The web server and executor servers should ideally run in different hosts
$ cd azkaban-solo-server-0.1.0-SNAPSHOT/
$ mkdir conf
$ cd conf
สร้างไฟล์ azkaban.properties
# Azkaban Personalization Settings
azkaban.name=Test
azkaban.label=My Local Azkaban
azkaban.color=#FF3601
azkaban.default.servlet.path=/index
web.resource.dir=web/
default.timezone.id=America/Los_Angeles
# Azkaban UserManager class
user.manager.class=azkaban.user.XmlUserManager
user.manager.xml.file=conf/azkaban-users.xml
# Loader for projects
executor.global.properties=conf/global.properties
azkaban.project.dir=projects
database.type=h2
# h2.path=./h2
h2.path=.
# h2.create.tables=true
# Velocity dev mode
velocity.dev.mode=false
# Azkaban Jetty server properties.
jetty.use.ssl=false
jetty.maxThreads=25
jetty.port=8081
# Azkaban Executor settings
executor.port=12321
# mail settings
mail.sender=
mail.host=
# User facing web server configurations used to construct the user facing server URLs. They are useful when there is a reverse proxy between Azkaban web servers and users.
# enduser -> myazkabanhost:443 -> proxy -> localhost:8081
# when this parameters set then these parameters are used to generate email links.
# if these parameters are not set then jetty.hostname, and jetty.port(if ssl configured jetty.ssl.port) are used.
# azkaban.webserver.external_hostname=myazkabanhost.com
# azkaban.webserver.external_ssl_port=443
# azkaban.webserver.external_port=8081
job.failure.email=
job.success.email=
lockdown.create.projects=false
cache.directory=cache
# JMX stats
jetty.connector.stats=true
executor.connector.stats=true
# Azkaban plugin settings
azkaban.jobtype.plugin.dir=plugins/jobtypes
# Number of executions to be displayed
azkaban.display.execution_page_size=16
azkaban.use.multiple.executors=true
azkaban.executor.runtimeProps.override.eager=false
# Azkaban Ramp Feature Configuration
#Ramp Feature Related
azkaban.ramp.enabled=true
azkaban.ramp.status.polling.enabled=true
azkaban.ramp.status.polling.interval.min=30
azkaban.ramp.status.push.interval.threshold=15
azkaban.ramp.status.pull.interval.threshold=100
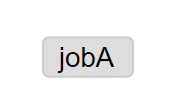
nodes:
  - name: jobA
    type: command
    config:
      command: echo "This is an echoed text."
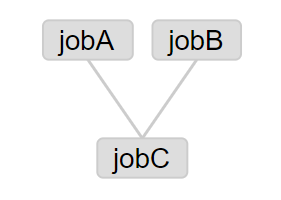
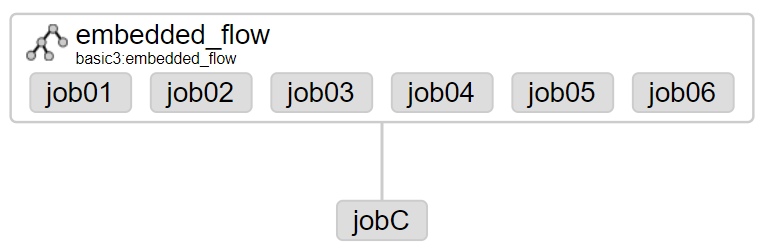
ตัวอย่าง Flow แบบมี Dependencies
แก้ไขไฟล์ basic.flow
nodes:
  - name: jobC
    type: noop
    # jobC depends on jobA and jobB
    dependsOn:
      - jobA
      - jobB

  - name: jobA
    type: command
    config:
      command: echo "This is an echoed text."

  - name: jobB
    type: command
    config:
      command: pwd
type: noop คือ A job that takes no parameters and is essentially a null operation. Used for organizing your graph. (Azkaban 3.0 Documentation #builtin-jobtypes)