ปัญหา Error – lzma

UserWarning: Could not import the lzma module.

/home/ctlfw/.local/lib/python3.7/site-packages/pandas/compat/__init__.py:120: UserWarning: Could not import the lzma module. Your installed Python is incomplete. Attempting to use lzma compression will result in a RuntimeError.
  warnings.warn(msg)

ทางแก้ติดตั้ง lzma-dev

For ubuntu: sudo apt-get install liblzma-dev

For centos: sudo yum install -y xz-devel

เข้าไปในโฟลเดอร์ที่ใช้ติดตั้ง Python แล้วรัน

Then sudo configure && sudo make && sudo make install

JWT Authentication ด้วย .NET 6 WebApi

สร้างโปรเจ็กส์แบบ ASP.NET Core Web API

ติดตั้ง Package Microsoft.IdentityModel.Tokens 6.15.0

PM> Install-Package Microsoft.IdentityModel.Tokens -Version 6.15.0

ติดตั้ง Package System.IdentityModel.Tokens.Jwt 6.15.0

PM> Install-Package System.IdentityModel.Tokens.Jwt -Version 6.15.0

สร้างคลาส Entities\User.cs

using System.Text.Json.Serialization;

namespace WebApi1.Entities
{
    public class User
    {
        public int Id { get; set; }
        public string FirstName { get; set; }
        public string LastName { get; set; }
        public string Username { get; set; }

        [JsonIgnore]
        public string Password { get; set; }
    }
}

สร้างคลาส Models\AuthenticateRequest.cs

using System.ComponentModel.DataAnnotations;

namespace WebApi1.Models
{
    public class AuthenticateRequest
    {
        [Required]
        public string Username { get; set; }

        [Required]
        public string Password { get; set; }
    }
}

สร้างคลาส Models\AuthenticateResponse.cs

using WebApi1.Entities;

namespace WebApi1.Models
{
    public class AuthenticateResponse
    {
        public int Id { get; set; }
        public string FirstName { get; set; }
        public string LastName { get; set; }
        public string Username { get; set; }
        public string Token { get; set; }


        public AuthenticateResponse(User user, string token)
        {
            Id = user.Id;
            FirstName = user.FirstName;
            LastName = user.LastName;
            Username = user.Username;
            Token = token;
        }
    }
}

สร้างคลาส Helpers\AppSettings.cs

namespace WebApi1.Helpers
{
    public class AppSettings
    {
        public string Secret { get; set; }
    }
}

สร้างคลาส Helpers\AuthorizeAttribute.cs

using Microsoft.AspNetCore.Mvc;
using Microsoft.AspNetCore.Mvc.Filters;
using WebApi1.Entities;

[AttributeUsage(AttributeTargets.Class | AttributeTargets.Method)]

public class AuthorizeAttribute : Attribute, IAuthorizationFilter
{
    public void OnAuthorization(AuthorizationFilterContext context)
    {
        var user = (User)context.HttpContext.Items["User"];
        if (user == null)
        {
            // not logged in
            context.Result = new JsonResult(new { message = "Unauthorized" }) { StatusCode = StatusCodes.Status401Unauthorized };
        }
    }
}

สร้างคลาส Helpers\JwtMiddleware.cs

using Microsoft.Extensions.Options;
using Microsoft.IdentityModel.Tokens;
using System.IdentityModel.Tokens.Jwt;
using System.Text;
using WebApi1.Services;

namespace WebApi1.Helpers
{
    public class JwtMiddleware
    {
        private readonly RequestDelegate _next;
        private readonly AppSettings _appSettings;

        public JwtMiddleware(RequestDelegate next, IOptions<AppSettings> appSettings)
        {
            _next = next;
            _appSettings = appSettings.Value;
        }

        public async Task Invoke(HttpContext context, IUserService userService)
        {
            var token = context.Request.Headers["Authorization"].FirstOrDefault()?.Split(" ").Last();

            if (token != null)
                attachUserToContext(context, userService, token);

            await _next(context);
        }

        private void attachUserToContext(HttpContext context, IUserService userService, string token)
        {
            try
            {
                var tokenHandler = new JwtSecurityTokenHandler();
                var key = Encoding.ASCII.GetBytes(_appSettings.Secret);
                tokenHandler.ValidateToken(token, new TokenValidationParameters
                {
                    ValidateIssuerSigningKey = true,
                    IssuerSigningKey = new SymmetricSecurityKey(key),
                    ValidateIssuer = false,
                    ValidateAudience = false,
                    // set clockskew to zero so tokens expire exactly at token expiration time (instead of 5 minutes later)
                    ClockSkew = TimeSpan.Zero
                }, out SecurityToken validatedToken);

                var jwtToken = (JwtSecurityToken)validatedToken;
                var userId = int.Parse(jwtToken.Claims.First(x => x.Type == "id").Value);

                // attach user to context on successful jwt validation
                context.Items["User"] = userService.GetById(userId);
            }
            catch
            {
                // do nothing if jwt validation fails
                // user is not attached to context so request won't have access to secure routes
            }
        }
    }
}

สร้างคลาส Services\UserService.cs

using Microsoft.Extensions.Options;
using Microsoft.IdentityModel.Tokens;
using System.IdentityModel.Tokens.Jwt;
using System.Security.Claims;
using System.Text;
using WebApi1.Entities;
using WebApi1.Helpers;
using WebApi1.Models;

namespace WebApi1.Services
{
    public interface IUserService
    {
        AuthenticateResponse Authenticate(AuthenticateRequest model);
        IEnumerable<User> GetAll();
        User GetById(int id);
    }

    public class UserService : IUserService
    {
        // users hardcoded for simplicity, store in a db with hashed passwords in production applications
        private List<User> _users = new List<User>
        {
            new User { Id = 1, FirstName = "Test", LastName = "User", Username = "test", Password = "test" }
        };

        private readonly AppSettings _appSettings;

        public UserService(IOptions<AppSettings> appSettings)
        {
            _appSettings = appSettings.Value;
        }

        public AuthenticateResponse Authenticate(AuthenticateRequest model)
        {
            var user = _users.SingleOrDefault(x => x.Username == model.Username && x.Password == model.Password);

            // return null if user not found
            if (user == null) return null;

            // authentication successful so generate jwt token
            var token = generateJwtToken(user);

            return new AuthenticateResponse(user, token);
        }

        public IEnumerable<User> GetAll()
        {
            return _users;
        }

        public User GetById(int id)
        {
            return _users.FirstOrDefault(x => x.Id == id);
        }

        // helper methods

        private string generateJwtToken(User user)
        {
            // generate token that is valid for 7 days
            var tokenHandler = new JwtSecurityTokenHandler();
            var key = Encoding.ASCII.GetBytes(_appSettings.Secret);
            var tokenDescriptor = new SecurityTokenDescriptor
            {
                Subject = new ClaimsIdentity(new[] { new Claim("id", user.Id.ToString()) }),
                //Expires = DateTime.UtcNow.AddDays(7),
                Expires = DateTime.UtcNow.AddMinutes(1),
                SigningCredentials = new SigningCredentials(new SymmetricSecurityKey(key), SecurityAlgorithms.HmacSha256Signature)
            };
            var token = tokenHandler.CreateToken(tokenDescriptor);
            return tokenHandler.WriteToken(token);
        }
    }
}

แก้ไขไฟล์ appsettings.json

{
  "AppSettings": {
    "Secret": "THIS IS USED TO SIGN AND VERIFY JWT TOKENS, REPLACE IT WITH YOUR OWN SECRET, IT CAN BE ANY STRING"
  },
  "Logging": {
    "LogLevel": {
      "Default": "Information",
      "Microsoft.AspNetCore": "Warning"
    }
  },
  "AllowedHosts": "*"
}

แก้ไขไฟล์ Program.cs

using WebApi1.Helpers;
using WebApi1.Services;

var builder = WebApplication.CreateBuilder(args);

// Add services to the container.

builder.Services.AddControllers();
// Learn more about configuring Swagger/OpenAPI at https://aka.ms/aspnetcore/swashbuckle

ConfigurationManager configuration = builder.Configuration;

// configure strongly typed settings object
builder.Services.Configure<AppSettings>(configuration.GetSection("AppSettings"));

// configure DI for application services
builder.Services.AddScoped<IUserService, UserService>();

builder.Services.AddEndpointsApiExplorer();
builder.Services.AddSwaggerGen();

var app = builder.Build();

// Configure the HTTP request pipeline.
if (app.Environment.IsDevelopment())
{
    app.UseSwagger();
    app.UseSwaggerUI();
}

app.UseHttpsRedirection();

app.UseAuthorization();

app.UseMiddleware<JwtMiddleware>();

app.MapControllers();

app.Run();

สร้าง API Controller Controllers\UsersController.cs

using Microsoft.AspNetCore.Mvc;
using WebApi1.Models;
using WebApi1.Services;

namespace WebApi1.Controllers
{
    [Route("[controller]")]
    [ApiController]
    public class UsersController : ControllerBase
    {
        private IUserService _userService;

        public UsersController(IUserService userService)
        {
            _userService = userService;
        }

        [HttpPost("authenticate")]
        public IActionResult Authenticate(AuthenticateRequest model)
        {
            var response = _userService.Authenticate(model);

            if (response == null)
                return BadRequest(new { message = "Username or password is incorrect" });

            return Ok(response);
        }

        [Authorize]
        [HttpGet]
        public IActionResult GetAll()
        {
            var users = _userService.GetAll();
            return Ok(users);
        }
    }
}

ทดลองเรียกใช้งาน https://localhost:7078/Users จะได้

{
    "message": "Unauthorized"
}

ต้องไปเรียก https://localhost:7078/Users/authenticate เพื่อขอ token มาก่อน

Request

{
    "username": "test",
    "password": "test"
}

Response

{
    "id": 1,
    "firstName": "Test",
    "lastName": "User",
    "username": "test",
    "token": "eyJhbGciOiJIUzI1NiIsInR5cCI6IkpXVCJ9.eyJpZCI6IjEiLCJuYmYiOjE2Mzk1OTM0OTYsImV4cCI6MTYzOTU5MzU1NiwiaWF0IjoxNjM5NTkzNDk2fQ.ingwuhAl4TB7n7lOMILt-hWpN07ggjwQu4VJF6Lky2U"
}

ถ้า username หรือ password ผิดจะได้

{
    "message": "Username or password is incorrect"
}

ทีนี้เรียก https://localhost:7078/Users พร้อมให้ค่า Bearer Token จะเรียกได้ละ (token มีอายุ 1 นาที ถ้าเกิน 1 นาทีก็จะ Unauthorized)

[
    {
        "id": 1,
        "firstName": "Test",
        "lastName": "User",
        "username": "test"
    }
]

Apache log4net™ กับ .NET 6 WebApi

สร้างโปรเจ็กส์แบบ ASP.NET Core Web API

1. ทดสอบ logger

ที่ไฟล์ Controllers/WeatherForecastController.cs เพิ่มโค๊ด _logger.* ไว้ดูผลการ log

using Microsoft.AspNetCore.Mvc;

namespace WebApi1.Controllers
{
    [ApiController]
    [Route("[controller]")]
    public class WeatherForecastController : ControllerBase
    {
        private static readonly string[] Summaries = new[]
        {
        "Freezing", "Bracing", "Chilly", "Cool", "Mild", "Warm", "Balmy", "Hot", "Sweltering", "Scorching"
    };

        private readonly ILogger<WeatherForecastController> _logger;

        public WeatherForecastController(ILogger<WeatherForecastController> logger)
        {
            _logger = logger;
        }

        [HttpGet(Name = "GetWeatherForecast")]
        public IEnumerable<WeatherForecast> Get()
        {
            _logger.LogInformation("This is an INFORMATION message.");
            _logger.LogWarning("This is a WARNING message.");
            _logger.LogError("This is an ERROR message.");

            return Enumerable.Range(1, 5).Select(index => new WeatherForecast
            {
                Date = DateTime.Now.AddDays(index),
                TemperatureC = Random.Shared.Next(-20, 55),
                Summary = Summaries[Random.Shared.Next(Summaries.Length)]
            })
            .ToArray();
        }
    }
}

เปิดหน้าต่าง Output โดยไปที่เมนู View | Output

ทดลองเรียก WeatherForecast เช่น https://localhost:7244/WeatherForecast แล้วดูที่หน้าต่าง Output

WebApi1.Controllers.WeatherForecastController: Information: This is an INFORMATION message.
WebApi1.Controllers.WeatherForecastController: Warning: This is a WARNING message.
WebApi1.Controllers.WeatherForecastController: Error: This is an ERROR message.

2. ใช้ log4net

ติดตั้ง Package log4net และ Microsoft.Extensions.Logging.Log4Net.AspNetCore

PM> Install-Package log4net -Version 2.0.13
PM> Install-Package Microsoft.Extensions.Logging.Log4Net.AspNetCore -Version 6.0.0
PM> NuGet\Install-Package log4net -Version 2.0.15
PM> NuGet\Install-Package Microsoft.Extensions.Logging.Log4Net.AspNetCore -Version 6.1.0

สร้างไฟล์ log4net.config

<?xml version="1.0" encoding="utf-8" ?>
<log4net>
  <appender name="RollingLogFileAppender" type="log4net.Appender.RollingFileAppender">
    <lockingModel type="log4net.Appender.FileAppender+MinimalLock"/>
    <file value="log/" />
    <datePattern value="yyMMdd'Jack.log'" />
    <staticLogFileName value="false"/>
    <appendToFile value="true"/>
    <rollingStyle value="Date"/>
    <maxSizeRollBackups value="100"/>
    <maximumFileSize value="15MB"/>
    <encoding value="UTF-8"/>
    <layout type="log4net.Layout.PatternLayout">
      <param name="ConversionPattern" value="%-5p%d{ HH:mm:ss} li:%line - [%method] %m  %n" />
    </layout>
  </appender>
  <root>
    <level value="ALL"/>
    <appender-ref ref="RollingLogFileAppender"/>
  </root>
</log4net>

หรือ

<log4net>
	<root>
		<level value="ALL" />
		<appender-ref ref="file" />
	</root>
	<appender name="file" type="log4net.Appender.RollingFileAppender">
		<file value="net6demo.log" />
		<appendToFile value="true" />
		<rollingStyle value="Size" />
		<maxSizeRollBackups value="5" />
		<maximumFileSize value="10MB" />
		<staticLogFileName value="true" />
		<layout type="log4net.Layout.PatternLayout">
			<conversionPattern value="%date [%thread] %level %logger - %message%newline" />
		</layout>
	</appender>
</log4net>

.NET 5 แก้ไขไฟล์ Start.cs

        public void ConfigureServices(IServiceCollection services)
        {

            services.AddControllers();
            services.AddSwaggerGen(c =>
            {
                c.SwaggerDoc("v1", new OpenApiInfo { Title = "EWBranchAPI", Version = "v1" });
            });

            ILoggerFactory _loggerFactory = (ILoggerFactory)new LoggerFactory();
            _loggerFactory.AddLog4Net();
            services.AddSingleton(_loggerFactory);
        }

.NET 6 แก้ไขไฟล์ Program.cs

var builder = WebApplication.CreateBuilder(args);

ILoggerFactory _loggerFactory = (ILoggerFactory)new LoggerFactory();
_loggerFactory.AddLog4Net();
builder.Services.AddSingleton(_loggerFactory);

// Add services to the container.

builder.Services.AddControllers();
// Learn more about configuring Swagger/OpenAPI at https://aka.ms/aspnetcore/swashbuckle
builder.Services.AddEndpointsApiExplorer();
builder.Services.AddSwaggerGen();

var app = builder.Build();

// Configure the HTTP request pipeline.
if (app.Environment.IsDevelopment())
{
    app.UseSwagger();
    app.UseSwaggerUI();
}

app.UseHttpsRedirection();

app.UseAuthorization();

app.MapControllers();

app.Run();

ทดลองเรียก WeatherForecast อีกครั้งจะได้ไฟล์ .log

2021-12-15 21:21:44,620 [.NET ThreadPool Worker] INFO WebApi1.Controllers.WeatherForecastController - This is an INFORMATION message.
2021-12-15 21:21:44,641 [.NET ThreadPool Worker] WARN WebApi1.Controllers.WeatherForecastController - This is a WARNING message.
2021-12-15 21:21:44,643 [.NET ThreadPool Worker] ERROR WebApi1.Controllers.WeatherForecastController - This is an ERROR message.

Number of levels recorded for each setting level:

 ALL    DEBUG   INFO    WARN    ERROR   FATAL   OFF
•All                        
•DEBUG  •DEBUG                  
•INFO   •INFO   •INFO               
•WARN   •WARN   •WARN   •WARN           
•ERROR  •ERROR  •ERROR  •ERROR  •ERROR      
•FATAL  •FATAL  •FATAL  •FATAL  •FATAL  •FATAL  
•OFF    •OFF    •OFF    •OFF    •OFF    •OFF    •OFF

แปลงจาก .json เป็น .csv ด้วย Python 3.8

แปลงด้วย Pandas

ติดตั้ง Pandas

python -m pip install pandas

แปลงจาก .json เป็น .csv ด้วย Pandas

import pandas as pd
df = pd.read_json (r'test.json')
df.to_csv (r'test.csv', index = None)

แปลงด้วย csv, json

import csv, json
fileInput = r'test.json'
fileOutput = r'test.csv'
inputFile = open(fileInput, 'r', encoding='utf-8') #open json file
outputFile = open(fileOutput, 'w', encoding='utf-8') #load csv file
data = json.load(inputFile) #load json content
inputFile.close() #close the input file
output = csv.writer(outputFile) #create a csv.write
output.writerow(data[0].keys())  # header row
f = True
for row in data:
    output.writerow(row.values()) #values row

แต่บางทีจะมีบรรทัดวางเกินมา ก็ลบบรรทัดว่างทิ้ง

filename_ip = 'test.csv'
filename_op = 'test.csv'
file = open(filename_ip, 'r', encoding='utf-8')
text = file.read()
lines = text.split('\n')
new_text = ''
for i in range(0, len(lines)):
    if (lines[i]!=''):
        new_text += lines[i] + '\n'
f = open(filename_op, 'w', encoding='utf-8')
f.write(new_text)
f.close()

ส่วนวิธีนี้ยังไม่ได้ลอง Convert JSON to CSV in Python – GeeksforGeeks

Python 3.8 วาดกราฟด้วย Graphviz

ติดตั้ง graphviz บน Ubuntu

sudo apt install graphviz

ติดตั้ง graphviz บน Windows เปิด cmd ด้วยสิทธิ administrator

choco install graphviz

dependency-graph

ติดตั้งไพธอนไลบรารี graphviz-0.19

python3.8 -m pip install graphviz

ที่บรรทัดแรกของไฟล์ dependency_graph.py เพิ่ม

#!/usr/bin/python3.8

ทำให้ไฟล์ dependency_graph.py รันได้

chmod 755 dependency_graph.py

หาตัวอย่าง source code ภาษา c (GitHub – pvigier/ecs: A simple and easy to use entity-component-system C++ library) มาไว้ใน folder src แล้วทดลองรัน

./dependency_graph.py src/ out -f png

จะได้ไฟล์ภาพ out.png

usage: dependency_graph.py [-h] [-f {bmp,gif,jpg,png,pdf,svg}] [-v] [-c]
                           folder output

positional arguments:
  folder                Path to the folder to scan
  output                Path of the output file without the extension

optional arguments:
  -h, --help            show this help message and exit
  -f {bmp,gif,jpg,png,pdf,svg}, --format {bmp,gif,jpg,png,pdf,svg}
                        Format of the output
  -v, --view            View the graph
  -c, --cluster         Create a cluster for each subfolder

แต่ถ้ารันแล้วได้ error

'dot' is not recognized as an internal or external command

แสดงว่ายังติดตั้ง graphviz ไม่สำเร็จ หรือ หา path ไม่เจอ Graphviz’s dot tool on Windows

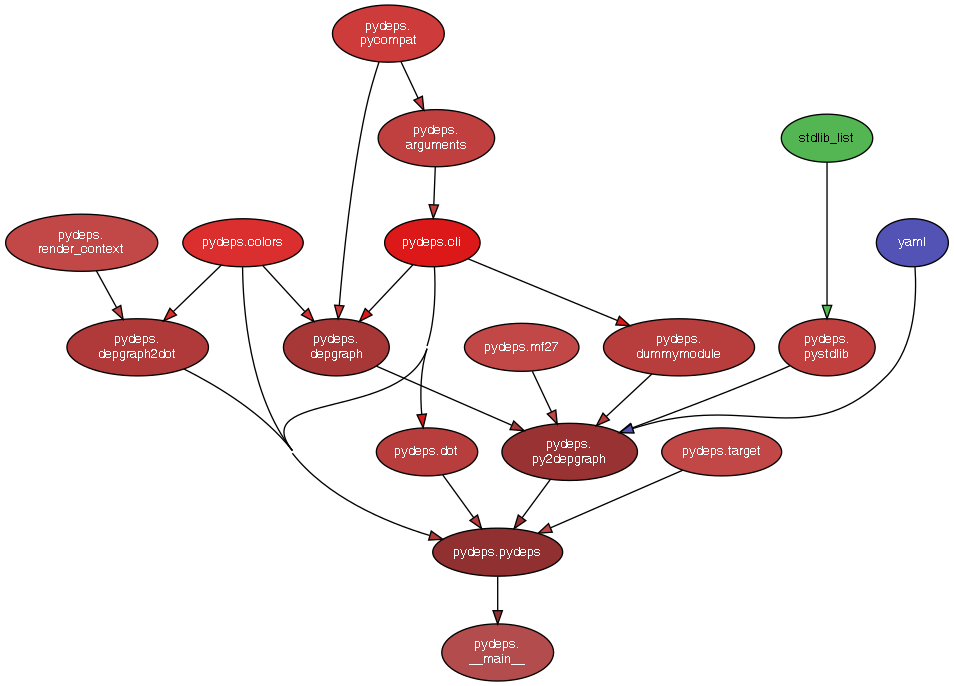
pydeps

ติดตั้ง pydeps

python -m pip install pydeps

ตัวอย่างการเรียกใช้

pydeps pydeps
pydeps pydeps --rankdir TB
pydeps pydeps --rankdir BT

ให้ output เป็นไฟล์ png

pydeps -T png pydeps

Azure Data

Microsoft Certified

#CertifiedExam
1Azure Data FundamentalsExam DP-900
2Azure Database Administrator AssociateExam DP-300
3Azure Data Engineer AssociateExam DP-203

Azure Data Fundamentals , Learning paths

1.Explore core data concepts

1.1 Explore core data concepts

1.2 Explore roles and responsibilities in the world of data

1.3 Describe concepts of relational data

1.4 Explore concepts of non-relational data

1.5 Explore concepts of data analytics

2.Explore relational data in Azure

2.1 Explore relational data services in Azure

2.2 Explore provisioning and deploying relational database services in Azure

2.3 Query relational data in Azure

3.Explore non-relational data in Azure

3.1 Explore non-relational data offerings in Azure

3.2 Explore provisioning and deploying non-relational data services in Azure

3.3 Manage non-relational data stores in Azure

4.Explore modern data warehouse analytics in Azure

Learn more

คอนฟิก SSH ต่อ GitHub บน Ubuntu 18.04

สร้าง ssh key

ssh-keygen

จะได้ output อยู่ที่ /home/jack/.ssh/

  • Private key – in /home/jack/.ssh/id_rsa
  • Public key – in /home/jack/.ssh/id_rsa.pub

GitHub configuration

ไปที่ https://github.com/settings/keys

เลือกปุ่ม “New SSH key”

แล้วใส่ Key โดยนำค่ามาจาก เสร็จแล้วกด  “Add SSH Key”

cat /home/jack/.ssh/id_rsa.pub

Clone the repository using SSH

git clone git@github.com:phaisarnsut/WebAppCore.git

คำสั่งพื้นฐาน Ubuntu 20.04

ที่ command line เลือก default editor ใช้คำสั่ง

$ select-editor

Select an editor.  To change later, run 'select-editor'.
  1. /bin/nano        <---- easiest
  2. /usr/bin/vim.tiny
  3. /bin/ed

Choose 1-3 [1]:

คำสั่ง crontab

  • crontab filename การนำเอาคำสั่ง crontab เข้ามาจากไฟล์อื่น
  • crontab -l ดูคำสั่ง crontab ทั้งหมดที่มีอยู่
  • crontab -e แก้ไข crontab ปัจจุบัน
  • crontab -r ลบคำสั่ง crontab ที่มีทั้งหมด

    รูปแบบของคำสั่ง crontab มีทั้งหมด 6 fields

    • 1 = minute มีค่า 0 – 59 เวลาเป็นนาที จะสั่งให้คำสั่งที่กำหนดทำงานทันที่เมื่อถึงนาทีที่กำหนด
    • 2 = hour มีค่า 0 – 23 เวลาเป็นชั่วโมง จะสั่งให้คำสั่งที่กำหนดทำงานทันที่เมื่อถึงชั่วโมงที่กำหนด
    • 3 = day มีค่า 1 – 31 เวลาเป็นวัน จะสั่งให้คำสั่งที่กำหนดทำงานทันที่เมื่อถึงวันที่กำหนด
    • 4 = month มีค่า 1 – 12 เวลาเป็นเดือน จะสั่งให้คำสั่งที่กำหนดทำงานทันที่เมื่อถึงเดือนที่กำหนด
    • 5 = weekday มีค่า 0 – 6 วันขะงแต่ละสัปดาห์ มีค่าดังนี้ (อาทิตย์ = 0, จันทร์ = 1, อังคาร = 2, พุธ = 3, พฤหัส = 4, ศุกร์ = 5 ,เสาร์ = 6 )
    • 6 = command คำสั่ง เราสามารถกำหนดคำสั่งได้มากมาย รวมทั้ง script ต่าง ๆ ตามที่เราต้องการ
    * * * * * command to be executed
    - - - - -
    | | | | |
    | | | | ----- Day of week (0 - 7) (Sunday=0 or 7)
    | | | ------- Month (1 - 12)
    | | --------- Day of month (1 - 31)
    | ----------- Hour (0 - 23)
    ------------- Minute (0 - 59)

    เสร็จแล้วก็ restart service

    $ systemctl status cron
    $ sudo systemctl stop cron
    $ sudo systemctl start cron
    $ sudo service cron status

    Package

    sudo apt install unzip